One-Cup Cookies

I’m not sure if these are a Prairie phenomenon or if it’s coincidence that I had never heard of them before moving to Calgary.

But they showed up in the newsroom one day, courtesy of a fellow reporter, and I was intrigued. Not quite oatmeal, not quite chocolate chip, not quite peanut butter, these One-Cup Cookies are like the best combination of cookies. The baker offered up a pair of recipes to try, but they essentially boil down to the simplest of formulas: one cup of everything. (OK, obviously not the leaveners.)

Stack of One-Cup Cookies

The main difference between the two recipes is the amount of peanut butter. One calls for a cup of the stuff, the other only 3/4 of a cup. After trying both (several times), I’ve decided I like the one with less peanut butter. The taste is barely noticeable, but adds just another dimension to these cookies.

The best thing about this recipe is that it’s infinitely adaptable. Add nuts, seeds, raisins as you see fit. Don’t like cranberries? Don’t add them. Don’t want your kids hopped up on chocolate? Omit the chips. And so on.

I love the addition of cranberries, though. The play of sweet chocolate against the tang of the slightly tart of the dried fruit is really nice.

Like all cookies, the trick to keeping these chewy is to pull them out of the oven, while they’re still slightly puffed and gooey looking in just the centre. They’ll keep cooking from the residual heat even after you pull them out, but won’t get overly crisp.

Chips and Coconut

The ingredient trio

One-Cup Cookie Dough

One-Cup Cookies

  • 1 cup brown sugar
  • 1 cup white sugar
  • 1 cup butter, softened
  • 3/4 cup peanut butter
  • 2 eggs
  • 1 cup rolled outs
  • 1 1/2 cups flour
  • 1 teaspoon baking soda
  • 1 teaspoon baking powder
  • 1 cup coconut
  • 1 cup dried cranberries
  • 1 cup chocolate chips

Preheat oven to 350. Cream butter and sugars, then beat in the eggs. Add peanut butter, then dry ingredients. Drop spoonfuls onto cookie sheet. Bake for 10 minutes, until edges are golden but middles are still slightly gooey looking. Let rest on cookie sheet for a few minutes before cooling on a wire rack.

Continue Reading

Pumpkin Cupcakes with Cream Cheese Icing

Hello fall!

Um, actually, that would have been more accurate about a month ago during the exactly two-day period that it was autumnal here.

Fall here leaves me wanting. One day the leaves are amber, gold, red; the next, they are brown, scattered, shredded on the ground. I want more time when there is only a slight nip in the air, when watery sunlight filters through the increasingly bare trees, when there is a crunch underfoot from those already fallen.

But, at least I can taste fall.

Lone cupcake

Pumpkin and squash and warm spices: cinnamon, nutmeg, cloves, allspice, ginger. Roasting and baking, soups and stews and pots simmering on the stove.

I went a little crazy at the grocery store, inspired by a host of pumpkin recipes I wanted to try out: pumpkin cinnamon rolls, chicken enchiladas with pumpkin sauce, pumpkin cookies, pumpkin pies. I walked out of there with six cans of pumpkin. Why do I always buy things like I am part of a family of six instead of a single girl in a tiny apartment with no discernable cupboard space?

(And, as an aside, why do all American recipes call for 15-ounce cans of pumpkin? They don’t appear to exist on this side of the border. I can only find 14 ounces or 28 ounces. Are we Canadians stingy with our pumpkin supplies?)

And which of all these recipes would have me cracking open the first can? It wasn’t much of a struggle to decide. I am increasingly drawn to cupcake recipes. I like individual desserts (perhaps I have sharing issues?) and cupcakes are so darn cute. So, when a friend invited me over for dinner, I shamelessly offered to make dessert. (One does not willingly make cupcakes when one lives alone. It is, literally, a recipe for disaster.)

So, Pumpkin Cupcakes with Cream Cheese Icing it was.

These were lovely and moist, full of flavour and ridiculously easy. I give two thumbs up to any recipe that doesn’t require me to soften the butter first. Sometimes I just can’t quite plan that far ahead. Since this one calls for melted butter, you can impulse bake these puppies. A dangerous thought indeed. And the icing was a breeze, even if you do need to pull out the butter and cream cheese early to make it whippably soft.

When I arrived at my friend’s house, she put the cupcakes up on the counter, but not far enough out of reach from her young son, who managed to swipe a finger over the icing of one cupcake. I agree, Erik, the icing is irresistible!

Cupcake from the top

I used the same recipe from my Red Velvet Cake (hot pink velvet cake?) for the icing. It’s foolproof and ridiculously good.

The batter was a little too delicious, though. This recipe, according to Martha Stewart, will give you 18 cupcakes. (Find hers here.) I don’t know what size of pan Ms. Stewart is using, but this easily made two batches in my 12-cupcake pan. Or, more accurately, it made 23 cupcakes. It would have made 24 had I not eaten so much batter. Good lord.

Mmmm spices

Mixing it up

Pumpkin Cupcake Batter

Pumpkin Cupcake Batter

Cream Cheese Icing

Pumpkin Cupcakes with Cream Cheese Icing

Pumpkin Cupcakes with Cream Cheese Icing

  • 2 cups all-purpose flour
  • 1 teaspoon baking soda
  • 1 teaspoon baking powder
  • 1 teaspoon coarse salt
  • 1 teaspoon ground cinnamon
  • 1 teaspoon ground ginger
  • 1/4 teaspoon freshly grated nutmeg (I doubled this because I love nutmeg.)
  • 1/4 teaspoon ground allspice
  • 1 cup packed brown sugar
  • 1 cup granulated sugar
  • 1 cup unsalted butter, melted and cooled
  • 4 large eggs, lightly beaten
  • 1 can (15 ounces) pumpkin puree (I used a 14-ounce can and it was still lovely and pumpkin-y)

Preheat oven to 350. In a medium bowl, whisk together flour, baking soda, baking powder, salt and the spices. In another bowl, whisk together the butter, brown sugar, granulated sugar and eggs. Add dry ingredients and whisk until smooth. Then whisk in pumpkin puree.

Line the cupcake pan with liners and fill each about halfway with batter. Bake until tops spring back when touched and a cake tester comes out clean, about 20 to 25 minutes. Rotate the pans if needed. (I have one pan, so did not bother with that step.) Transfer to wire rack and let cool completely before icing.

Cream Cheese Icing

  • 8 oz. cream cheese, room temperature
  • 1/2 cup butter, room temperature
  • 3 cups icing sugar, sifted
  • 1 tsp. pure vanilla extract

Beat butter and cream cheese until light and fluffy. Add vanilla and sugar.

Continue Reading

Nutmeg Shortbread

I am completely addicted to other food blogs and find my need for a quick fix completely appeased by Foodgawker and Tastespotting. No, no, go on, take a look. I’ll wait. (Although, some of you, hopefully have just come from there.)

As a result, an ever-growing list of recipes to try is starting to clog up my bookmarks folder and I’m realizing that I have to actually start making some of things rather than just drooling over images of what other bloggers have made.

Which leads me to Nutmeg Shortbread.

These had been advertised as “tea cookies” at Apple Pie, Patis and Pate, but as I made them I realized they were shortbread. (Is “tea cookies” a common alternative name for shortbread?) This was kind of funny because I don’t love shortbread. But I really liked this recipe. I suspect using granulated sugar instead of powdered sugar gave them a slight chew I don’t find in other recipes.

Since there are so few ingredients, I have to say that this recipe really requires freshly grated nutmeg. Like other spices, pre-ground nutmeg loses something. I don’t think you will regret buying fresh nutmeg. These little nuggets are so innocuous at first appearance, but are beautiful marbled loveliness on the inside and the smell and taste is intoxicating.

Nutmeg

When I wrote out the recipe, I only copied the ingredients, the oven temperature and the time the cookies should be in the even, believing the method would be the same as other cookies. So, I used my hand-held mixer to add in the flour and the dough seemed to shatter into granules. And that’s when I really began to freak out. Apparently, I was supposed to mix the flour in by hand. Whoops. But I thought I’d see it through anyway. It’s not really a disaster, I figured, until they come out of the oven as a disaster. So I packed the dough into logs, wound them up in parchment and threw them in the fridge overnight.

When I unwound the packages the next afternoon, the dough had formed into nice logs and, for the most part, were easily cut into slices. There were the odd pieces that crumbled a bit when I tried to cut off a slice — mostly, I suspect, because this is where I had joined the lumps of dough and I guess it was not quite as seamless as it looked..

Still, they baked beautifully and were super tasty. My love of intense flavours, however, was still left wanting. Next time, more nutmeg.

Nutmeg shortbread dough

Nutmeg Shortbread

Nutmeg Shortbread

  • 1 cup butter, softened
  • 3/4 cup granulated sugar
  • 1 teaspoon vanilla
  • 1 large egg
  • 2 1/2 cups flour
  • pinch of salt
  • 1/4 teaspoon freshly grated nutmeg (But you may want to consider adding more if you really like the taste of this spice.)

Cream the butter and sugar until light and fluffy. Beat in vanilla and the egg. In a separate bowl, stir together flour, salt and nutmeg. Add the dry ingredients to the butter mixture by hand until just combined.

Divide the dough in four and roll into logs about 8″ long and 1″ in diameter. Wrap in wax paper, plastic wrap or parchment and chill until firm, from two hours to overnight.

To bake, preheat the oven to 350. Cut each log into pieces 1/2″ thick and space evenly on baking sheet. Bake for 10 minutes or until just golden.

Continue Reading

Earl Grey Cupcakes with Lemon Buttercream

I don’t drink coffee.

I know, I know. Take a minute to digest that fact. It is a bit strange.

Solo cupcake

But I grew up in a household where there was always a pot of tea sitting around. And it was always Earl Grey. And it still is.

I’m sure it’s partly that because I grew up with it, but it’s still my favourite flavour of tea. But I also love the taste of perfume-y Bergamot — an essence from the skin of a sour fruit. While my family likes Twinings for it’s faint Bergamot taste, I prefer Tazo, which has a bit more of the essence in its mix. Even better? Stash Tea’s Double Bergamot.

And, full disclosure, I like the smell of Earl Grey tea so much, I even bought the Demeter fragrance of it.

While here at home I drink it with milk, at my parents’ house I always have my Earl Grey tea with lemon and sugar. So when I came across a recipe for Earl Grey Cupcakes with Lemon Buttercream Icing, I immediately bookmarked it. And then, like about a thousand other recipes, I forgot about it for some indeterminate amount of time until I got bored and began going through the aforementioned bookmarks looking for something to surf to.

The stars of the show

Earl Grey tea

I had some extra lemons lying around after making Whiskey Sours on the weekend, was bored and basically wanted to hang out in my kitchen baking and listening to good music. So, I whipped up these babies, ate two and then realized I was going to have to take the rest to work the next day lest I eat them all.

These will be made again. I might add more tea next time. Also, it was a particularly juicy lemon I used in the buttercream and, in hindsight, I should have measured instead of squeezing through a sieve and right into the bowl. So, it wasn’t all that surprising the icing was quite sloppy. Another cup or so of icing sugar did the trick, but next time I’ll be more careful.

Then again, when I took some into work (I think my colleagues were more excited about me launching a food blog for the inevitable leftovers), almost every comment revolved around the icing. It seems I’m not the only one that loves a lemon dessert.

This recipe originally comes from Desert Candy. Here is her post on it.

She made 24 cupcakes, but I halved it to make 12. This is the version I used. Double if you wish. Also, the original recipe called for self-rising flour. I didn’t have any, wasn’t going to go out and get some (is it even available in Canada?), so some googling led me to several versions of how to make “self-rising” flour (which basically just has leaveners and salt added already). The recipe below uses all-purpose flour.

I also “lemoned up” the icing by using the zest of an entire lemon and more than the required amount of lemon juice. Feel free to tone it down, if you wish.

Earl Grey Cupcake Batter

Just before the oven

Earl Grey Cupcakes with Lemon Buttercream

Earl Grey Cupcakes with Lemon Buttercream

  • 1/2 cup unsalted butter, softened
  • 1 cup sugar
  • 2 egg
  • 1 1/2 cups all-purpose flour
  • 2 1/4 tsp. baking powder
  • 3/4 tsp. salt
  • 1/2 cup milk
  • 1 tbsp. Earl Grey tea (I used 1 bag and didn’t measure. I might add more next time.)

Preheat the oven to 350. Beat the butter and sugar together until it is light and fluffy. Add eggs one at a time, making sure they are thoroughly combined before adding the next one. Mix together the dry ingredients, including the tea. Beat in half of the dry mixture with the wet, then add the milk and the rest of the dry mixture, stirring until just combined. Line the cupcake pan with 12 cups and fill them about two-thirds full. Bake 20 to 25 minutes. Cool thoroughly before frosting.
Lemon Buttercream

  • 1/2 cup unsalted butter, softened
  • 2 cups icing sugar
  • zest of one lemon
  • 2 tbsp. lemon juice

Cream butter, then add the icing sugar and beat until fluffy. Add the lemon zest, juice and beat until smooth. Spread over cooled cupcakes.

Continue Reading

Brown Butter Plum Cake

It’s not often that I see a recipe, print it off and then make it immediately. But when I saw Julie’s post on what she has called Browned Butter Bliss, I was intrigued.

Not only had she raved about this baked dessert, but it sounded delicious and ridiculously easy. If that doesn’t tempt someone (namely me) to try it out, what will?

Brown Butter Plum Cake

Plus, making such a fantastic looking dessert also meant I would have to purchase a pie plate. Any excuse to buy new kitchen goodies! Of course, now I might actually have to learn how to make pie.

A cake/cobbler type of dessert, its flavour is heightened by browning the butter before making the dough, adding a nice nuttiness. But, other than the added step of watching and swirling the melting butter to make sure that it doesn’t go from browned loveliness to black, this recipe is a cinch.

I ate a piece as soon as it had cooled enough for, you know, scientific, recipe-testing purposes. And then I ate another piece a few hours later when it was well and truly cooled to room temperature for, you know, comparison purposes. And I have to say that while Julie seemed to prefer it fresh from the oven, I had different feelings. Once it had cooled, the purply plummy juices had soaked more into the cake, which had solidified slightly.

Plums

Plums and spices

Ready to bake

Plum Cake and Ice Cream

This recipe is adapted from Julie (see her post here), which in turn appears to be adapted from elsewhere. That’s one of the things I love about cooking: it’s about taking something and making it your own.

Brown Butter Plum Cake

  • 8 or so plums, thickly sliced (or try peaches, apples, apricots)
  • 3/4 cup + 3 Tbsp. sugar, divided
  • 1/2 tsp. cinnamon
  • dash nutmeg
  • 1/2 cup butter
  • 2 large eggs
  • 1 cup all-purpose flour

Preheat the oven to 350F and butter a pie plate.

Toss the fruit in a bowl with about 2 tbsp. of the sugar, the cinnamon and nutmeg. Spread into the plate.

Melt the butter in a saucepan or small frying pan and keep cooking it for about five minutes until it turns golden. (Swirl the pot occasionally and watch it carefully; it goes quickly from brown to black.)

Pour the butter into a bowl and add the 3/4 cup of sugar, then the eggs and flour. Pour over the fruit and sprinkle with one tablespoon of sugar.

Bake for 40 to 45 minutes until golden and the juices are coming up around the edges.

Delicious with vanilla ice cream.

Continue Reading

Lemon Custard Cakes

I once “smiled” at a guy on an Internet dating website simply because in his write-up he noted he liked lemon-flavoured desserts and despite the fact he was far out of my romantic league (not to mention geographic).

That citrus kiss of lemon almost makes me swoon sometimes. The pucker, the tang, the play of sweet and sour.

Lemon Custard Cake

I first made these Lemon Custard Cakes on Valentine’s Day for three girlfriends in a sort of lonely hearts’ dinner. Though, truth be told, only two of us were single at the time. Really it was a way of ensuring I wasn’t alone that night and, yes, the friends — not to mention the two (or was it three?) bottles of wine — and these little lemony babies made it a night to remember.

And I have thought about them many a time since then.

Last week I thought it was time to pull that recipe back out and enjoy these cakes again. But as I prematurely began salivating over thoughts of the light lemon cake that forms over the creamy lemon pudding at the base, I realized two things. 1) My milk was not really milk anymore. (Yikes!) and 2) I was out of all-purpose flour. (How did that happen?) Dreams dashed, I put the book away again.

But, a quick stop at the grocery store on the way home from work tonight and I was good to go.

And it was all going very well until it came time to squeeze the lemon and I realized that this might be tricky considering the ginormous paper cut I subjected myself to yesterday (while on the phone no less, which left me trying to deal with the wound, while typing, while pretending to the person on the phone that nothing was happening. No small feat.) And yes, lemon juice got in it. And, yes, it hurt. But it also reminded me of this exchange from The Princess Bride:

Inigo Montoya: Are you the Miracle Max who worked for the king all those years?

Miracle Max: The king’s stinking son fired me, and thank you so much for bringing up such a painful subject. While you’re at it, why don’t you give me a nice paper cut and pour lemon juice on it?

These Lemon Custard Cakes are a strange piece of alchemy. A thin, watery batter goes into the oven and a cake-topped custard comes out. I was so pleasantly surprised the first time I made them. The unctuous custard, the hint of lemon, a powdering of icing sugar, what wasn’t to like?

The first time I followed the recipe exactly, right down to the fact that you cook them in a water bath sitting on a kitchen towel. It was only this time that I saw the explanation why:

Baking the desserts in a hot-water bath keeps them creamy and custardy beneath their golden cakey tops. Linking the roasting pan with a dish towel helps water circulate under the cups for even cooking.

Who am I to question that?

Of course, my version looks nothing like the picture in the cookbook, but I think that’s because I’m using larger ramekins and filling them up a bit more than is probably recommended.

Egg yolks, sugar and lemon zest

Empty lemon

Whipped egg whites

Mix it up

Into the oven

Lemon Custard Cake II

This recipe comes from Everyday Food — an offshoot of Martha Stewart Living. (Yet another cookbook impulse buy but with some very impressive and consistently delicious and easy recipes.) My notes are in italics.

Lemon Custard Cakes

  • Unsalted butter, at room temperature, for custard cups
  • 3 large eggs, separated
  • 1/2 cup granulated sugar
  • 2 tbsp. all-purpose flour
  • 2 to 3 tbsp. grated lemon zest (from one lemon)
  • 1/4 cup fresh lemon juice
  • 1 cup milk
  • 1/4 tsp. salt
  • Icing sugar for dusting

Preheat the oven to 350. Set a kettle of water to boil. Butter six 6-ounce custard cups, and place them in a roasting pan or baking dish lined with a kitchen towel.

In a large bowl, whisk together the egg yolks and granulated sugar until the mixture is light; whisk in the flour. Gradually whisk in the lemon zest and juice, then whisk in the milk.

With an electric mixer, beat the egg whites and salt until soft peaks form. Add to the lemon mixture; gently fold in with a whisk (the batter will be thin).

Divide the batter among the prepared cups. Place the pan in the oven, and fill with boiling water to reach halfway up the sides of the cups. Bake until the puddings are puffed and lightly browned, 20 to 25 minutes. (Note: Because I used larger ramekins, mine took a bit longer but only one or two minutes, so I suggest checking at the 20-minute mark.) Serve warm or at room temperature, dusting with icing sugar.

Note: If you do not have individual custard cups, bake the batter in an 8-inch square baking dish (or other shallow 2-quart baking dish) for 30 to 35 minutes. (I bet this would be great too and will consider trying that next time.)

Continue Reading

Berry Scones

I’m behind on my blogging due to many reasons, including the fact that I am unsure what I’ve even been subsisting on for the last two weeks. (Well, that’s not completely true; I had about four days’ worth of mustard-butter broccoli pasta to get through.) And I guess I was also hesitating to post these scones for several reasons, not the least of which is that they were only mostly successful. I mean, who wants to read a cooking blog by someone who keeps making mistakes? It doesn’t scream confidence.

Finished scone

That’s not to say these Berry Scones weren’t light and flaky and fully of raspberry deliciousness. It’s just that I really should have moved the oven rack up about two levels so the bottoms didn’t bake (um, brown) quite as quickly as they ended up doing. However, perhaps we can all use this as a lesson about making sure your oven rack is in the middle of the oven when it comes to baking and not being lazy about moving it when you discover it’s a bit low.

So, this really all began because I had this extra buttermilk lying around and I really didn’t want to waste it. And I was on a bit of a scone kick because I do believe that practice makes perfect. Oh, and because I believe in full disclosure, it was also a bit because I had just bought my first set of biscuit cutters — a lovely batch of three varying sizes that nest inside each other. So, really, a buttermilk scone made perfect sense. And, bless the Internet, I found a nice recipe.

All went surprisingly well, though it did get a bit messy because I broke apart the frozen raspberries as I wanted them to be a little more well distributed. I now have a pink-stained rolling pin, but it was worth it. I’d much rather have raspberries in every bite than just one or two in an entire scone.

Thankfully, because they were pretty tall and flaky, it was easy to just cut the less-than-desirable bottoms off and continue to enjoy.

In future, I would add more lemon zest because I love all things lemon and I feel it would have perked these up even more, adding to the summery flavour.

Cutting in the butter

Adding the zest

Scone dough

Scone cutouts

Solo scone

Berry Scones

  • 4 3/4 cups flour
  • 1 cup, 1 tbsp. unsalted butter
  • 1 tbsp. baking powder
  • 3/4 tsp. baking soda
  • 1/2 cup sugar
  • 3/4 cup fruit (fresh or dried)
  • 1 1/2 cups buttermilk
  • 1 tsp. lemon zest

Preheat oven to 400. Mix together flour, baking powder, baking soda, salt and sugar. Using a food processor, a pastry blender or two knives, cut the butter into the flour until it looks like coarse oatmeal. Add the lemon zest and fruit and mix to combine. Add all of the buttermilk at once, then stir just until the dough comes together. Topple out onto floured counter and form into a ball before rolling out until it’s about an inch thick. Cut out using cutters or into rustic triangles using a knife.

Bake for 25-30 minutes, though I would start checking sooner.

Eat. Especially if you can find devonshire cream somewhere.

Continue Reading

In pursuit of focaccia perfection

There is a restaurant in Victoria that I am almost incapable of avoiding during any visit to that lovely little city. Pagliacci’s was the scene of more than a few fun nights out with friends while we procrastinated on assignments from UVic and has subsequently become a place that speaks to me of good memories along with good food. I am positively addicted to their dish called the Prawn Broker (spinach pasta, prawns and cashews in a coconut-curry sauce) and will admit with no hesitation that I always order the full size — which is far too big for one sitting — so that I can enjoy just a little bit more later. (Side note: Every few weeks I search the Internet in the apparently feeble hope that the recipe will magically appear. Future blogging may include attempts to recreate the thing myself. Success is not guaranteed.)

But, while the Prawn Broker is my main dish of choice, I could very easily live on the baskets of focaccia set on the table shortly after ordering. Chewy, thickly crusted, salty. I have no idea what magic lies in that recipe which leads to such bready perfection. I can only presume part of the reason is a thick dousing of olive oil. But there are no apparent herbs or crystals of salt to hint at what else goes into this recipe.

My pursuit of focaccia perfection began about a year ago when I bought (finally!) a handheld mixer. (Friends were unsurprisingly baffled when I made cookies without a mixer, using my own arm strength to cream butter and sugar together.) To my delight, it came with two dough hooks, which opened up the world of bread baking. Okay, so, it’s a pretty limited world at this point, but nevertheless. Since then, I’ve tried to make focaccia a few times, but found it lacking. Where i wanted dense and chewy, these attempts were light and, at one point, crumbly (don’t try to make bread with all-purpose flour, apparently). The top was delicious, owing mostly to a liberal sprinkling of flaky Maldon salt, chopped rosemary and a few generous glugs of olive oil that filled in the divots I had dimpled across the surface of the pale dough. But it wasn’t the best ever.

Baking bread, I fear, is one of those arts that is being lost in my generation. The reason I never made bread before was that, frankly, kneading baffles me. I never seem to get the dough to come together and never seem to have the patience to keep going. Growing up, my mum often made homemade bread and I would “help” but eventually she would take over the kneading. (This is why the dough hooks were such a welcome addition to my mixer.) But also lost is the knowledge on how to affect the outcome of recipes.

I was sharing the focaccia dilemma with my friend Shelley one afternoon when she asked me a few questions about the recipe and I mentioned that it called for the dough to rise three times. Well, she said, that explained why it was so light. Fewer chances to rise = denser dough. Of course, now that she has said that, it makes perfect sense. But since I didn’t know much about baking bread, it didn’t occur to me to play around with the recipe. Of course, now that i *do* know, I’m making it a mission to make the best focaccia possible.

This time I tried a different recipe, but modified it slightly by not letting it rise a second time in the hope it would produce a chewier end result. It definitely did. But it’s still not as good as the bread from Pagliacci’s and I felt the focaccia overall could have used some more flavour. The top was pretty good, though, owing I’m sure to the generous amount of salt, olive oil and chopped rosemary.

And so, the pursuit continues.

Yeast, water, sugar and olive oil

Just mixed dough

Rising dough

Ready for the oven

Fresh from the oven

Here is the latest attempt. It comes from the fabulous Rebar Modern Food Cookbook, which, as previously mentioned, I bought only for a salad dressing recipe. In this case, however, I didn’t let it rise a second time and I didn’t bother with the garlic, as I find it very hard to keep it from burning. There are few tastes worse than burnt garlic. This is the recipe as printed.

Rosemary Garlic Foccacia

  • 1 3/4 cups warm water
  • 1 tbsp. traditional baking yeast
  • 1/2 tsp. sugar
  • 2 tsp. salt
  • 1/4 cup olive oil
  • 4 cups unbleached flour

Topping

  • 4-6 garlic cloves, minced
  • 4 tbsp. olive oil
  • 2 tsp. coarse salt
  • 2 tbsp. chopped rosemary
  • cracked black pepper

In a large mixing bowl, combine the warm water, yeast and sugar. Let the mixture sit until it foams. Stir in salt and olive oil, then start adding flour, one cup at a time, beating well with a wooden spoon. (Yeah, I used my mixer here.) When you can no longer stir, turn the dough out on a floured surface and knead in the remaining flour. Knead the dough until smooth and elastic, sprinkling just enough flour on the counter to prevent sticking.

Form the dough into a ball and place a large, lightly oiled bowl. Cover with a clean, damp cloth and set the bowl in a warm, draft-free spot. Let rise until doubled in bulk (1 – 1 1/2 hours). Punch the dough down and let it rise again until doubled.

Pre-heat the oven to 350F. Place the dough on a well-oiled 12″x16″ baking sheet with 1/2″ sides. Gently stretch the dough to roughly fit the dimensions of the pan. Drizzle the surface with olive oil and spread the minced garlic over the entire area. Sprinkle chopped rosemary evenly on top, followed by coarse salt. Finish with cracked pepper. Using your fingertips, gently poke indentations over the entire surface. It should appear dimpled and rustic-looking. Let rise again for about 15 minutes, or just until it puffs up slightly.

Place the loaf in the center rack of the oven. Bake for 20 minutes, rotating the pan halfway through. The garlic should be lightly golden. Be careful not to over bake. Serve warm.

Continue Reading

Chocolate Cupcakes with Peanut Butter Icing

Most smart bakers know to make sure everything is ready to go in advance of getting started. I am, apparently, not a smart baker.

Chocolate cupcake with peanut butter icing

We were celebrating a (much belated) birthday for a good friend. Some wiggling around with the schedule had the celebration moved from brunch to Sunday night dinner and I volunteered (most willingly — any excuse to bake) to bring the birthday dessert. All week I Googled for moist, rich chocolate cake recipes and then sat there trying to decide which would be better: mayo-based or buttermilk; white icing or chocolate; cupcakes or layer cake. Finally, when I shared my dilemma with a friend, she queried why I wasn’t using a Barefoot Contessa recipe. Indeed! Why wasn’t I?

She has two recipes in her books and one online at Food & Wine. Since I already bought the books, I figured I may as well try one of those and, at last, settled on the Chocolate Cupcakes with Peanut Butter Icing. My love of this combination knows no bounds, so I’m kind of surprised I didn’t think of this recipe immediately.

Initially, it was all going very well. I ran out to the store to buy sour cream, buttermilk and coffee, along with whipping cream for the icing, then returned to begin. There was butter to soften and dry ingredients to sift (and, boy did I sift those. I learned my lesson from the Red Velvet cake when not sifting the cocoa with the flour led to brown swirls through the cake.) and, of course, photos to take to document my progress.

Cakes still make me a bit nervous. I’m worried I’ll overmix and make a tough cake and that is not eased by the fact most recipes have this whole “mix in thirds” step. What if it’s not exactly thirds? Also, I think a lot of recipes these days assume people have stand mixers, which makes this step (among others) much easier, then when trying to hold the mixer while pouring in a third of the dry mixture and not end up covered in cocoa and flour dust.

Butter and sugar and eggs, oh my!

The batter trifecta

Chocolate cupcake better

Chocolate cupcakes ready to bake.

But, for the most part, it all went really well. The batter seemed incredibly light at the end (Okay, and, yes, it did taste good.) and I was all ready to put the batter into the tins. I pulled out my cupcake liners and found I only had five left. Gah! Thankfully, there’s a grocery store a little over a block away, so I turned off the oven and bolted down there where I bought some liners and then raced back. I was really worried that extra time would ruin the batter somehow.

In the end, it was only a 15-minute delay and I don’t think it affected the cupcakes. They baked up perfectly, though for less time than the recipe suggested owing, I suspect, to the fact that my muffin tins are more shallow and took less batter to fill. (I used a 1/8 cup scoop, which worked perfectly. No spillage.)

Chocolate Cupcakes

Solo chocolate cupcake

The cupcakes are not overly sweet, which was a nice counterpoint to the rich peanut butter icing.

Peanut butter icing

Row of cupcakes

This recipe is from Barefoot Contessa at Home.

Chocolate Cupcakes with Peanut Butter Icing

  • 12 tbsp. unsalted butter, at room temperature (that’s 3/4 cup for those of us that don’t use sticks of butter)
  • 2/3 cup granulated sugar
  • 2/3 cup light brown sugar, packed
  • 2 extra-large eggs, at room temperature
  • 2 tsp. pure vanilla extract
  • 1 cup buttermilk, shaken, at room temperature
  • 1/2 cup sour cream, at room temperature
  • 2 tbsp. brewed coffee (Full disclosure: I don’t drink coffee. I made a cup of instant and it tasted awful to me, so I only threw in less than a tablespoon. I suspect good coffee may be a great addition.)
  • 1 3/4 cups all-purpose flour
  • 1 cup good cocoa powder
  • 1 1/2 tsp. baking soda
  • 1/2 tsp. kosher salt

Preheat oven to 350 degrees. Line cupcake pans with paper liners.

In the bowl of an electric mixer fitted with a paddle attachment, cream the butter and two sugars on high speed until light and fluffy, approximately five minutes. (For those of us without a stand mixer, a handheld is just fine. It just makes it a bit trickier when mixing in the wet and dry ingredients.) Lower the speed to medium, add the eggs one at a time, then add the vanilla and mix well. In a separate bowl, whisk together the buttermilk, sour cream and coffee. In another bowl, sift together the flour, cocoa, baking soda and salt. On low speed, add the buttermilk mixture and the flour mixture alternately in thirds to the mixer bowl, beginning with the buttermilk mixture and ending with the flour mixture. Mix only until blended. Fold the batter with a rubber spatula to be sure it’s completely blended.

Divide the batter among the cupcake pans (one rounded standard ice cream scoop per cup is the right amount). Bake in the middle of the oven for 20 to 25 minutes, until a toothpick comes out clean. Cool for 10 minutes, remove from the pans, and allow to cool completely before frosting.

Frost each cupcake with peanut butter icing and sprinkle with chopped peanuts, if desired.

Kathleen’s Peanut Butter Icing

  • 1 cup confectioners’ sugar
  • 1 cup creamy peanut butter
  • 5 tbsp. unsalted butter, at room temperature
  • 3/4 tsp. pure vanilla extract
  • 1/4 tsp. kosher salt
  • 1/3 cup heavy cream (I used whipping cream)

Place the confectioners’ sugar, peanut butter, butter, vanilla and salt in the bowl of an electric mixer fitted with a paddle attachment. Mix on medium-low speed until creamy, scraping down the bowl with a rubber spatula as you work. Add the cream and beat on high speed until the mixture is light and smooth.

Continue Reading

Carrot-Rosemary Scones

I love scones. I like sweet ones with devonshire cream and jam. I like savoury ones with a little butter.

But scones don’t seem to feel quite the same way about me.

Or maybe they sense fear.

Ready to eat

One of the last times I remember making scones was when I was living in a small town in southern Japan. While I was the only foreigner in my community of 10,000, I was eagerly welcomed by many of the locals, including my next door neighbour who preferred to be called Susan. She was married to one of the teachers at the high school where I also taught and they had a young son. (We lived in a rather unattractive triplex — is that what a set of three townhouse-type homes is called, if a duplex means two? — that was teachers’ housing, along with the school’s vice-principal.) She was a very sweet woman who often had me over for dinner and hosted a pretty large (when one considers the relatively tiny size of her living room) dinner party when my then-boyfriend, mum and little sister came over to visit. At any rate, she signed us up for a cooking lesson with a women from the U.S. Naval base, stationed in nearby Sasebo. The subject was, of course, scones.

So, here I was, the lonely foreigner amongst a group of Japanese housewives learning to bake scones from some southern U.S. navy wife. Truly one of the stranger experiences.

Susan and I followed all of the directions faithfully, or so I believed. But our lovely little scones were nothing more than dough rocks by the time they came out of the oven. The instructor was convinced we had done something wrong (and I guess we must have), but I was so confident we had followed the recipe exactly.

I didn’t bother to attempt scones again for several years. Mostly, I suspect, because it’s one thing to bake cookies for a crowd and quite another to show up at work with a pile of scones. And also likely because deep down I harboured some anxiety that I would put in all that effort and still come out with flavoured rocks.

And then I saw a recipe for Carrot and Rosemary Scones.

I love rosemary. And carrots. And dijon mustard. And garlic. And parmesan cheese. The fact that all of these things were combined into a flaky scone was enough to jolt me out of my scone slump.

But it wasn’t going to be a breeze.

When I first attempted these, I found the mixture unbearably dry, but was nervous to add more liquid since I know making a light and fluffy scone requires some delicate baking chemistry. In the end, I did add some more cream, but it was still quite a dry dough. Once baked, the scones were still quite flat and not very brown. That’s not to say they weren’t tasty; they were. But not scone perfection.

The next time I called my mum (to whom I turn for all baking advice, her being a stellar baker and, I suspect, slightly amused by my ongoing need for guidance) and she said to not fear the addition of even more cream as the lack of liquid may have contributed to the rather flat outcome of the first attempt. Take two on the scones was slightly more successful — they were, at least, a little more golden and the dough had come together more easily — but only just. They were still flattish, though.

I sent the recipe along to my mum in advance of a visit out to Vancouver so that we could have a hands-on attempt together. (Baking, I feel, is best learned by participating at the side of an expert.) Not only did we almost double the amount of liquid, but, in the end, they still didn’t rise as much as other scone recipes. We eventually concluded the weight of the carrots was likely the culprit.

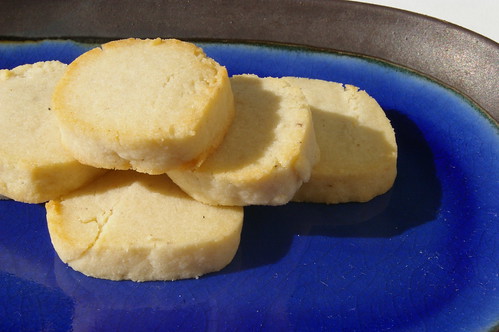
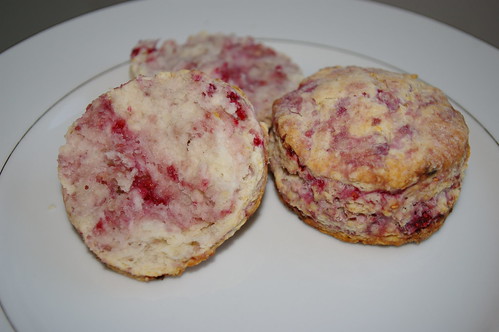
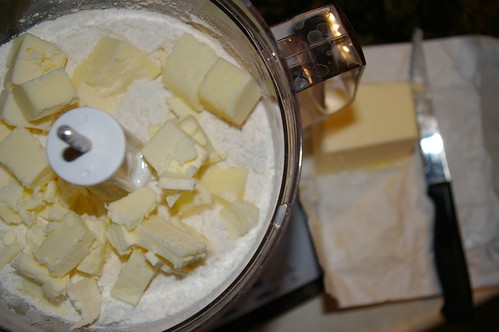
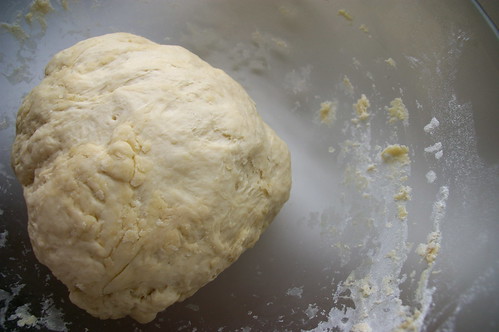
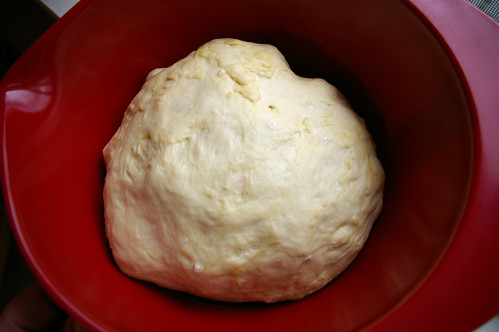
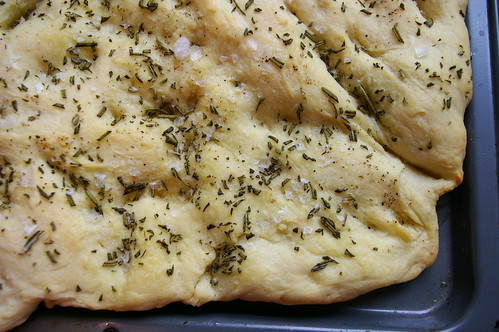
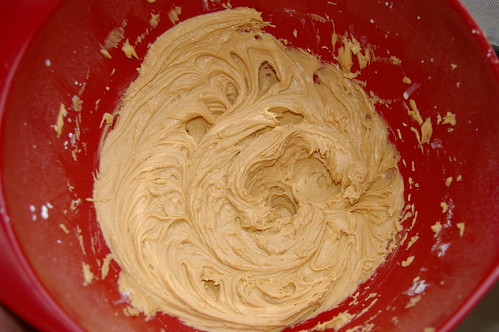
On the next attempt, I used my food processor to cut in the butter (justifying it as that I had to pull it out for grating the carrots anyway) and then added much more cream (a mixture of whipping and half-and-half because I wanted to use up the heavier cream) than originally called for. I also accidentally forgot the parmesan. So, I’m unsure which, if either, of those decisions played a role in the outcome, but these scones were beautiful.

They rose! They were tasty! They were flaky!

They still didn’t rise as much as other scone recipes; I blame it on the carrots.

carrots and rosemary

rosemary goes in to the dough

grated carrots

cutouts

ready to bake

Ready to eat II

While this recipe originally comes from Clotilde at Chocolate and Zucchini, I have made some adjustments. Below is the recipe as I make it.

Carrot and Rosemary Scones

  • 2 cups all-purpose flour
  • 1 1/4 tsp. baking powder
  • 1 1/4 tsp. salt
  • 9 tbsp. chilled, unsalted butter (this is a little more than 1/2 cup if that helps)
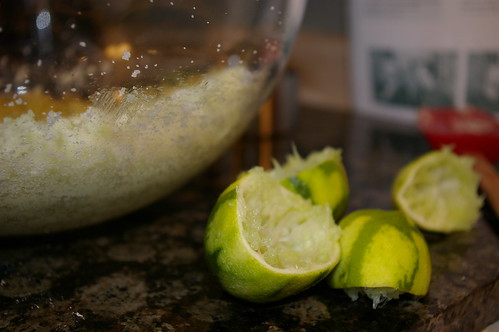
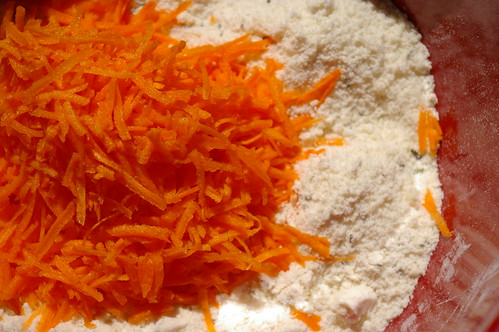
  • 1 1/2 cups grated carrots
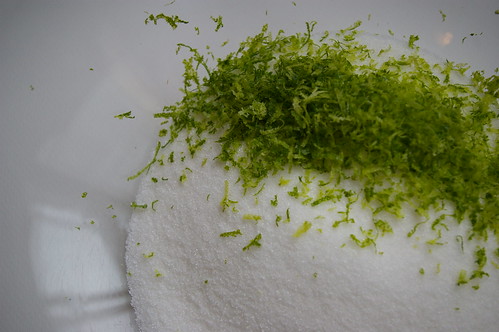
  • 2 tbsp. fresh rosemary, chopped
  • 2 cloves garlic, peeled and finely minced (I use my handy rasp for this.)
  • 2 tbsp. Dijon mustard
  • 3/4 cup cream (whipping, half-and-half or a mixture of the two, it doesn’t really matter.)
  • 1 cup grated parmesan (I’d go with optional for this because they were so tasty even without the cheese)

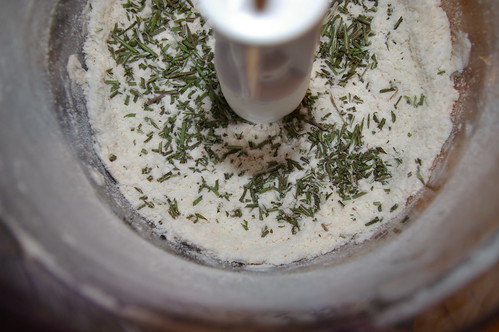
Preheat the oven to 350. In a mixing bowl, combine the flour, baking powder and salt. Add the butter and rub it into the flour mixture with your fingers or using a pastry blender or in a food processor, if you have one. It should resemble coarse crumbs when it’s blended enough. Add the carrots, rosemary and cheese if you’re using it.

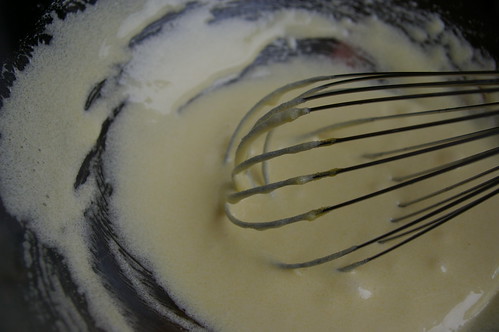
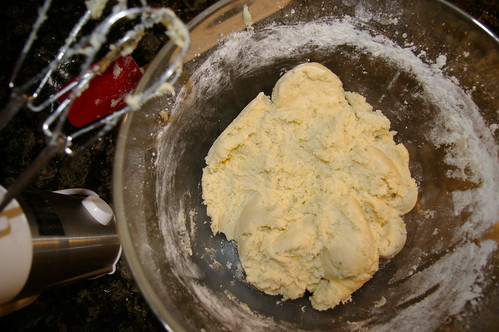
Mix together the mustard, cream and garlic (I find this distributes the garlic better, but you can also add it when you mix in the carrots) and then add to the dry ingredients. Mix together gently until the dough comes together and then empty out onto floured counter. Pat together into a ball and then roll out until the dough is about a half-inch thick. Cut out using biscuit cutter or whatever is handy. (I used a narrow drinking glass and that worked fine.)

The original recipe calls for 20 minutes in the oven. Mine baked for 17 before they were nice and golden. Cool on a rack. And then try to keep yourself from eating too many.

Continue Reading

Lime Sugar Cookies

Is it ridiculous that I bought a recipe book solely for a basil salad dressing?

Does it make it better if I explain that the salad dressing goes on one of my all-time favourite salads from a vegetarian/vegan restaurant in Victoria that I must visit each time I’m back in that city? (Especially interesting considering my carnivore ways.)

Nevermind, it was because of the cookbook that I was led to this fabulous cookie. The sweetness of sugar and tang of lime in neat cookie form. I love all things citrus and these certainly satisfy the craving.

IMGP2190

Oddly, I never went to Rebar while I lived in Victoria, which I now realize is a huge shame. Still, I get back to the capital city twice a year, so I can keep my cravings for their salad relatively in check. (Hmmm. Perhaps I should blog about the salad dressing….)

Anyway, when I found their recipe book in a store one day, I bought it immediately. When I got home (as I tried to justify the unnecessary purchase of *yet another* cookbook), I started to flip through and inevitably found a bunch of recipes I wanted to try, including the one for the Lime Sugar Cookies.

Sure, it calls for pepitas (pumpkin seeds) and, sure, there was no way I was going to have those on hand and there was no way I was going to buy them. (Surely, the whole point of cookies is that, in general, there is nothing healthy in the mix?) So, I forewent that step and moved ahead.

Then, on the second time making them, I made a very happy mistake. I doubled the recipe, but then didn’t fully double the amount of flour. As a result, the cookies came out a bit denser and with a nice chew, as opposed to the somewhat cake-y versions previously. I now purposely make that mistake. (And, yes, I still don’t bother with the pepitas.)

The one thing to really be aware of with these cookies is that they probably won’t look fully baked, even if they’re ready to be pulled out of the oven. They’ll look puffed, but still very pale with only a hint of golden at the edges. Once you pull them out and they start to cool, they’ll fall slightly and get the nice sort of cracked top to them.

It was raining today when I made these before going in to work. The grey skies made me a bit homesick for Vancouver. But this light and tangy cookies were cheerful, a little taste of summer.

IMGP2120

IMGP2134

IMGP2150

IMGP2155

IMGP2165

IMGP2183

Here is the recipe as printed in the Rebar Modern Food Cookbook. My notes and changes are in italics.

Lime Sugar Cookies

  • 1 cup granulated sugar
  • 1/4 cup unsalted butter
  • 1 tbsp. vegetable oil
  • zest of 1 lime
  • 1 large egg
  • 2 tbsp. lime juice
  • 1 3/4 cups unbleached flour (I use all purpose)
  • 1/4 cup pepitas (pumpkin seeds), toasted and roughly chopped
  • 1/2 tsp. baking soda
  • 1/2 tsp salt

Preheat the oven to 350F. Cream the sugar, oil, butter and lime zest until light and fluffy. Add egg and lime juice, and beat together to incorporate.

In a separate bowl, mix the flour, pepitas, baking soda and salt. Add the dry mix to the wet mix and stir together well.

Using a 2 oz. ice cream scoop or forming 3 tbsp balls (or, in my case, a big rounded soup spoon), drop the batter onto a cookie sheet, leaving space in between to allow the cookies to spread during baking. Flatten each slightly and sprinkle with granulated sugar. Bake for eight minutes. Cool on a wire rack.

As I said above, I always double this recipe (11 cookies is not enough), but instead of using 3 1/2 cups of flour, I only use 3. Feel free to try it both ways.

Continue Reading

Long Lost Cookies

Say what you will about Facebook, it reunited me with a long-lost recipe for some of the best cookies I’ve baked in a long time.

Long Lost Cookies

Of course, it’s a little more convoluted than that.

Let me try to put this in as small a nutshell as possible. Back in high school, I traveled to England for six weeks to spend time with a friend of mine. The summer was pretty awesome: we snuck into pubs with our pitiful fake IDs that should not have helped us gain entry anywhere (Seriously, mine literally said: Canadian I.D.), visited London and Stonehenge, spent a week in a cottage in a seaside town in Wales and basically spent a lot of time hanging out without much parental supervision. But back in Vancouver, a girl whom I had called a best friend (and whose friend we were visiting in England) essentially severed our friendship. Since she had been friends with the girl in England much longer than I, I pulled back.

And then, 15 years later, she found me on Facebook. Did I still make those famous cookies? she queried. Um, what cookies?

Over the course of several e-mail conversations, she then relayed this message: I see you travel a lot. Any chance you’re coming over here any time soon? And I was.

Was I hesitant to reconnect with a person I had not seen, let alone communicated with, in more than a decade? A woman now with a husband and children who probably no longer craves Buck’s Fizz (an awful concoction of fizzy wine and orange juice that I guzzled that summer) and with whom I may no longer have anything in common? Um, yes. But then I arrived in Bristol to a Welcome Home sign coloured by her two children. I was welcomed at the dinner table like family and everything fell into place as if no time had passed other than we have grown wiser (for the most part) and can now legally buy our alcohol.

During the three days in Bristol, she pulled out of her recipe book and showed me the short list of ingredients written in my own bubbled printing that I had given her when we were still teens. I had, apparently, made these all the time. I have no recollection of them. I copied out the recipe — an odd sensation copying something written in my own hand — in my travel journal. Since then, there have been little nudges from overseas, reminding me of the recipe.

So, when a cup of butter sat softened on the counter and my plans to make a type of roll-out cookie had fallen through, it seemed only right to see just why that recipe had stood the test of time.

I am so grateful to have it, and my friend, back in my life.

Getting started

The batter

Mmmmm chocolate chips

Preparing to bake

It’s so basic that I don’t quite understand how all these dull-normal ingredients can come together to make such a thick, chewy cookie. But I’m definitely not going to lose this recipe again.

Long Lost Cookies

  • 1 cup butter
  • 2/3 cup white sugar
  • 2/3 cup brown sugar
  • 2 eggs
  • 1 tsp. vanilla
  • 1 1/2 cups flour
  • 1 tsp. salt
  • 1 tsp. baking soda
  • 2 cups oatmeal
  • 1 1/2 cups chocolate chips

(I would consider the addition of nuts or dried cranberries might be a nice touch. But this recipe is pure deliciousness as is, so don’t feel you have to experiment.)

(EDIT: Some people have wondered why there are two types of chocolate chips in my photo. The answer is, quite simply, that I had half of a bag of milk chocolate chips left over from some other baking frenzy and wanted to use them up. Though the combination was good, just use whatever you have on hand.)

Preheat oven to 350. Cream together softened butter and sugars until light. Beat in eggs and vanilla. Add flour, salt and baking soda, then oatmeal. Stir in chocolate chips (and nuts or cranberries, if desired). Bake for 10 – 12 minutes. (I like my cookies a good solid size. These ones I measured out using a mounded soup spoon and they took 12 minutes.) Let cool.

Long Lost cookies

Continue Reading