Roast Salmon and Potatoes with Mustard-Herb Butter

Some meals are made perfect simply by the company and the conversation.

There’s something about gathering together good friends and good food that makes a meal so much greater than the sum of its parts.

The first time I had this Roast Salmon and Potatoes with Mustard-Herb Butter was in Edmonton while visiting friends. For the last day of the weekend, we decided to have some fun in the kitchen and, after flipping through Martha Stewart’s Dinner at Home, we settled on it.

A trip to the farmers’ market netted us the fingerling potatoes and herbs, a stop at the fishmonger, the salmon, and the final stop was at the wine store for some rose. (I drink what I like and do not profess to know anything about pairings; but I did like this match.)

The recipe comes together so quickly that there was more time to chat and set the table for the early afternoon meal.

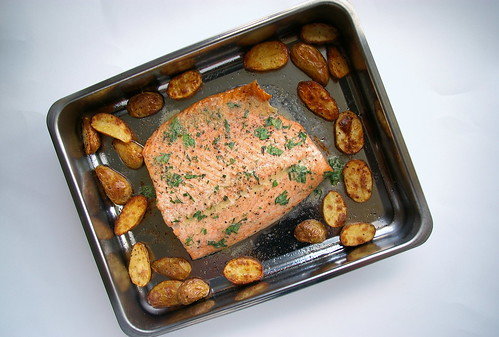
And when the coral pink salmon and lightly browned potatoes came out of the oven and we smothered on the green-flecked butter, we knew it was going to be good.

Roasted salmon and potatoes with mustard-herb butter

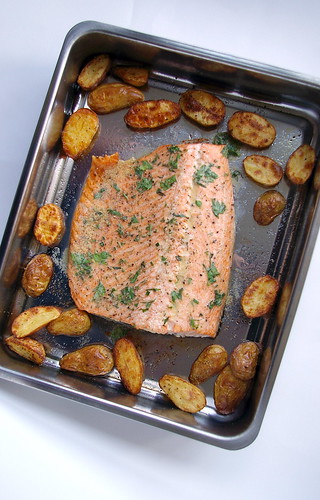
But it was the combination of the rich salmon, crisp-edged potatoes and fresh herbs, along with the crisp rose and the inevitable laughs and conversation that made the the meal so memorable. That said, when I made it again Monday night, alone in my apartment, and ate it with a now-requisite glass of rose, it was still incredibly tasty.

The Dijon is not overwhelming and the rich fish is brightened by the slight mustard tang and fresh herbs.

And I love the idea of a one-pan dish, particularly since I’m the one doing the dishes.

Maybe that’s another great reason why this should be enjoyed with friends.

Roasted salmon and potatoes with mustard-herb butter

Roast Salmon and Potatoes with Mustard-Herb Butter

I’ve had this with fingerling potatoes, which are great, but this time around I used the more readily available Yukon Golds.

  • 1 tbsp plus 2 tsp (25 mL) extra-virgin olive oil, plus more for the pan
  • 1 lb (500 g) fingerling potatoes, halved lengthwise
  • coarse salt and freshly ground pepper
  • 2 lb (1 kg) fillet salmon, skin on
  • Mustard-Herb butter (see below)
  • fresh herbs, plus more leaves for garnish

Preheat oven to 400°F (200°C). Brush the bottom of a roasting pan with oil. Place potatoes in pan; season with 3/4 tsp (3 mL) salt and a pinch of pepper, and drizzle with 1 tbsp (15 mL) oil. Toss to coat, and spread in a single layer.

Roast 30 minutes, turning with a spatula after potatoes begin to turn golden underneath (about 20 minutes). Season salmon on both sides with salt and pepper. Push potatoes to edges of pan, and place salmon, skin side down, in centre of pan. Brush with remaining 2 tsp (10 mL) oil, and roast until salmon barely flakes on the edges when pressed, 25 to 28 minutes for medium-rare (it will still be pink in the centre). Brush salmon and potatoes with herb butter while still hot.

Serve, garnished with herbs. Serves 4.
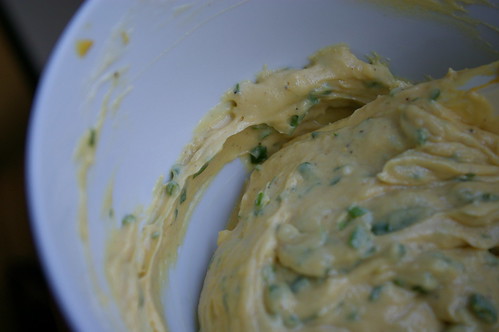
Mustard-Herb Butter

While the original recipe calls for chervil, thyme and parsley, I used dill, tarragon and parsley.

Use what you like or what you have on hand. I didn’t use all of the butter, so don’t feel you need to put it all on. Stewart suggests it goes well with roasted, grilled or broiled fish, chicken or pork.

I’m thinking of roasting the rest of my potatoes and tossing it with them.

  • 1/2 cup (125 mL) unsalted butter, room temperature
  • 1 tbsp (15 mL) Dijon mustard
  • 1/4 cup (50 mL) tightly packed small herb leaves, such as parsley, thyme and chervil, plus more for garnish
  • coarse salt and freshly ground pepper

Stir butter and mustard together in a small bowl until smooth. Stir in the herbs and season with 1/4 tsp (1 mL) salt and 1/8 tsp (0.5 mL) pepper, or to taste.

(The compound butter can be made ahead, rolled tightly in parchment paper to form a log, and then wrapped in plastic; store in the refrigerator up to 1 week, or in the freezer up to 1 month.)

This article first appeared in the Calgary Herald. For more recipes and meal ideas, check out CalgaryHerald.com/food.

Continue Reading

Butter, onion, tomato sauce

My general approach to tomato sauce is simple: I wing it.

After years of watching my parents throw basic ingredients into a pot and letting it simmer for an hour or two to create a hearty and rich tomato sauce, and even more years of making it from scratch on my own – owing to a perhaps unnatural love of pasta – I don’t give too much thought to cooking up a decent red sauce.

I’m a big believer in the long-simmered sauce with a multitude of ingredients that all come together over a slow heat, melding and marrying into something that is so much greater as a whole than the sum of its parts.

But I can also turn around a very basic sauce in 15 minutes.

At the very least, my spaghetti sauce usually has garlic and diced onions, sauted in olive oil with a generous pinch of salt, canned plum tomatoes I roughly (and gently, using a butter knife) chop in my hand over the pot, fresh basil if I can get my hands on it, a little sprinkle of sugar if the whole mix is too acidic, and a Parmesan heel, which I stash in my freezer for just such occasions.

So, it takes an unusual tomato sauce recipe to catch my eye.

Like this one. It has three ingredients. (OK, four, if you count salt, which, in general, I don’t, since almost all recipes call for salt.)

Canned tomatoes. A yellow onion. Butter.

That’s it.

Butter, onion, tomato II

Marcella Hazan’s recipe for tomato sauce with butter and onion has made appearances over the years on various food blogs I follow.

Each time I saw it, I thought I really should remember to give that a try.

And then I’d forget about it until someone else posted their love of this simple yet rich dish.

This seemed like a great weeknight dinner recipe since there is minimal fuss. No chopping or dicing, sweating or sauteing.

You dump it all into the pot, let it come to a simmer, reduce the heat, and go about things. In this case, a little laundry, some tidying and things that allowed for a quick wander past the pot to give the tomatoes a stir and squish against the side with a wooden spoon.

At the end of 45 minutes, all it needed was a small pinch of salt and to be dolloped over a nest of noodles.

Some have suggested sprinkling on Parmesan, but I opted not to. The sauce is rich and tasty without adornment, which is sort of the beauty of it.

The butter adds an almost unidentifiable creaminess and mellows out the acidity of the tomatoes.

And, luckily, such an easy recipe is simple enough that in the future I can pretty much wing it.

Butter, onion, tomato

Cooked sauce

Spaghetti and Sauce I

Spaghetti and sauce II

Marcella Hazan’s Tomato Sauce

This was adapted from Hazan’s The Essentials of Classic Italian Cooking by way of several food blogs. Since there are only three ingredients, I do recommend using San Marzano or San Marzano-style canned tomatoes, which are packed in tomato puree instead of water and have, therefore, a greater tomato flavour. You can find Marzano-style tomatoes in most grocery stores these days.

  • 1 28-oz (796-mL) can of whole tomatoes
  • 5 tbsp (75 mL) butter
  • 1 medium yellow onion, peeled and halved
  • 1 lb (500 g) spaghetti
  • salt to taste, if needed

Put the tomatoes, butter and onion in a pot over medium heat. Once the butter is melted, stir to combine, then reduce the heat to low or medium low – depending on how hot your element is; you’re looking for a slow but steady simmer – and cook for about 45 minutes. Stir occasionally, squishing the tomatoes against the side of the pot.

Cook pasta according to package instructions.

Remove sauce from heat, discard the onion and taste. Add salt if needed. Serve over cooked pasta.

This article first appeared in the Calgary Herald. For more recipes and meal ideas, head to the Calgary Herald’s food page.

Continue Reading

English Toffee

Candy making kind of scares me.

Thread stage, soft ball, hard crack. It just all sounds like it could go horribly wrong with little or no notice. And the thought of burnt sugar (or, perhaps, more importantly, trying to clean up burnt sugar) is enough to put me completely off the idea entirely.

But when I went home at Christmas (and yes, that’s how long I’ve procrastinated on this post. I have no idea why.), my mum and I thought this would be a good afternoon project. Considering about three feet of snow was surrounding the house and even the four-wheel-drive SUV was having a hard time making it up the narrow gravel road, staying in to do some baking and candymaking seemed like a grand plan. Not to mention the newly renovated kitchen was ideal for photos. Hello natural light!

We’re both big fans of English Toffee, even though I’m generally not a huge fan of almonds. My mum is more of a connoisseur than me, though; she can judge good toffee from bad. So, it was entertaining to think we could have a go at making our own.

English Toffee

It was great to cook with someone else. Since I have no tripod, my photos tend to be very static. Just too tricky to try to pour or stir and shoot at the same time. Not to mention that my cave-like kitchen is terrible when it comes to lighting. I actually take things out of my kitchen and shoot them by the window to get the best light. So, I took full advantage of having another pair of hands.

Also, frankly, I wasn’t going to attempt this recipe without having someone there who has some expertise.

But this has made me feel that I could attempt candy again in the future.

It’s essentially a waiting (and stirring) game. Keeping an eye on the temperature and watching as two basic ingredients transform themselves into something completely different. I liked the molten lava look of the toffee as it grew closer to being ready and then how it changed again when it was poured into the sheet pan, taking on an almost stained glass type look: coloured and glossy and flat.

Mostly, though, what I enjoyed was a chance to hang out, catch up and just spend time together. I only get back to Vancouver once or twice a year and I’m usually rushing around to see old friends and poke around some of my favourite stores.

The giant piles of snow that continued to fall almost the entire time I was there over the Christmas holidays were a blessing, in the end. There was no reason to rush off on errands or to visit. Instead, we had the perfect excuse to stay in and just spend time in the kitchen, bonding over a bubbling pot of sugar and butter.

Butter and almonds

Butter

Bubbling hot toffee

Pouring the toffee

Smooth Toffee

Adding the chocolate chips

Making the chocolate layer

Spreading the chocolate

Almonds

Finished Toffee

Breaking it up

Smashed up

English Toffee

  • 3 cups salted butter (1.5 pounds)
  • 3 cups sugar
  • 2 cups semi-sweet chocolate chips
  • 3 cups roasted, unsalted almonds crushed

In a heavy bottom stock pot, start to melt the butter, adding the sugar after it has started to melt. Stir to emulsify the mixture, then add the candy thermometer, making sure there is enough of a gap between it and the bottom of the pot. (A wooden spoon should just be able to sweep underneath it.) Keep stirring the mixture. As it gets hotter, the mixture will thicken and start to darken. Keep cooking until the mixture reaches 294 degrees F. Caution, the temperature will climb quickly through the final 20 degrees.

Let the mixture cool slightly and then pour into a 13×18″ pan. Let cool for about 10 minutes, then sprinkle on the chocolate chips. The heat of the toffee should be enough to melt the chocolate. It didn’t for us, so we threw it in the oven (warm from roasting the almonds) for a minute or two until it was spreadable and then used a spatula to get the chocolate covering the toffee.

Sprinkle on chopped nuts and press into chocolate.

After it has cooled to room temperature, put another pan of the same size over the toffee and invert. It should pop right out.

We used a meat mallet to break it into manageable pieces.

Continue Reading

Mustard-butter Broccoli Pasta

I have very particular feelings about condiments. These may verge a bit on condiment OCD.

Growing up, I refused to eat — in no particular order — mayo, mustard, relish, chutney. And mushrooms. Not a condiment, I know, but it was something I refused to eat. My burgers were dry except for ketchup and that was just fine with me. Except, oddly, McDonald’s hamburgers with their thin scraping of yellow mustard. Somehow that was OK with me.

Nowadays, things have relaxed slightly. I still ask for no mayo, if it’s just straight-up, out-of-the-jar, spread. Bring on the pesto, lemon, dill, herb, curry variations. I won’t go out of my way to add relish or mustard, but I enjoy them on my burger. (Oh god, when I decided to finally try a White Spot burger — the real ones from B.C., not these faux Alberta versions —and had the Triple O sauce? Damn, that is good condiment.)

(Ketchup is good, but belongs only on fries, hot dogs, hamburgers and sausages. That is all.)

And the turning point may have been Mustard-butter Broccoli Pasta.

Until I had this, I was certain I didn’t like Dijon mustard. I was wrong. Oh, so, very wrong.

Broccoli

This is a wonderful summer pasta, partly because of the bright colour and fresh taste, but also because it requires but one pot. And, if you’re quick on the ball and plan ahead, you can use the summer heat to soften butter, which is one of the “sauce” ingredients. Of course, if you’re a bit forgetful (like me), there is always the microwave. That said, softening the butter naturally is much tastier. (Full disclosure: I have used Becel to make this and it’s still good.)

My Mum first made this many, many years ago, then photocopied it for me while I lived for a summer in Kitimat with her own notes neatly written out in red pen. And this recipe has become one of those comfort ones that has followed me as I lived in teeny-tiny towns across B.C., slogging my way through jobs at teeny-tiny newspapers, and over to Japan where I lived for a year. Sure, finding Dijon was tricky, but it was doable. And, more importantly, it was worth it.

I like to use penne with this because then it’s super easy to eat, plus the penne rigate’s ridges pick up more sauce. Of course, the big carriers are the broccoli spears; they become sponges for the mustard-butter sauce. And, frankly, I’ll use whatever pasta I have on hand. Case in point: tonight’s dinner was farfalle.

Mustard-butter sauce

All in the pot together

Mustard-butter Broccoli Pasta

I’ve made some changes from the original recipe, so this is the version as I make it.

Mustard-butter Broccoli Pasta

  • 1/2 cup butter
  • 4 tbsp. Dijon mustard (I use generic — gasp! — Safeway brand. I like it better than Grey Poupon.)
  • 2 cloves garlic, finely minced (I use my lovely, lovely rasp.)
  • Salt and pepper
  • Herbs (chives, parsley or green onion tops), about 4 tbsp. total (And if I don’t have them, I don’t worry about it.)
  • 2 or 3 cups broccoli florets, from two crowns
  • 3/4 pound pasta

Let the butter soften, then mix in the mustard, herbs and pepper. Check for seasonings before adding more salt. Set a huge pot of water on the stove to boil. When it comes to a rolling boil, season liberally with salt, then add the pasta. Cut the broccoli florets off the stem and set aside. When the pasta is about two or three minutes from being cooked to al dente, throw in the broccoli and stir to let it cook with the pasta. Drain when the pasta is tender and the broccoli is still green. Throw back into the pot and stir in the mustard-butter mixture. The heat from the cooked pasta and broccoli will melt the butter mixture. Check for seasonings and serve.

Note: I usually hold back some of the mustard-butter. Often you won’t need all of it. But when I put away the leftovers in containers, I spoon a bit of the mixture on top. That way, when you reheat it the next day (or whenever) in the microwave, it’s still a bit saucy.

Continue Reading