Flourless Chocolate Cake

A milestone slipped past last week.

I took note of it, but said nothing because there was no point in celebrating unless there was cake.

Slice of Cake III

Actually, the original plan was to make a salted caramel tart but, once again, pastry bested me. One day, pastry. One day! Truth be told, it was flaky as all get out and tasted great, but uneven rolling led to some parts being more cooked than others and there were slumping and shrinking issues. My theory is that I’m actually not putting enough weight in when pre-baking and then taking the beans out too quickly. It worked much better with the second shell, which didn’t slump as much, but the unevenness of the baked pastry was a little more than this mostly-perfectionist could handle.

No matter, there was a back-up plan. Albeit one that would have to wait until post-milestone.

See, it’s my blog’s third birthday.

Three years.

Craziness.

I remember first broaching the idea with some friends after we had been out at the pub. We were outside, in the frigid cold, saying goodnight when I just sort of threw it out there. “I’m thinking of starting a food blog.”

And since then there have been many baking projects and, thankfully, many happy eaters. (A special thanks must go to the Civilized Sunday crew at the Herald who willingly — and, occassionally, expectantly — ate what I brought to work on the weekend shift. Cake for breakfast? Yeah, that was a good tradition.

There have been amazing times  and incredibly tough times.

So, I’m interested to see what the next year (and more) will bring.

For the last three years, I’ve kicked off the start of a new blogging year with cake. First, there was the inaugural Red Velvet Cake (wee bit embarrassed by the photos back then, but moving along), followed by a much-better version for my first blogiversary and then a triple layer chocolate cake last year.

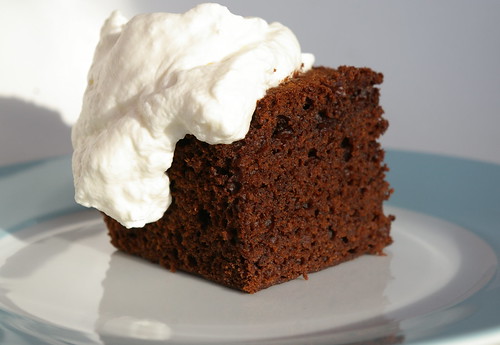
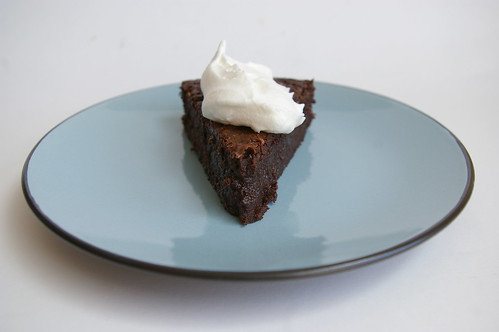
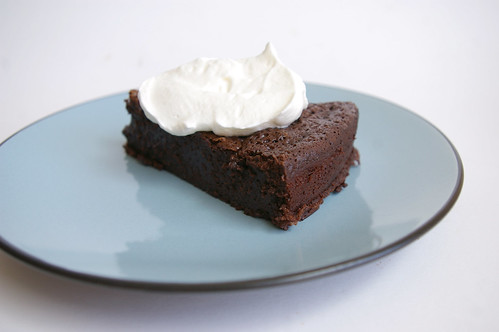
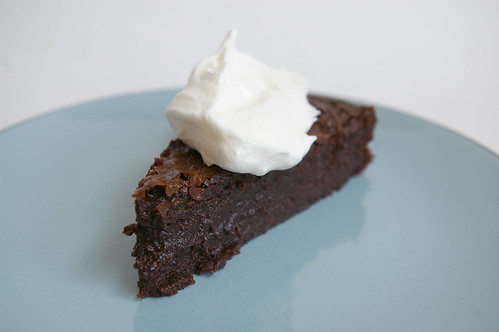
This year is only slightly different. It’s still cake, but it’s a decadent and rich, truffle-like Flourless Chocolate Cake.

Slice of Cake II

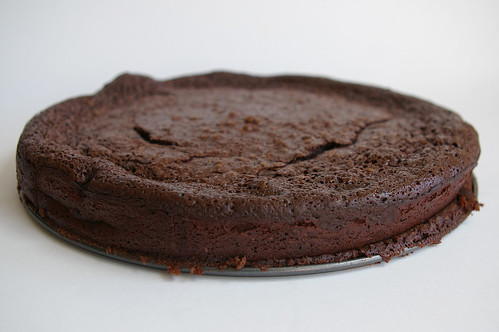
At least in this case, unlike the pastry situation, slumping is expected.

This cake is deeply, darkly rich, ironically lightened by a topping of whipping and sour creams, beaten with icing sugar. (Or, if you think you have tons because there’s always about six bags in the cupboard where they appear to multiply like bunnies until the day you need some and then there isn’t any, a little bit of berry sugar will do the trick.) And it is Oh. So. Good.

I actually heard about it over Twitter from the gang at Real Simple one day. Made it a few days later for friends and was still thinking about it months later and how I really needed to make it again. That’s the sign of a good cake, I figure. (Original recipe here. Though I haven’t really made any changes.)

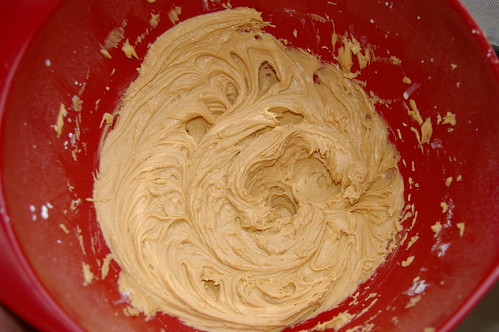
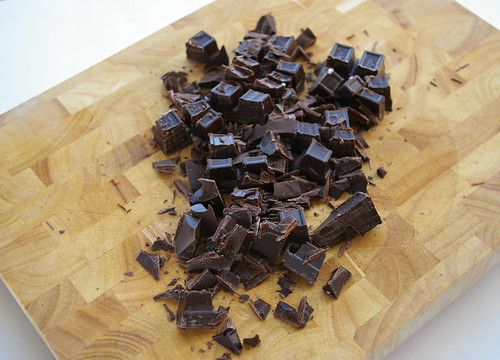
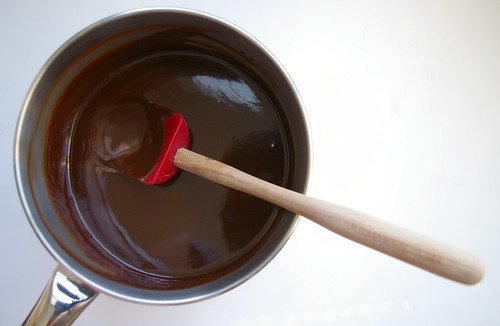
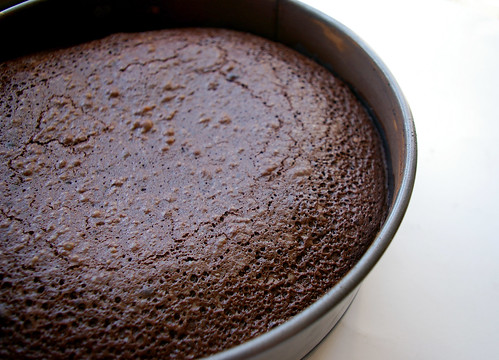
Baking like this is so lovely. I especially love adding the chopped chocolate to the hot butter-and-cream mixture and then stirring, stirring, stirring as it changes from a curdled-looking mass to silky smooth melted chocolate. And how it comes out of the oven all puffy and light looking before collapsing into a deeply dark slump of rich chocolate cake. The slight tang in the dollop of the whipped cream takes it to a whole new level.

I ate one slice and gave the rest away to friends. Now, as it nears bedtime, I wish I had saved myself just another sliver. Ah well. Reason to make it again soon.

This recipe is fantastic, but I would add a pinch or two of salt. I really feel that a tiny bit of salt in sweet things rounds them out. In this case, I didn’t quite have enough unsalted butter, so about half of the butter was salted. I think it worked perfectly and I may do this from now on. Only have unsalted? Just add a pinch or two of regular table salt.

Chopped Chocolate

Melted Chocolate

Batter in Pan

Puffed out of the oven

Slumped cake

Cake Slice I

Flourless Chocolate Cake

  • 1 cup unsalted butter, cut into pieces, plus more for the pan
  • 1/4 cup unsweetened cocoa powder, plus more for the pan
  • 1 1/4 cups whipping (heavy) cream, divided
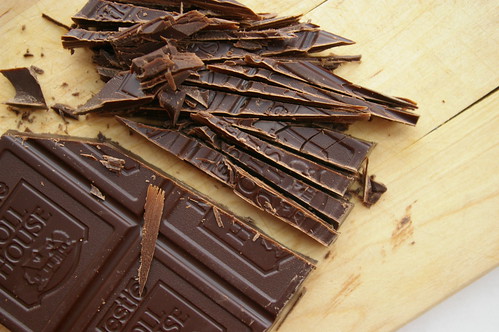
  • 8 ounces bittersweet chocolate, chopped
  • 5 large eggs
  • 1 cup granulated sugar
  • 1/2 cup sour cream
  • 1/4 cup icing sugar, plus more for dusting
Heat oven to 350° F. Butter a 9-inch springform pan and dust with cocoa powder.
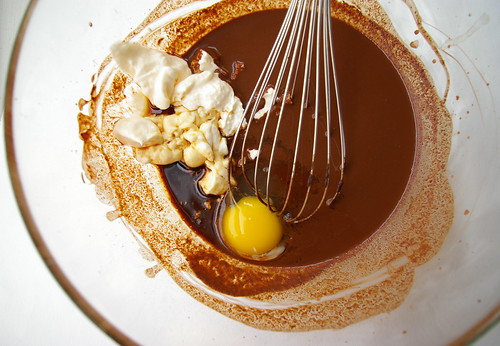
In a medium saucepan, heat the butter with ¼ cup of the whipping cream over medium-low heat until the butter is melted. Add the chocolate and stir until melted and smooth; remove from heat.
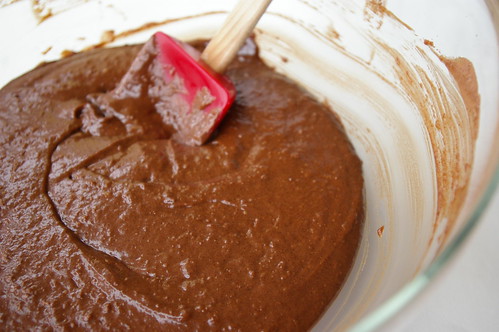
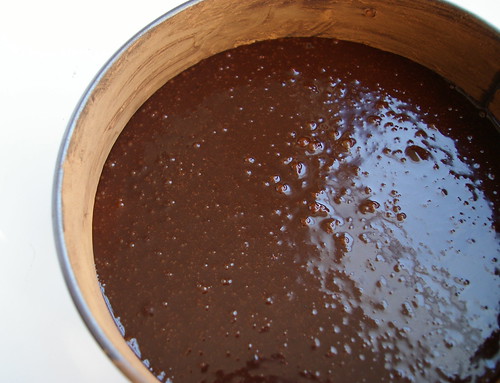
In a medium bowl, whisk together the eggs, granulated sugar, and cocoa powder; whisk in the chocolate mixture.
Transfer the batter to the prepared pan and bake until puffed and set, 35 to 40 minutes. Let cool in the pan for 1 hour. Run a knife around the edge of the cake before unmolding.
Using an electric mixer, beat the remaining 1 cup of whipping cream with the sour cream and icing sugar until soft peaks form. Dust the cake with confectioners’ sugar and serve with the whipped cream.
Continue Reading

Chocolate Cake

So, I know I’ve mentioned before that I don’t drink coffee. I couldn’t brew a pot if my life depended on it and, for that matter, I don’t even have the supplies to make an attempt. So, noting that this Chocolate Cake recipe — like many others involving chocolate — called for brewed coffee, I knew I was going to have to resort to other measures. Yup, Starbucks. But, since I don’t drink coffee, I had no idea what to order.

Me: Um, can I get a tall, uh, um, Verona…?

Barista guy: Sure. (Starts to pour coffee.)

Me: Um, is that a dark roast? (It occurs to me that might be too much of a coffee flavour. I think? Isn’t that what dark roast means? Jesus, I need a coffee primer.)

Barista guy: Yup. (pause) Did you want something else?

Me: Uhhhhhh, yes…..? A medium roast…..?

Barista guy: (shrugs and dumps out dark roast, pours new one.)

Me: Um, I’m a coffee neophyte. (Wishes had stopped talking.)

Then, since the coffee had to be hot, I had to drive home immediately and start making the cake. Yes, I’m a baking nerd.

So, I found this recipe on the Cook’s Illustrated web site. I’ve always loved this magazine and now I love their site (thanks to my friend Julie for the birthday subscription!). The videos are especially great because sometimes you really do need to see what they are talking about. But it does crack me up that all the clips are about three minutes long. Anything looks easy when a) professional chefs do it b) they do it in three minutes.

But this recipe, actually is easy.

The other thing I liked about this recipe was that it isn’t unheard of to have all of these ingredients on hand. (Except, for me, coffee, of course.) And it bakes super quickly and it doesn’t really need frosting, so this would be easy to whip up any time.

This cake is really fantastic on it’s own, so I don’t suggest icing it. But I do feel that a little dollop of sweetened whipped cream is the perfect addition. It, possibly ironically, cuts some of the richness but without taking away from the chocolate-y goodness of the cake.

Chopped Chocolate

Chocolate and cocoa

Chocolate, egg and mayonnaise

Whisked together

The batter

What was left over

Chocolate cake topped with whipped cream

Easy Chocolate Cake

  • 1 1/2 cups unbleached all-purpose flour
  • 1 cup sugar
  • 1/2 teaspoon baking soda
  • 1/4 teaspoon table salt
  • 1/2 cup Dutch-processed cocoa powder (I used Fry’s)
  • 2 ounces bittersweet chocolate , chopped fine
  • 1 cup fresh black coffee, hot
  • 2/3 cup mayonnaise
  • 1 large egg
  • 2 teaspoons vanilla extract
  • whipped cream — for serving, optional

Preheat oven to 350. Spray an 8″-square baking dish with nonstick spray.

Whisk flour, sugar, baking soda and salt in a large bowl. In separate bowl, mix cocoa and chocolate, then pour hot coffee over and whisk until smooth. Set aside to cool slightly. Whisk in mayonnaise, egg and vanilla. Add to flour mixture and stir until combined. Pour into baking dish, smoothing top before putting in oven. Bake until toothpick or skewer inserted comes out with a few crumbs attached, about 30 to 35 minutes. Let cool in pan on wire rack for one to two hours. Serve dusted with icing sugar or a little lightly sweetened whipping cream.

Continue Reading

Chocolate Cupcakes with Peanut Butter Icing

Most smart bakers know to make sure everything is ready to go in advance of getting started. I am, apparently, not a smart baker.

Chocolate cupcake with peanut butter icing

We were celebrating a (much belated) birthday for a good friend. Some wiggling around with the schedule had the celebration moved from brunch to Sunday night dinner and I volunteered (most willingly — any excuse to bake) to bring the birthday dessert. All week I Googled for moist, rich chocolate cake recipes and then sat there trying to decide which would be better: mayo-based or buttermilk; white icing or chocolate; cupcakes or layer cake. Finally, when I shared my dilemma with a friend, she queried why I wasn’t using a Barefoot Contessa recipe. Indeed! Why wasn’t I?

She has two recipes in her books and one online at Food & Wine. Since I already bought the books, I figured I may as well try one of those and, at last, settled on the Chocolate Cupcakes with Peanut Butter Icing. My love of this combination knows no bounds, so I’m kind of surprised I didn’t think of this recipe immediately.

Initially, it was all going very well. I ran out to the store to buy sour cream, buttermilk and coffee, along with whipping cream for the icing, then returned to begin. There was butter to soften and dry ingredients to sift (and, boy did I sift those. I learned my lesson from the Red Velvet cake when not sifting the cocoa with the flour led to brown swirls through the cake.) and, of course, photos to take to document my progress.

Cakes still make me a bit nervous. I’m worried I’ll overmix and make a tough cake and that is not eased by the fact most recipes have this whole “mix in thirds” step. What if it’s not exactly thirds? Also, I think a lot of recipes these days assume people have stand mixers, which makes this step (among others) much easier, then when trying to hold the mixer while pouring in a third of the dry mixture and not end up covered in cocoa and flour dust.

Butter and sugar and eggs, oh my!

The batter trifecta

Chocolate cupcake better

Chocolate cupcakes ready to bake.

But, for the most part, it all went really well. The batter seemed incredibly light at the end (Okay, and, yes, it did taste good.) and I was all ready to put the batter into the tins. I pulled out my cupcake liners and found I only had five left. Gah! Thankfully, there’s a grocery store a little over a block away, so I turned off the oven and bolted down there where I bought some liners and then raced back. I was really worried that extra time would ruin the batter somehow.

In the end, it was only a 15-minute delay and I don’t think it affected the cupcakes. They baked up perfectly, though for less time than the recipe suggested owing, I suspect, to the fact that my muffin tins are more shallow and took less batter to fill. (I used a 1/8 cup scoop, which worked perfectly. No spillage.)

Chocolate Cupcakes

Solo chocolate cupcake

The cupcakes are not overly sweet, which was a nice counterpoint to the rich peanut butter icing.

Peanut butter icing

Row of cupcakes

This recipe is from Barefoot Contessa at Home.

Chocolate Cupcakes with Peanut Butter Icing

  • 12 tbsp. unsalted butter, at room temperature (that’s 3/4 cup for those of us that don’t use sticks of butter)
  • 2/3 cup granulated sugar
  • 2/3 cup light brown sugar, packed
  • 2 extra-large eggs, at room temperature
  • 2 tsp. pure vanilla extract
  • 1 cup buttermilk, shaken, at room temperature
  • 1/2 cup sour cream, at room temperature
  • 2 tbsp. brewed coffee (Full disclosure: I don’t drink coffee. I made a cup of instant and it tasted awful to me, so I only threw in less than a tablespoon. I suspect good coffee may be a great addition.)
  • 1 3/4 cups all-purpose flour
  • 1 cup good cocoa powder
  • 1 1/2 tsp. baking soda
  • 1/2 tsp. kosher salt

Preheat oven to 350 degrees. Line cupcake pans with paper liners.

In the bowl of an electric mixer fitted with a paddle attachment, cream the butter and two sugars on high speed until light and fluffy, approximately five minutes. (For those of us without a stand mixer, a handheld is just fine. It just makes it a bit trickier when mixing in the wet and dry ingredients.) Lower the speed to medium, add the eggs one at a time, then add the vanilla and mix well. In a separate bowl, whisk together the buttermilk, sour cream and coffee. In another bowl, sift together the flour, cocoa, baking soda and salt. On low speed, add the buttermilk mixture and the flour mixture alternately in thirds to the mixer bowl, beginning with the buttermilk mixture and ending with the flour mixture. Mix only until blended. Fold the batter with a rubber spatula to be sure it’s completely blended.

Divide the batter among the cupcake pans (one rounded standard ice cream scoop per cup is the right amount). Bake in the middle of the oven for 20 to 25 minutes, until a toothpick comes out clean. Cool for 10 minutes, remove from the pans, and allow to cool completely before frosting.

Frost each cupcake with peanut butter icing and sprinkle with chopped peanuts, if desired.

Kathleen’s Peanut Butter Icing

  • 1 cup confectioners’ sugar
  • 1 cup creamy peanut butter
  • 5 tbsp. unsalted butter, at room temperature
  • 3/4 tsp. pure vanilla extract
  • 1/4 tsp. kosher salt
  • 1/3 cup heavy cream (I used whipping cream)

Place the confectioners’ sugar, peanut butter, butter, vanilla and salt in the bowl of an electric mixer fitted with a paddle attachment. Mix on medium-low speed until creamy, scraping down the bowl with a rubber spatula as you work. Add the cream and beat on high speed until the mixture is light and smooth.

Continue Reading