English Toffee

Candy making kind of scares me.

Thread stage, soft ball, hard crack. It just all sounds like it could go horribly wrong with little or no notice. And the thought of burnt sugar (or, perhaps, more importantly, trying to clean up burnt sugar) is enough to put me completely off the idea entirely.

But when I went home at Christmas (and yes, that’s how long I’ve procrastinated on this post. I have no idea why.), my mum and I thought this would be a good afternoon project. Considering about three feet of snow was surrounding the house and even the four-wheel-drive SUV was having a hard time making it up the narrow gravel road, staying in to do some baking and candymaking seemed like a grand plan. Not to mention the newly renovated kitchen was ideal for photos. Hello natural light!

We’re both big fans of English Toffee, even though I’m generally not a huge fan of almonds. My mum is more of a connoisseur than me, though; she can judge good toffee from bad. So, it was entertaining to think we could have a go at making our own.

English Toffee

It was great to cook with someone else. Since I have no tripod, my photos tend to be very static. Just too tricky to try to pour or stir and shoot at the same time. Not to mention that my cave-like kitchen is terrible when it comes to lighting. I actually take things out of my kitchen and shoot them by the window to get the best light. So, I took full advantage of having another pair of hands.

Also, frankly, I wasn’t going to attempt this recipe without having someone there who has some expertise.

But this has made me feel that I could attempt candy again in the future.

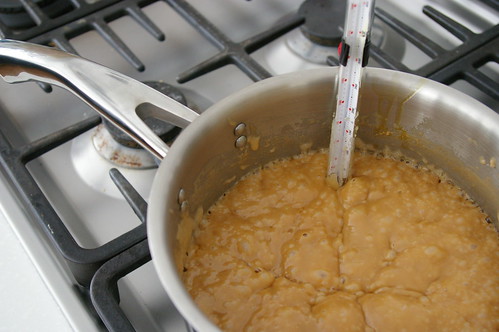
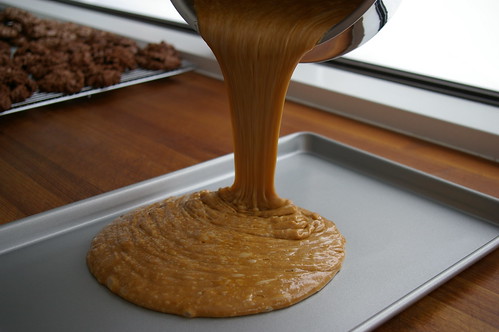
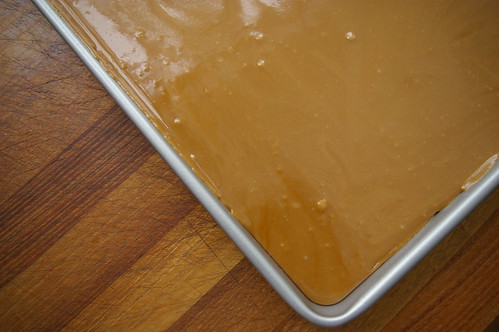
It’s essentially a waiting (and stirring) game. Keeping an eye on the temperature and watching as two basic ingredients transform themselves into something completely different. I liked the molten lava look of the toffee as it grew closer to being ready and then how it changed again when it was poured into the sheet pan, taking on an almost stained glass type look: coloured and glossy and flat.

Mostly, though, what I enjoyed was a chance to hang out, catch up and just spend time together. I only get back to Vancouver once or twice a year and I’m usually rushing around to see old friends and poke around some of my favourite stores.

The giant piles of snow that continued to fall almost the entire time I was there over the Christmas holidays were a blessing, in the end. There was no reason to rush off on errands or to visit. Instead, we had the perfect excuse to stay in and just spend time in the kitchen, bonding over a bubbling pot of sugar and butter.

Butter and almonds

Butter

Bubbling hot toffee

Pouring the toffee

Smooth Toffee

Adding the chocolate chips

Making the chocolate layer

Spreading the chocolate

Almonds

Finished Toffee

Breaking it up

Smashed up

English Toffee

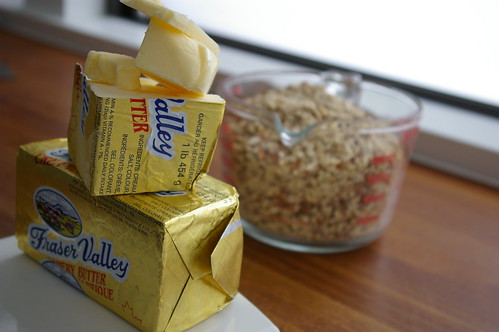
  • 3 cups salted butter (1.5 pounds)
  • 3 cups sugar
  • 2 cups semi-sweet chocolate chips
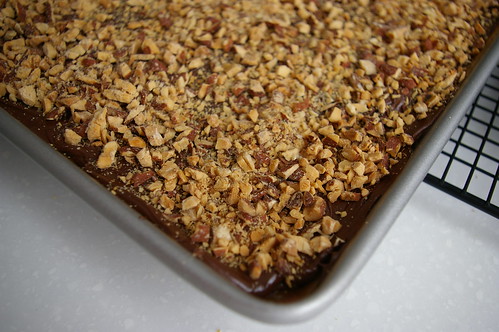
  • 3 cups roasted, unsalted almonds crushed

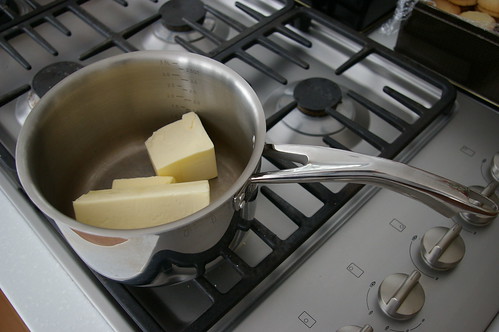
In a heavy bottom stock pot, start to melt the butter, adding the sugar after it has started to melt. Stir to emulsify the mixture, then add the candy thermometer, making sure there is enough of a gap between it and the bottom of the pot. (A wooden spoon should just be able to sweep underneath it.) Keep stirring the mixture. As it gets hotter, the mixture will thicken and start to darken. Keep cooking until the mixture reaches 294 degrees F. Caution, the temperature will climb quickly through the final 20 degrees.

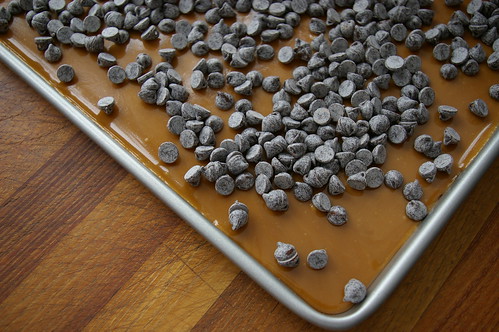
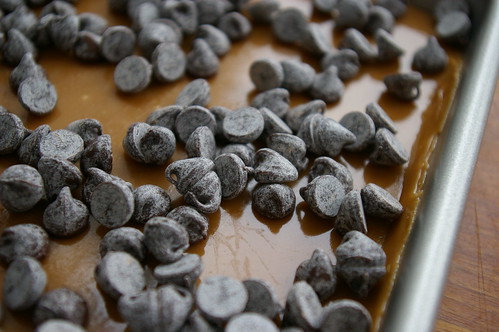
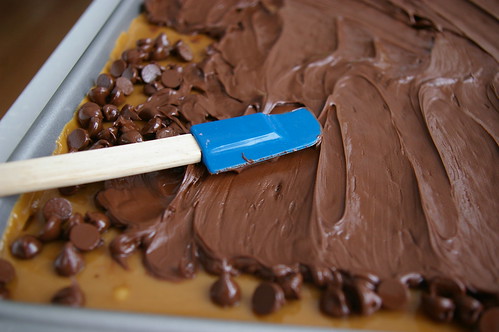
Let the mixture cool slightly and then pour into a 13×18″ pan. Let cool for about 10 minutes, then sprinkle on the chocolate chips. The heat of the toffee should be enough to melt the chocolate. It didn’t for us, so we threw it in the oven (warm from roasting the almonds) for a minute or two until it was spreadable and then used a spatula to get the chocolate covering the toffee.

Sprinkle on chopped nuts and press into chocolate.

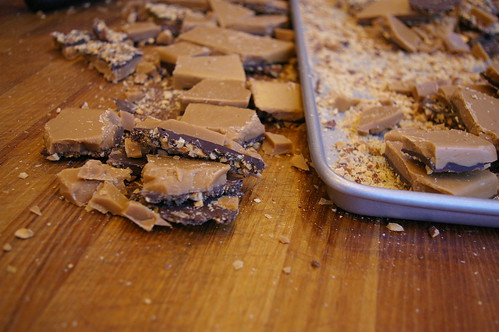
After it has cooled to room temperature, put another pan of the same size over the toffee and invert. It should pop right out.

We used a meat mallet to break it into manageable pieces.

Continue Reading

Risotto with Roasted Butternut Squash

Last week I worked a couple of night shifts.

I used to have a position where I worked nights for a month at a time, every three months. That was too much for me. Over the course of the weeks, I’d start to feel more and more ghost-like, spending my days alone and my nights with only a handful of colleagues; the final hour I was pretty much alone and I would slink out into the dark night, drive home and stay awake until three in the morning before finally crawling into bed.

But I don’t mind the odd night shift, actually. Sleeping in? A sunny day to one’s self? A few hours to bake and cook and photograph and eat? Sounds good to me. (Especially in these days of waning winter light, when full sun has been minimized to just a few short hours in the early afternoon.)

Plus, who doesn’t love the idea of waking up and having Risotto with Roasted Butternut Squash for breakfast?

Risotto with Roasted Butternut Squash

That morning, searching around for something to eat, I realized I had better use up some butternut squash that was otherwise going to have to be imminently pitched. Roasting it was the only reasonable answer. And, as I dumped the cubes into a roasting dish and drizzled it with olive oil and sprinkled on salt and pepper, I remembered a Barefoot Contessa recipe for a risotto with roasted squash.

In pulling out my recipe book, however, I realized I was missing some key ingredients, including shallots and pancetta. I’m sure these things make her version even better, but this bastardized version made me swoon when I sat down less than an hour later with a big bowlful and the contented feeling that comes from hot food and knowing work is still hours away.

Luckily, I did have a small box of saffron — another of my myriad food impulse purchases that had not been cracked open. Saffron, those delicate threads, so scarlet, so fragile. I remember growing up, seeing the same type of small, clear plastic box in my mum’s cupboards. But I have no recollection of her ever using it. The red threads impart a lovely orange-yellow colour to the risotto and also their own flavour, which I can’t really attempt to explain. Still, while I made this with saffron, if you don’t have it, I wouldn’t panic.

This made enough to feed two adults generously, likely four as a side dish. Or, one of me over the course of several meals.

Roasted butternut squash

Saffron

Getting the risotto started

Final steps

Risotto with Roasted Butternut Squash

  • 1 small butternut squash (1 pound)
  • 2 tablespoons olive oil, divided
  • salt and pepper
  • 1/2 onion, diced
  • 3/4 cup arborio rice
  • pinch saffron (optional)
  • 1/2 cup white wine
  • 3 cups chicken stock
  • 2 tablespoons butter
  • 1/2 cup freshly grated parmesan

Preheat oven to 400. Peel the butternut squash, halve it and remove seeds. Cut into 3/4″ cubes. Place squash in roasting dish or on sheet pan, toss with olive oil, 1 teaspoon salt and 1/2 teaspoon pepper. Roast until tender and golden in spots, about 25 minutes. Toss once to ensure even roasting.Meanwhile, heat the chicken stock in a small covered saucepan. Leave it on low heat to simmer.

In saucepan, heat 1 tablespoon olive oil, add diced onion and saute until translucent. Put chicken stock in microwave safe bowl or measuring cup and heat. (Time will vary on the microwave; start with two minutes. This can also be done by warming the stock on the stove, but I find the microwave system saves me another pot to wash. If the stock cools too much, just microwave it again.)

Add rice to onion and oil mixture and stir until the grains are coated. Add the wine and let it reduce slightly. Add one cup of stock, along with the saffron, if using. Simmer, stirring occasionally, until the stock is absorbed — about five to 10 minutes. When the stock is almost gone, add the next cup. Repeat with the last cup of stock. When the liquid is all absorbed, remove pot from heat, stir in butter and cheese. Toss in roasted squash. Add salt and fresh pepper to taste.

Continue Reading