Teriyaki Trout and Quick Japanese Pickles

When I’m nostalgic for Japan, there is one recipe I pull out.

Though, oddly, I didn’t find it in Japan nor use it when I was there.

Instead, this recipe for Teriyaki Trout was one I inherited from my family, who has been cooking it for years.

Teriyaki trout with quick pickles IV

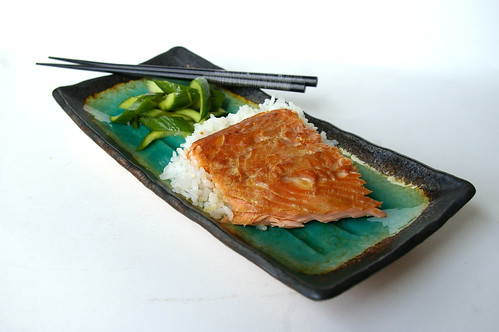
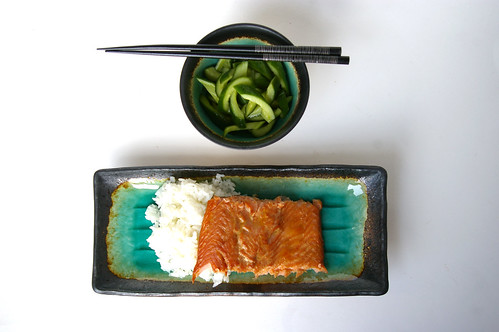
Although only really a nod to a traditional teriyaki, it is my fallback recipe when I’m longing for the Land of the Rising Sun. There, I often made an authentic teriyaki salmon that I would serve with steamed rice and a selection of tsukemono (pickles).

But this tastes just as good and the ingredients are readily available, unlike the two types of soy and mirin that usually went into my marinade when I was overseas. (These can, of course, be found at Asian grocery stores, but this recipe is built on ingredients most people have readily available in their cupboards: soy, sugar and sherry.)

This is not the thick gloppy sauce you find on supermarket shelves. This is a thin marinade that infuses the fish with that salty-sweet teriyaki flavour.

A few cloves of smashed garlic perfume the marinade without overpowering the flavours. (And, bonus, they are easy to fish out when it’s time for the trout to go in the oven.)

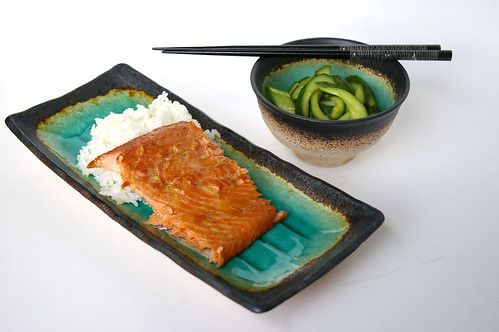
In the beginning, my parents made this with salmon, as the original recipe calls for, but when the price of that got too dear, they started using steelhead trout. Now that’s what I grab as well.

Teriyaki trout with quick pickles II

My version is a photocopy of the original, with no notation of where it came from. Even the amount of fish called for is absent from the recipe.

But I’ve found the marinade is enough for about two pounds of fish. I prefer to do whole sides rather than individual fillets or steaks, though please use what you want.

Since it’s usually only me dining, I often make the full batch of marinade and divide it between two pieces of fish, throwing one into the freezer for dinner at a later date. I’ll pull it out in the morning and let it sit in the fridge. As it thaws, it continues to infuse the teriyaki flavour into the fish and by the time I get home from work, it’s ready to cook, which, some nights, is exactly the kind of meal I like to have around.

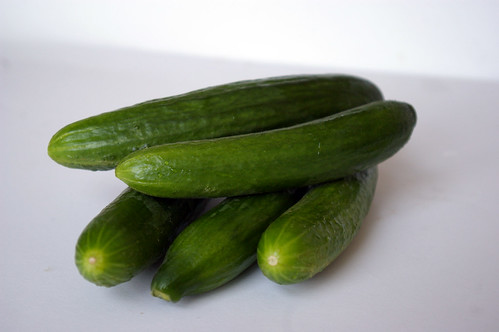
When I’m a little homesick for the rice paddies and stunted hills of the small town in Japan where I lived, I make this dish, serving it with rice and some steamed green vegetables. Sometimes, when I’m really feeling nostalgic, I also make quick pickles -thin slices of de-seeded cucumbers left to sit in a bath of rice vinegar, sugar and salt.

The tangy flavour is a nice balance to the rich fish.

Cucumbers

Sliced Cucumbers

Teriyaki trout with quick pickles

Teriyaki Trout

  • 2 pounds (1 kg) steelhead trout, side or steaks
  • 1 cup (250 mL) soy sauce
  • 1/4 cup (50 mL) sherry (drinking, not cooking)
  • 2 tablespoons (25 mL) sugar
  • 3 cloves garlic, crushed
  • 2 tablespoons (25 mL) grated ginger or ginger paste

Combine the soy, sherry, sugar, garlic and ginger in a bag or flat dish. Add the trout. Let marinate for at least 30 minutes or up to overnight.

Preheat oven to 450°F (230°C). Place fish in a casserole dish (if using steaks, grease the dish slightly so they can be easily removed) and bake until fish is cooked and flakes easily, about 12 to 20 minutes depending on the thickness of the fish.

Quick Japanese Pickles

The amount of salt and sugar can be easily adjusted for taste. I use Maldon flaked sea salt, which has a milder flavour. Sea salt can be easily substituted, but start with just 1 tsp (5 mL) and add more only if needed. The rice vinegar should be unseasoned.

  • 1 English cucumber (or 3-4 small cucumbers)
  • 1/2 cup (125 mL) rice vinegar
  • 1 tablespoon (15 mL) sugar
  • 1½ teaspoons (7 mL) flaked sea salt
  • 2 tablespoons (25 mL) water

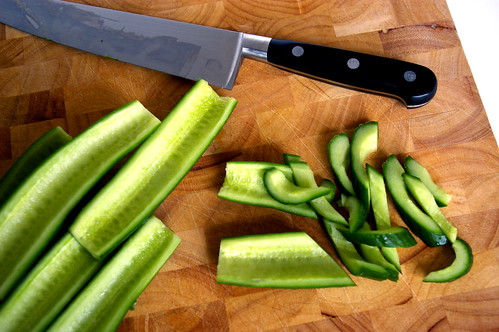
Slice cucumbers in half and use a small spoon to scrape out seeds. Slice on a diagonal into ½-cm half-moons. Stir together vinegar, sugar, salt and water and mix until salt and sugar have dissolved. Add cucumber slices, tossing them with brine. Let rest in the fridge for at least an hour, tossing occasionally.

This originally ran in the Calgary Herald. For more recipes and food stories, head to the Calgary Herald’s Food page.

Continue Reading

Beef Bulgogi

I had never tried Korean food before I moved to Calgary.

There had been Thai and Vietnamese, Japanese and Chinese, of course. But in all my opportunities to eat Asian food, there had been no kimchee or bulgogi.

Beef Bulgogi II

And then a group of friends formed an ad hoc supper club where we would all go out for dinner on Thursday nights, typically for ethnic foods.

We dined on Indian and pho and then, finally, a Korean place where I had my first taste of beef bulgogi.

I didn’t know what to expect, but was in beef heaven by the time I took that first bite. The marinated short rib meat was almost as soft as butter, flavoured with ginger, garlic, soy and sesame. I wedged it into crisp, cold lettuce leaves and savoured each bite. (Or as much as I could, as it was so fantastic it was hard to remember to eat slowly.)

I went back a couple of months later and there was only one thing on the menu I wanted.

Later, I stumbled on a recipe in my oft-thumbed Everyday Food cookbook (Clarkson Potter, March 2007) for a version of beef bulgogi. Instead of the more traditional Korean short ribs, it called for thinly sliced rib-eye and it required no ingredients more exotic than sesame and chili oils and some staples found in most kitchens: brown sugar, soy, ginger, garlic.

Craving the taste again of that distinct mix of salty soy, garlic and the hint of sweet from the brown sugar, I thought it was worth a try.

The book now cracks open to that page, left slightly spattered by being set too close to the fry pan when cooking — the sign of a successful recipe.

At home, the first time I tried this out, I couldn’t be bothered with the lettuce wraps; it seemed too fussy for eating in front of the TV. So, I just put a couple of scoops of it on cooked rice and ate it with chopsticks. The rice soaked up the extra sauce, making for a very satisfying and flavourful meal. (And the leftovers were a nice lunch at work the next day.)

But I also like the idea of rolling up the beef and onions and peppers in soft butter lettuce, so this time around I did exactly that.

Beef Bulgogi I

The leaves of butter lettuce (or Boston lettuce, as it is also known) are tender and pliable, making them a perfect container for the bulgogi mixture. The thin leaves also don’t interfere with the flavours and softness of the meat.

Either way, it’s a delicious and fast way to taste Korea.

And one I’ll come back to again and again.

Beef Bulgogi III

Beef Bulgogi

This recipe from Everyday Food calls for hot chili sesame oil, which I have never found in my grocery store travels. Instead, I use half sesame oil and half chili oil. In a pinch, you can use all sesame oil and a dash of red pepper flakes.

  • 1½lbs (750g) rib-eye steak, trimmed of excess fat
  • 1/4 cup (50 mL) soy sauce
  • 1½ tsp (7 mL) sesame oil
  • 1½ tsp (7 mL) chili oil
  • 2 tbsp (25 mL) dark brown sugar
  • 6 garlic cloves, minced
  • 1 tbsp (15 mL) finely grated, peeled fresh ginger
  • 2 medium red onions, halved and cut lengthwise into 1-inch (2.5-cm) wedges
  • 1 green bell pepper, seeds and ribs removed, sliced into ½-inch (1-cm) strips
  • 4 tsp (20 mL) vegetable oil, divided
  • 1 small head Boston (also known as butter) lettuce

Freeze the beef for 20 minutes; transfer to a clean work surface. Slice diagonally (across the grain) into 1/8-inch (3-mm) thick strips.

In a small bowl, whisk together the soy sauce, sesame and chili oils, brown sugar, garlic and ginger. Place the onions and peppers in a small bowl; toss with half the soy marinade. Toss the steak in the remaining marinade; let stand for 15 minutes

Heat 2 tsp (10 mL) of the vegetable oil in a large non-stick skillet over medium-high heat. Add the onions and peppers; cook until softened, about 5 minutes. Transfer to a plate. Wipe the skillet clean with a paper towel.

Heat the remaining 2 tsp (10 mL) vegetable oil over high heat. Cook half the meat, turning often, until browned, about 2 minutes. Transfer to a plate. Cook the remaining meat. Return the first batch and any accumulated juices to the pan; add the onion mixture. Cook, tossing, until heated through, about 1 minute.

To serve, roll up the beef mixture in lettuce leaves.

Serves 4.

This first ran in the Calgary Herald. For more recipes and food stories, check out www.CalgaryHerald.com/life.

Continue Reading

Sautéed Chard over Polenta with Fried Eggs

I came into a plethora of eggs over the weekend.

Farm fresh eggs

I was at work on Sunday when a colleague came up to me.

Him: You like X, right?

Me: Oh yes, that’s how I get through the day sometimes. (In my best, most sarcastic and slightly confused voice.)

Him: Uh, OK. Well, I have some and I wondered if you wanted to buy some.

Pause.

Me: Wait, did you say eggs?

Him: What did you think I said?

Me: Um…..

Anyway, he had a few dozen from this totally organic, self-sustaining farm outside of Calgary called Thompson Small Farm. I’ve been searching for really good eggs since I moved here from Vancouver. I’ve found the ones here, even from area farms, to be pretty anemic looking and I’ve craved those with those golden-orange yolks that are so beautiful. So, the thought of finding those was enough to tempt me to buy two dozen. Plus, well, he said one of them was blue-green and that was just a bonus.

So, for the next two days I dreamed up things to make with these pretty eggs in their multicoloured shells. And I realized I wanted to do something that would really showcase the egg itself. Somewhere in my food-related Internet travels, I came across a post where someone had topped polenta with cooked greens and a poached egg. Since I have come to love chard mostly owing to this, I thought it would be cool to do a riff on that idea.

Polenta and chard with egg

For the most part, I made this up as I went along, taking inspiration from the chickpeas and chard entry. But I did a lot of research on poaching eggs (vinegar, no vinegar, swirl, boiling water, stainless steel etc. Who knew there were so many variations?), so that I would be fully prepared when it came time to make them. On the drive home, though, I realized I just wanted to do something fast and, in all honesty, I really didn’t want to dirty another dish. I figured frying the egg in the pan where I had just sautéed the chard would add even more flavour.

I have about three different grinds of cornmeal as I keep thinking I have the wrong one for polenta. In the end, I used the instant stuff. What? It was in my cupboard already and I’m desperately trying to clear space. Plus, that stuff is INSTANT and that makes for a very, very quick dinner. I followed the instructions and then just doctored it up with a bit of cream (er, yes, well, it was already in the fridge . . . .) and some butter and a nice pinch of flaked salt.

This was quick, easy and delicious. I loved the soft polenta, garlicky chard and the ever-so-slightly oozing egg yolk all combined into one. Maybe next time I will try poaching the eggs, but, in a pinch, this was just fine.

Chard

Egg

Blue eggshell

Chopped chard stems

Polenta and chard with egg II

I’d call these more guidelines than a recipe, so adjust as you see fit.

Sautéed Chard over Polenta with Fried Eggs

  • 1 bunch chard
  • 2 cloves garlic, minced
  • 1 tablespoon olive oil
  • 1/4 cup white wine (or water or chicken stock)
  • 2 eggs
  • butter
  • cooked polenta
  • salt and pepper to taste

Cook polenta according to directions, adding some butter/cream/salt/pepper/cheese or whatever else you desire.

Remove the stems from the chard, then dice finely. Chop leaves into thin strips and set aside. In a large frying pan, heat up olive oil over medium heat. Add stems and a pinch of salt. Saute until they start to soften, about five minutes. Add the garlic and cook for about a minute, until it gets fragrant. Add wine (or water or chicken stock) and then the strips of chard leaves. Stir, then top with a lid and cook for about five minutes until the leaves are wilted. Scrape out pan and add a small knob of butter to melt. When bubbling add eggs and fry to desired doneness.

Dollop polenta onto plate, top with chard and fried egg.

Continue Reading