No-knead Pumpkin Cinnamon Rolls

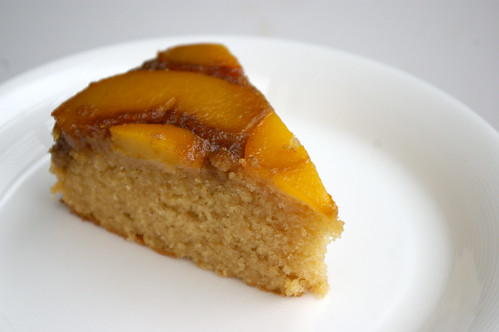
Last day of October and I’ve got a pumpkin recipe in just under the wire.

Though, truth be told, I made these a couple of weeks ago and took them in to the newsroom for election night, hoping the sugar rush would keep us all going through the tight deadlines and late night. With so many people voting and such a crazy race right up until the end, most of us stayed later than we ever have for an election. I can’t remember ever covering one as interesting and found myself watching the results roll in live as if it was some sort of TV show.

Anyway, back to the rolls.

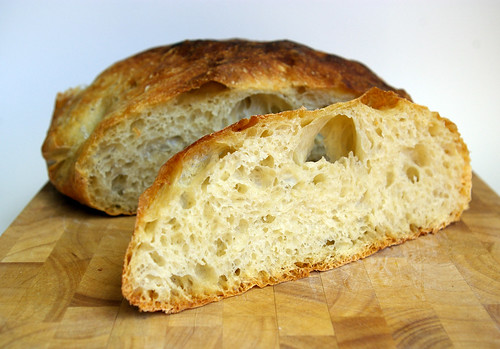
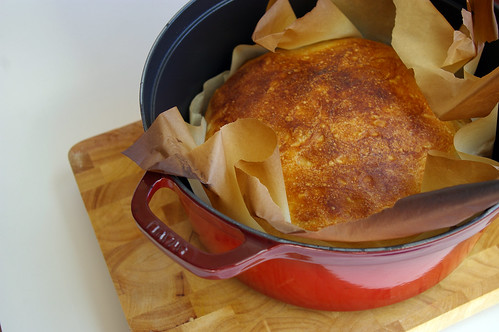
They’re no-knead. Sensing a theme here? First no-knead pizza dough (if you haven’t tried this, please bookmark it, so very worth it) and then no-knead bread and now no-knead cinnamon rolls. God only knows what will be next, but I am loving this trend.

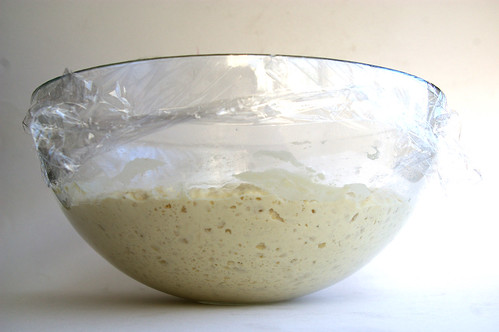
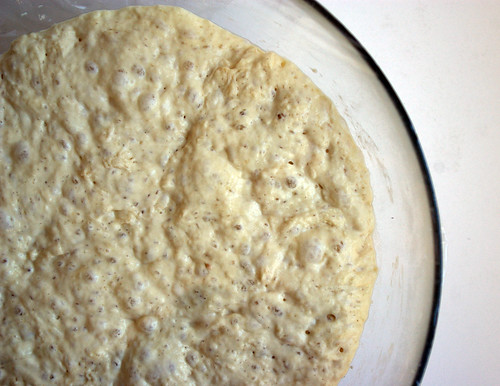
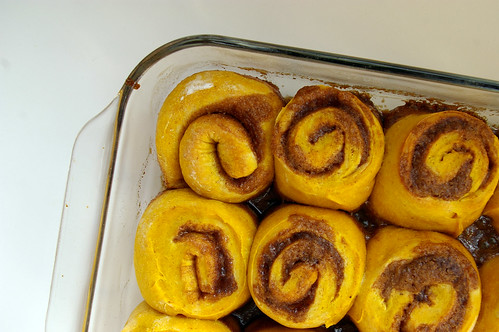
Once again, it takes some planning since it takes more time for these to rise. The recipe suggests, though, you can let them rise then refrigerate overnight and continue the next day, which is exactly what I did and it worked like a charm. Sure, there were some paranoid moments, like when I cut them into slices and let them rise in the pan prior to baking but couldn’t discern they actually rose a second time. I didn’t have much hope when I put them into the hot oven, but they came out all fat and puffy, shouldering each other in neat little rows.

I gave two to some friend who had popped by with her new baby since she was in the ‘hood and she texted me seemingly minutes after leaving to say she had eaten them both already and was tempted to lick the plastic wrap. That, my friends, is a pretty good endorsement.

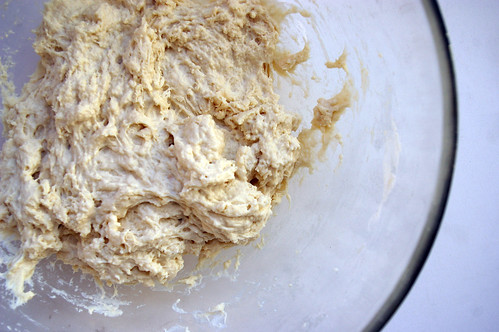
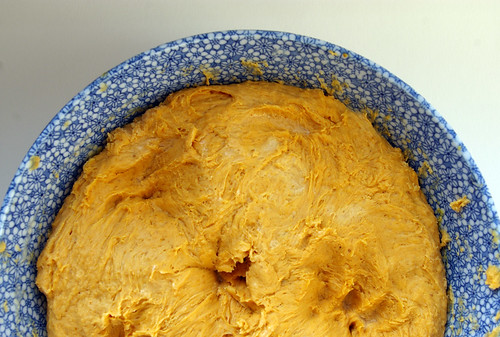
The dough is beyond sticky and please learn from my misstep by using a really big bowl. I had a difficult time incorporating all the flour in my small-ish bowl (which felt big before I combined the wet and dry ingredients) and eventually had to dive in with my hands. Let me repeat: beyond sticky. (But, you know, kind of fun at the same time.)

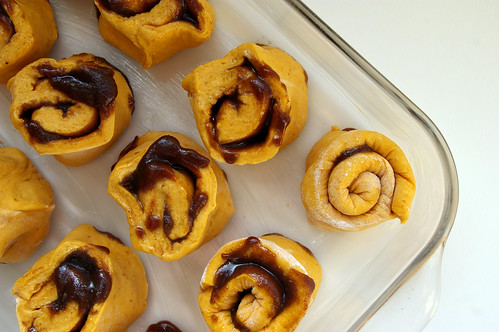
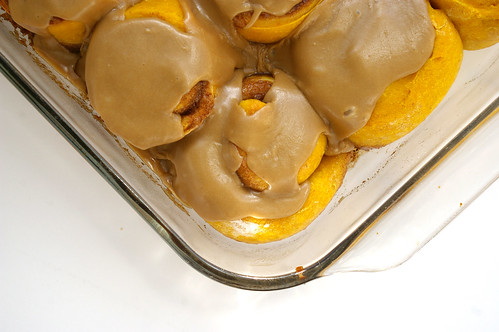
But beyond that, it was pretty easy to work with once it came time roll out and, uh, roll up again. Some of my filling leaked out the edges. Obviously, I’m no expert at cinnamon rolls. But I’ll take ugly and tasty any day. And man are these tasty. I mean, really, how can you go wrong? pumpkin, cinnamon, brown sugar, butter, glaze? Yeah, it’s all good.

So, this is kind of short and sweet but if I don’t post this soon, I’m going to miss my Oct. 31 deadline.

In short: these are good, pumpkin-y and easy. Enjoy.

No-knead pumpkin dough

Misshapen rolls

Pumpkin cinnamon rolls

Glaze

Glazed pumpkin cinnamon rolls

This comes from the folks over at the Kitchn, like quite a few recipes I’ve posted here. It’s almost to the point where I’m wondering if I need to create a tag for them . . . .

The only change I made was I omitted the pecans. I’ve got nothing against them but was just too lazy to get them out of the freezer, toast and chop them. Oh, and I didn’t use as much milk in the glaze which is why, I’m pretty sure, it’s so much thicker. Not that anyone was complaining.

No-Knead Pumpkin Rolls with Brown Sugar Glaze
Makes 16-18 rolls

For the dough:

  • 1/4 cup water
  • 1 scant tablespoon yeast (1 package)
  • 1 cup milk
  • 1/2 cup butter
  • 1/2 cup sugar
  • 1 15-ounce can pumpkin puree
  • 1 1/2 teaspoons kosher salt
  • 5 1/2 cups all-purpose flour

For the filling:

  • 1/2 cup butter
  • 1 cup packed brown sugar
  • 2 teaspoons cinnamon
  • 1/2 teaspoon ginger
  • 1/2 teaspoon nutmeg
  • 2 cups pecans – toasted, chopped, and divided in half (optional)

For the glaze:

  • 1/4 cup butter
  • 1/2 cup milk
  • 1 cup brown sugar
  • pinch salt
  • 2 1/2 cups powdered sugar

Sprinkle the yeast over the water and let it sit a few minutes until the yeast is dissolved.

Meanwhile, warm the milk and butter in a small saucepan on the stove top until the butter is melted. Combine this with the sugar in a large heat-proof mixing bowl and stir until the sugar is completely dissolved.

Let the milk mixture cool until it is just warm to the touch – NOT HOT. Then stir in the yeast and the pumpkin. Add the salt and five cups of the flour all at once, stirring until all the flour has been absorbed. Squish it between your hands if you’re having trouble incorporating the last of the flour. The dough will be sticky, but should come together in a shaggy ball. If it’s still more the consistency of cookie batter, work in an additional 1/2 cup of flower.

Cover the dough and let it rise for 1-3 hours. During this time, it should double in bulk. At this point, you can punch the dough down and refrigerate it overnight or continue shaping the rolls.

To shape the rolls (either immediately or with the refrigerated dough), sprinkle your work surface with a little flour and dump the dough on top. Pat it down into a rough rectangle and then use a floured rolling pin to roll it into a rectangular shape about a half an inch thick, longer than it is wide. If the dough gets sticky, sprinkle a little more flour on the dough’s surface and on your hands.

Melt the butter in the microwave and stir in the brown sugar and the spices. Spread this over the rectangle of dough, leaving an inch of bare dough at the top. Sprinkle one cup of the toasted pecans over the dough, if using. Starting at the edge closest to you, roll the dough into a cylinder and pinch it closed at the top.

Rub a tablespoon of soft butter into the bottom of two 9×13 baking dishes, two 9-inch cake pans, or a combination. Using a bench cutter or a sharp knife, cut the cylinder into individual rolls 1 – 1 1/2 inches thick. Place them into your baking dishes so they have a little wiggle room on all sides to rise. Cover them with a clean kitchen towel and let them rise until they fill the pan and look puffy, 30 minutes for already-warm dough and 1 hour for dough that’s been refrigerated.

About 20 minutes before baking, begin heating the oven to 375°. When the rolls are ready, bake them for 20-25 minutes, until the tops are golden and starting to look toasted around the edges. Rotate the pans halfway through cooking.

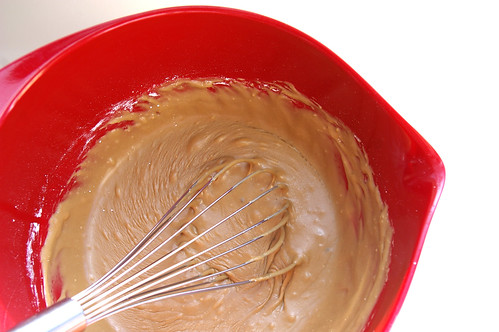
While they are baking, prepare the glaze. In a small saucepan over medium heat, combine the milk and butter. When the butter has melted, add the brown sugar and salt. Stir until the brown sugar has melted. Remove from heat and strain into a mixing bowl to remove any sugar clumps. Stir in the powdered sugar. This should form a thick but pourable glaze.

Let the baked rolls cool for about five minutes and then pour the glaze on top. Sprinkle the remaining cup of pecans over the top, if more nuttiness is desired. Eat them immediately. Leftovers will keep for several days and are best reheated for a minute in the microwave.

Continue Reading

No-knead bread

Little side note: Patent and the Pantry now has a page on Facebook. Come say hello and join in the discussion. Find it here.)

And now, on with the baking!

No one would ever call me trendy.

I’m not on top of the latest fashions, my music tastes are more eclectic than current and I’d label my style retro rather than cutting edge.

So, when food trends begin taking over the Internet, appearing on blogs and in newspaper articles alike, I don’t exactly jump on board. Macarons? Those look a bit tricky, I say. Whoopie Pies? Not sure what the allure is there. No-knead bread? Looks complicated.

No-knead bread was everywhere about four years ago, shortly after the New York Times’ Mark Bittman wrote a piece about Jim Lahey and his revolutionary recipe for a crusty loaf of bread that required very little effort, only advance planning. Soon bloggers were extolling the virtues of this bread and posts abounded with photos of the round boule with its dark gold crust and large-holed interior.

Bread slice I

My parents jumped on the bandwagon and in the intervening years have abandoned their bread maker in favour of no-knead bread, making a loaf seemingly every other day.

So, on a recent visit with them, I was finally able to taste what all the fuss was about.

It’s no surprise everyone’s been raving.

Bread II

This bread has a crisp crust, but the interior — riddled with the large air bubbles that come from the long fermentation — is all soft chew. It tastes like bread should.

And it makes amazing toast.

But even with all those points, I still resisted for another year before finally deciding it was time to see if I could do it, too.

(I will readily admit here that part of that hesitation stemmed from the inevitable danger that comes from a carboholic realizing she can have access to fresh, homemade bread at will.)

In my glass bowl, I mixed the flour, salt, instant yeast and cool water. I stirred it into a sticky, shaggy mess, covered it with plastic wrap and left it alone for 18 hours. The next day (the most reasonable way to make this bread, I figure, is to let it rise overnight), the dough had tripled in size and was dotted with hundreds of tiny bubbles.

It smelled of yeast and good things to come.

The only time I deviated from the recipe was when Lahey called for a second rise on a clean kitchen towel using wheat bran or additional flour to keep it from sticking, which is then used to dump the dough into a preheated cast iron or enamel pot. Instead, I let it rise again on a piece of parchment. When it came time to get the dough into the cooking vessel, it was just a matter of picking up the four corners of the paper and plopping it in the pot, greatly lessening any chances of getting burned.

When it came out of the oven, and I lifted it out of the pot using two wooden spoons, I was excited. It looked and smelled like a perfect round loaf.

And that first slice was perfection, topped only with a thin smear of real butter.

Besides the undeniable beauty of eating a slice of bread still slightly warm from the oven (although Lahey calls for it to rest for at least an hour before cutting into it, it is often hard to resist waiting the entire 60 minutes), there is something so satisfying about baking a loaf of bread on your own.

So — I may be behind the times in finally trying it, but this bread is no passing fad.

(This is a Danish Dough Whisk — a tool that is great for mixing dough.)
Danish Dough Whisk

One gram over

Sticky dough

Risen

Risen from the top

Bread

Bread III

Bread slice II

The recipe is Lahey’s own, but I have adapted it to use parchment paper for the second rise. I also found the cooking time too long, so when I bake this bread I cut it down by about 10 minutes.

(The cooking times here are as Lahey suggests.)

Basic No-Knead Bread

Adapted slightly from Jim Lahey’s My Bread (W. W. Norton & Company, 2009, $37.50)

  • 3 cups (750 mL) bread flour
  • 1¼ tsp (6 mL) table salt
  • ¼ tsp (1 mL) instant yeast
  • 1 ¹/³ cups (325 mL) cool water, at 55°F to 65°F (12°C to 18°C)

In a medium bowl, stir together the flour, salt and yeast. Add the water and, using a wooden spoon or your hand, mix until you have a wet, sticky dough, about 30 seconds. Make sure it’s really sticky to the touch; if it’s not, mix in another tablespoon or two of water.

(Note: I’ve had to use more water almost every time. I suspect it’s because Calgary is so dry.)

Cover the bowl with a plate, tea towel or plastic wrap and let sit at room temperature (about 72°F/22°C), out of direct sunlight, until the surface is dotted with bubbles and the dough is more than double in size.

This will take a minimum of 12 hours and (Lahey’s preference) up to 18 hours. This slow rise -fermentation -is the key to flavour.

When the first fermentation is complete, generously dust a work surface (a wooden or plastic cutting board is fine) with flour. Use a bowl scraper or rubber spatula to scrape the dough on the board in one piece.

When you begin to pull the dough away from the bowl it will cling in long, thin strands (this is the developed gluten), and it will be quite loose and sticky, but do not add more flour.

Use lightly floured hands, a bowl scraper or spatula to lift the edges of the dough toward the centre. Nudge and tuck in the edges of the dough to make it round.

Place on a piece of parchment paper, seam side down. Cover with a clean towel and place in a warm, draft-free spot to rise for 1 to 2 hours. The dough is ready when it is almost doubled in size.

Half an hour before the end of the second rise, preheat the oven to 475°F (240°C), with a rack in the lower-third position and place a covered 4½ to 5½ quart (4¼ to 5 L) heavy pot in the centre of the rack.

Using pot holders, carefully remove the preheated pot from the oven and uncover it. Gather up the dough by holding the four corners of the parchment paper and place the entire thing, paper and all, into the pot.

Cover the pot and bake for 30 minutes.

Remove the lid and continue baking until the bread is a deep chestnut colour, but not burned, 15 to 30 minutes more.

Use a heatproof spatula or pot holders to carefully lift the bread out of the pot and place it on a rack to cool thoroughly. Don’t slice or tear into it until it has cooled, which usually takes at least an hour.

Makes one large loaf.

This article first appeared in the Calgary Herald’s Real Life section. For more delicious recipes, visit CalgaryHerald.com/life.

Continue Reading

Fruit Cobbler Cake

Look! It’s more peach-related baking.

Actually, that’s not entirely true. I only had one peach by the time I finally got around to this cake from Julie over at Dinner with Julie, so I had to get a little creative with the other fruit I had bought from the Farmer’s Market the weekend before, adding a nectarine and some blackberries to the mix.

(And I feel a little bit badly posting this since peach season is just about over for the year. Sorry!)

Julie’s version used rhubarb (and I kind of wish I had thought of this recipe when that fruit was still available. Must keep in mind for next year), but pretty much any fruit will work. The only adjustment that needs to be made is to the amount of sugar you sprinkle on over top. Rhubarb, with it’s tart flavour, needs more sugar. These needed barely any. And in an effort to get creative, I actually used large-grained raw sugar, which probably gave it a much more caramel-like flavour on top.

As you can see in the photo, it, uh, caramelized the edges of the cake. Actually, truth be told, I was freaking out the whole thing was going to burn before the centre was finally cooked. But people seemed to like it quite a bit (favouring the edges where it hit more of the batter and less of the fruit), but next time I’d like to try it with straight-up sugar to see what kind of difference it makes.

I liked the idea of this cake, the way it bakes up around the fruit, enveloping it even. And it didn’t disappoint.

Peaches and Nectarines

Scattered Fruit

Fruit Cobbler Cake

Fruit Cobbler Cake Slice

It’s definitely one to keep in mind when next summer gets going or, even better, when you are craving a taste of summer and the fruit isn’t exactly ripe and delicious enough to eat on its own. Baking it into this cake will elevate it, I swear.

This recipe, like so many good ones, comes from Julie over at Dinner with Julie. (And hey, while you’re over there, check out her peach bran muffins recipe, which I also made and was fabulous.)

Fruit Cobbler Cake

  • 1/2 cup butter, at room temperature
  • 1 1/2 cup sugar
  • 4 large eggs
  • 1 teaspoon vanilla
  • 2 cups all-purpose flour
  • 2 teaspoon baking powder
  • pinch salt
  • 2 – 4 cups assorted fruit (rhubarb, strawberries, peaches, plums, nectarines, blackberries etc. I used a peach, a nectarine and a scattering of blackberries in my version)
  • 1/8 to 1/2 cup sugar (depending on the tartness of the fruit; rhubarb, for example, would need a greater amount of sugar)

Preheat the oven to 350F.

In a large bowl, beat together the butter and sugar until well combined and starting to get fluffly. Add the eggs one at a time, beating after each, then beat in the vanilla.

Add the flour, baking powder and salt and stir by hand or beat on low speed just until combined; the batter will be thick. Spread into a 9″x13″ pan that has been sprayed with nonstick spray, and scatter the fruit over top. Sprinkle with sugar and bake for 45-50 minutes, until the cake is golden and the cakey parts springy to the touch.

Makes one large cake.

Continue Reading

Peach Upside Down Cake

In a rash move, I bought a whole bunch of peaches a couple of weeks ago. And then, when those had run out, I bought some more. Some of you may have already enjoyed the Peach, Prosciutto, Rosemary and Goat Cheese flatbread, which resulted from this sudden and inexplicable need to purchase peaches. But, wait, there’s more! Since it became clear I was going to need to bake with some of them, as they all began to ripen at once, I became fascinated by the idea of making a Peach Upside Down Cake.

I never really understood the love affair with pineapple upside down cakes (maybe it’s my aversion to maraschino cherries), but I do like the idea of fruit getting baked into the bottom of a cake and then being turned out so it becomes the decorative topping. They’re just so darn pretty.

Peaches on the bottom

Peach Upside Down Cake

Now would be a good time to praise my digital kitchen scale because, well, this recipe is almost completely in weights, with the exception of the eggs and vanilla.

That said, I absolutely do love my digital kitchen scale, which was a gift from my mum one Christmas. It is, by far, one of the most used gadgets in my kitchen. It’s super handy for measuring butter (since I always have to cut mine to measure because we don’t have “sticks” of butter up here and it gets tricky sometimes trying to carve off the appropriate amount from the blocks we have up here) and I now use it exclusively when making no-knead bread (post coming soon) because I can just tare it off before adding the next ingredient. And, of course, a lot of European recipes only use weights, which makes the scale essential.

I don’t usually encourage people to purchase additional things for the kitchen (cough, cough, except for the clearly essential rasp, which I have talked often about; mine is from Lee Valley Tools), but I do believe this is a useful tool. Ok, moving on.

This cake was seriously delicious and oh-so-pretty. The brown sugar and butter-topping created a moist, topping and the peaches were perfect. The cake was relatively light and nicely spiced, so the perfect complement to the rich topping and cooked fruit.

And, perhaps more importantly, it was really quiet easy. But the gorgeous presentation doesn’t suggest that at all, making it an ideal cake for sharing with friends. (Which I did!)

Peaches on the bottom - closer

Peach Upside Down Cake II

Peach Upside Down Cake III

Peach Upside Down Cake slicef

I have no idea how I stumbled on to this recipe, but it came from Kerrisdale Design Inc.

Peach Upside Down Cake

  • 3 ounces brown sugar
  • 4 tablespoons unsalted butter
  • 2 peaches, peeled and cut into 1/2″ slices
  • 6 ounces unsalted butter
  • 3.5 ounces brown sugar
  • 3.5 ounces white sugar
  • 2 teaspoons vanilla
  • 2 eggs
  • 6.5 ounces all-purpose flour
  • 1/2 teaspoon cinnamon
  • 1/4 ounce baking powder
  • 1/4 teaspoon salt
  • 7.5 ounces buttermilk

Heat the oven to 350 F and spray an 8-inch cake pan with non-stick spray. In the microwave or in a small pot on the stove, melt together the butter with brown sugar, mixing well. Pour the butter mixture into the prepared pan and layer the sliced peaches on top. Set aside.

In a medium bowl, cream the butter and sugars until well combined. Add the vanilla and eggs, one at a time, mixing well between additions. In a separate bowl sift the flour, cinnamon, baking powder, and salt.  Add the dry ingredients, alternating with the buttermilk, starting and finishing with the flour. Pour the batter over the peaches and spread to the edges of the pan.

Bake for 40 to 50 minutes, or until the center of the cake springs back when lightly pressed and the edges begin to pull away from the sides of the pan.  Cool for 10 minutes in the pan then turn out onto your serving platter.  Allow to cool for an additional 30 minutes before slicing.

Continue Reading