White Pizzas with Arugula

That’s slush outside right now. Melting snow and ice are forming rivulets that wend their way along curbs, searching out drains, forming murky puddles. Patches of grass left exposed are at last revealed, mats of brown carpeting the landscape.

It’s that shoulder season between winter’s end and the birth of spring when everything is dirt-covered, mottled from months of being hidden under cold and damp and snow.

So, until those pops of green start to stand out in relief against the landscape, until those buds burst out along tree branches and from the once-frozen ground, the next best thing, as far as I’m concerned, is to eat like spring is already here.

It’s time to shed the stews and soups of winter comfort and embrace herbs, baby lettuces, tender chard, pencil-thin stalks of asparagus and peppery arugula.

Well, in my kitchen at least.

Arugula

There was something about this recipe for White Pizzas with Arugula that caught my eye at one point as I flipped through the Barefoot Contessa’s Back to Basics cookbook ages ago.

I like a good traditional pizza. And some of you may remember a version I did last year topped with shaved asparagus.

But this one appealed because I like the idea of garlic and cheese matched with an arugula salad that had been tossed in a lemon vinaigrette. It was like a salad and main dish combined to make something even better.

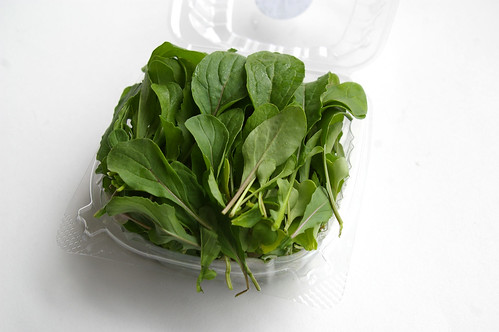
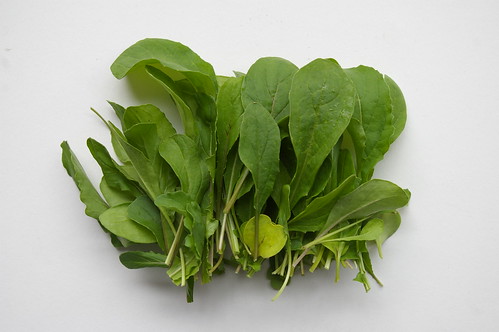
Arugula, which is also known as rocket, has a nice pepper bite to it, owed, apparently, to being a relative to radishes and watercress.

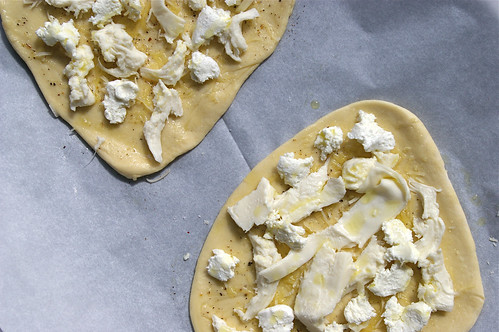
The lemon would add a nice bright kick, but the melted cheeses – Fontina, mozzarella and goat cheese – would lay a decadent foundation on the pizzas.

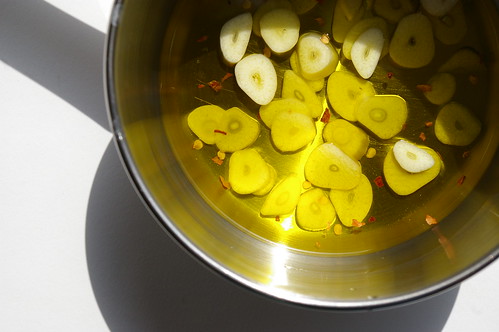
Oh, and garlic-infused olive oil? Well, that would take the whole thing over the edge.

Garlic and oil

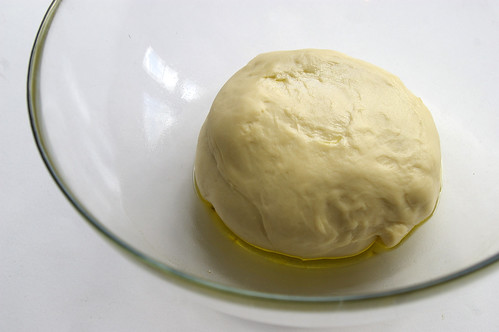
The only thing that could have stood in my way was attempting to knead dough (a task that remains my culinary nemesis for now), but Ina Garten’s recipe calls for pretty much the entire thing to be done in a stand mixer.

Sold.

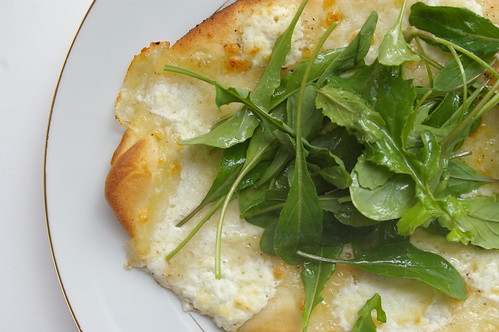
The pizzas are simple to put together and came out of the oven crisp, the cheese just starting to change to a soft golden colour. Topped with the arugula, they’re a food metaphor for the changing season: bright green emerging from white.

And the taste was a marriage between the comfort food of winter and the emerging flavours of spring: the peppery arugula and acidic zing of lemon vinaigrette played well against the rich pizza with its creamy cheeses and garlicky oil.

Don’t be intimidated by the rather lengthy recipe; it’s all pretty straightforward. And the result is worth it. Because even if this isn’t the last we see of winter -and, judging from the last several years here, I suspect it’s not – I can at least taste spring.

Dough ball

White pizzas

Arugula II

White pizza with arugula

White Pizzas with Arugula

This recipe comes from The Barefoot Contessa Back to Basics. To make all at six pizzas at once, you will need three parchment-lined sheet pans. But this recipe is easily halved if you want. She also calls for a few sprigs of thyme to steep in the olive oil with the garlic, but I didn’t have any on hand and I don’t think I missed out by not adding it.

I’ve found arugula at Lina’s Italian Market, at the farmer’s market and sometimes in clamshell-type packages at major grocery stores.

Pizza:

  • 1¼ cups (300 mL) warm water, 100?F to 110?F (38?C to 43?C)
  • 4½ tsp (22 mL) dry yeast
  • 1 tbsp (15 mL) honey
  • olive oil
  • 4 cups (1 L) all-purpose flour, plus extra for kneading
  • salt
  • 4 garlic cloves, sliced
  • 1/4 tsp (1 mL) crushed red pepper flakes
  • freshly ground pepper
  • 3 cups (750 mL) grated Italian Fontina
  • 1½ cups (475 mL) grated fresh mozzarella
  • 11 oz (300 g) creamy goat cheese

Salad:

  • 1/2 cup (125 mL) olive oil
  • 1/4 cup (50 mL) freshly squeezed lemon juice
  • 8 oz (250 g) baby arugula

For the dough, combine the water, yeast, honey and 3 tbsp (50 mL) olive oil in the bowl of an electric mixer fitted with a dough hook. When the yeast is dissolved, add 3 cups (750 mL) flour, then 2 tsp (10 mL) salt, and mix on medium-low speed. While mixing, add up to 1 more cup (250 mL) flour, or just enough to make a soft dough.

Knead the dough for about 10 minutes until smooth, sprinkling it with the flour as necessary to keep it from sticking to the bowl. When the dough is ready, turn it out onto a floured board and knead by hand a dozen times. It should be smooth and elastic. Place the dough in a well-oiled bowl and turn it to cover it lightly with oil.

Cover the bowl with a kitchen towel and allow the dough to rise at room temperature for 30 minutes.

Meanwhile, make the garlic oil. Place ½ cup (125 mL) oil, the garlic and red pepper flakes in a small saucepan and bring to a simmer over low heat. Cook for 10 minutes, making sure the garlic doesn’t burn.

Preheat the oven to 500F (260C). Dump the dough onto a board and divide into 6 equal pieces. Place them on a sheet pan lined with parchment paper and cover them with a damp towel. Allow the dough to rest for 10 minutes. Use immediately, or refrigerate for up to 4 hours.

Press and stretch each ball into an 8-inch (20cm) circle and place 2 circles on each parchment-lined sheet pan. (If you’ve chilled the dough, take it out of the refrigerator approximately 30 minutes ahead to let it come to room temperature.) Brush the pizzas with the garlic oil, and sprinkle each one liberally with salt and pepper.

Sprinkle the pizzas evenly with Fontina, mozzarella and goat cheese. Drizzle each pizza with 1 tbsp (15 mL) more of the garlic oil and bake for 10 to 15 minutes, until the crusts are crisp and the cheeses begin to brown.

Meanwhile, for the vinaigrette, whisk together ½ cup (125 mL) oil, the lemon juice, 1 tsp (5 mL) salt, and ½ tsp (2 mL) pepper. When the pizzas are done, place the arugula in a large bowl and toss with just enough lemon vinaigrette to moisten. Place a large bunch of arugula on each pizza and serve immediately.

Makes 6 pizzas.

This originally ran in the Calgary Herald. For more recipes, check out the Herald’s online food section.
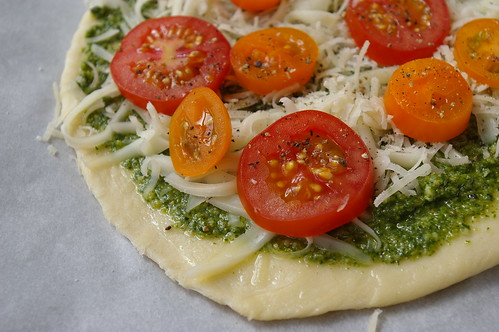
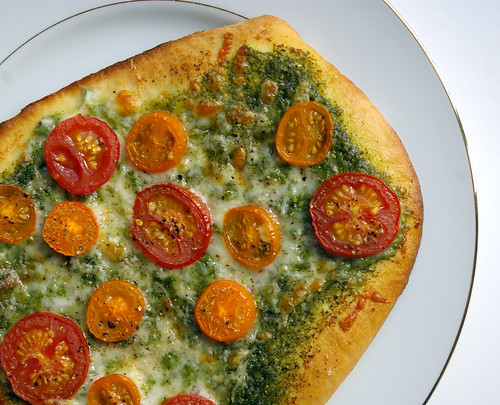
Bonus pizza: Homemade pesto topped with tomatoes.

Bonus pizza: Pesto with tomatoes

Bonus pizza: Pesto with tomatoes

Continue Reading

Cheddar Corn Chowder

It’s cold. Ergo, I want soup.

Cheddar Corn Chowder - close crop

For one thing, it’s warm and soothing. And for a second, it doesn’t need to take much time to put together, which means I’m back under a blanket eating it without much fuss.

Soup for me often means throwing in random vegetables from the crisper, potatoes, onions and garlic, a Parmesan heel (the leftover rind, which I save in a tightly sealed bag in the freezer) if I have it, fresh herbs if there are any to be found and a few handfuls of a small pasta or rice. It’s about creativity and frugality. Emphasis equally on both.

Other times, I want a bowl of soup that requires no real thought on my part, but delivers with soothing flavour.

I want comfort in a bowl.

Without much hassle.

The Barefoot Contessa’s Cheddar Corn Chowder delivers.

Cheddar Corn Chowder - blue napkin

“It tastes like Thanksgiving,” a friend once said when she tried some.

It’s an apt description. The corn and potatoes, combined in the unexpectedly rich, chicken-y broth is a nod to the family holiday.

The turmeric adds a nice golden colour, while the addition of flour cooked in a decadent combination of bacon fat, olive oil and butter, thickens the soup to an almost gravy-like consistency. The sweetness of the corn works nicely in the savoury broth with the soft potatoes, and a few handfuls of white Cheddar.

Cheddar Corn Chowder - ingredients

And yet for a mid-week meal, it’s a good choice. The chowder is relatively quick to make — especially since you can easily substitute frozen corn for fresh, as I have done here, and the potatoes require no peeling. Paired with a salad, it can be a full, well-rounded meal.

Frankly, on its own, it’s quite filling.

And fairly fast.

From start to finish, this took less than 45 minutes. That could be partly because I prepped as I went along. Tossing the bacon into the pot, I started chopping onions. Onions starting to saute, and I moved on to dicing the potatoes. (I use baby potatoes, which need little more attention than cutting into quarters, so even less work this way.) Once the potatoes were cooking in the soup, I got on with grating the cheddar. And so on.

(That even includes the inevitable 30-second break I have to take after chopping onions to deal with my intensely watering eyes. Aside: I seem to have lost any immunity to raw onions. Sad but true.)

There are enough gaps between adding ingredients and letting them cook that there’s even a bit of time to tidy up before the soup is served.

That means when it’s ready, there’s less guilt about pouring a bowl and getting back under the blanket for some soup sipping.

And with temperatures slipping back down to the negative double digits this week, that’s exactly what I’m looking for.

Cheddar Corn Chowder - red napkin

Cheddar Corn Chowder

I cut this recipe from The Barefoot Contessa Cookbook (Clarkson Potter, 1999) in half because the original serves 10 to 12 people. Even halved it makes a lot of soup, which is great for leftovers.

Need more? Doubling it is easy. In the summer and fall, substitute frozen corn with fresh (from about 5 ears) by cutting off the kernels and cooking them for 3 minutes in boiling salted water.

  • 1/4 lb (125 g) bacon, chopped
  • 2 tbsp (25 mL) olive oil
  • 3 cups (750 mL) chopped yellow onions (about 2 large)
  • 2 tbsp (25 mL) unsalted butter
  • 1/4 cup (50 mL) allpurpose flour
  • 1 tsp (5 mL) salt
  • 1/2 tsp (2 mL) freshly ground black pepper
  • 1/4 tsp (1 mL) ground turmeric
  • 6 cups (1.5 L) chicken stock
  • 3 cups (750 mL) medium-diced white boiling or baby potatoes, unpeeled
  • 5 cups (1.25 L) corn kernels
  • 1 cup (250 mL) half-and-half
  • 1/4 lb (125 g) sharp white cheddar cheese, grated

In a large stockpot on medium-high heat, cook the bacon and olive oil until the bacon is crisp, about 5 minutes. Remove the bacon with a slotted spoon and reserve.

Reduce the heat to medium, add the onions and butter to the fat, and cook for 10 minutes, until the onions are translucent.

Stir in the flour, salt, pepper, and turmeric and cook for 3 minutes. Add the chicken stock and potatoes, bring to a boil and simmer uncovered for 15 minutes, until the potatoes are tender.

Add the corn to the soup, then add the half-and-half and cheddar. Cook for 5 more minutes, until the cheese is melted. Season to taste with salt and pepper.

Serve hot with a garnish of bacon.

Serves 5 to 6.

This originally ran in the Calgary Herald. For more recipes, check out the Herald’s online food section.

Bonus: I took a shot of the set up I used to make this photo work. Since it was earlier in the day than usual (I typically shoot in the afternoon), I needed to get the dish up even closer to the window. So, that’s why there’s a stool on the table. That’s a laptop sleeve propping up the edge of the white cardboard. Classy, right? Sometimes I have to also hold up the edge of the cardboard to ensure it’s a plain white background. This gets particularly tricky when dealing with things like soup. It’s really time to invest in a tripod.

This is how I shoot photos

Continue Reading

Pecan Pie Bars

Going through my delicious bookmarks, I clicked a few links for things I wanted to make this week. And then I was mildly surprised to see that about half were from Family Kitchen on Babble.

Including this one for Pecan Pie Bars.

Pecan Pie Bars III

I’ve only had a few pecan pies in my time. Probably the most memorable was one I was served by the parents of a boy I was dating for a couple of weeks in England. He was the friend of my friend’s boyfriend, so he hung out with us while I was visiting her in the summer between Grade 11 and Grade 12. Saw the sights of England, drank a lot of Buck’s Fizz, spent a week in the Welsh town of Aberdovey and got a temporary boyfriend (who broke it off shortly after I returned to Vancouver, though not after sending me one or two care packages filled with mix tapes. He made me a friendship bracelet too. Ah, young romance.)

As part of our extremely short courtship, he invited me to his parents’ house for dinner. I don’t remember much about that meal, though I’m sure it was chock-full of awkwardness, except that his mother made pecan pie.

Anyway, I’ve never attempted making one (that damn fear of pastry), but when I saw this recipe for Pecan Pie Bars, I was totally smitten. Who doesn’t love a shortbread crust?

The trick with shortbread, I’ve learned, is to wait and let the butter get really gloppy before getting started. I let my butter sit out for 36 hours, I think, so it was perfect for this recipe. But before I got started, I finally took a moment to fix my KitchenAid mixer, which had too large a gap between the mixing implements and the bottom of the bowl, which meant I was constantly scraping down and around the base of the bowl to make sure everything was getting mixed together. Bless the Kitchn for their oh-so-helpful tutorial on how to make that adjustment. It took about three seconds and has greatly improved things.

Just after they went into the oven, I got a text from a friend saying she had unexpectedly come into two tickets to the Heritage Classic. Did I want to go? Although no one would call me a huge hockey fan, I do like to go to games when opportunities present themselves to me. And the thought of attending this game was kind of appealing, despite the negative temperatures.

Heritage Classic
The view from our seats as the sun set.

I thought the bars would be done in plenty of time, but they were still incredibly jiggly in the centre when I went to pull them out (albeit a bit early since my oven sometimes runs a bit hot). I gave them five more minutes. And then another five. And then another three. And then I had to leave. The centre was still not set, but I had high hopes it would solidify more as it cooled and then after a night in the fridge.

It was not to be.

When I cut into the bars the next day, the edges were fine, if not slightly (and deliciously) gooey. The centre fell completely apart in a liquid mess of pecans and sticky goo. Not going to lie, I ate part of it with a spoon, but that’s why there are only photos of edge pieces.

The sauce also bubbled up over the top of the crust in some places, sneaking under to the bottom of the pan. This was kind of a lovely accident, really because it baked into the crust.

I will definitely make these again, this time letting them bake a little bit more.

Pecans and crust

Pecans, crust and filling

Pecan Pie Bars

Pecan Pie Bars II

Find the original post on Babble here.

Pecan Pie Bars

for the crust:

  • 1 1/2 stick unsalted butter at room temperature
  • 1/2 cup sugar
  • 1/2 teaspoon salt
  • 1 1/2 cup unbleached flour

for the filling:

  • 1 cup corn syrup
  • 3/4 cup granulated sugar
  • 1/4 cup light brown sugar
  • 3 tablespoons melted butter
  • 3 eggs, lightly beaten
  • 1/2 teaspoon salt
  • 1 teaspoon pure vanilla extract
  • 2 tablespoons flour
  • 1/4 teaspoon cider vinegar
  • 2 cups pecans

Preheat oven to 325.

For the crust: In a medium bowl, cream together butter, sugar, and salt. Add in flour and mix until just incorporated. Press into the bottom and up the sides of an 8-inch square pan. The crust should come up at least two inches on the sides.

For the filling: In a large bowl, whisk together corn syrup, sugars, melted butter, eggs, salt, vanilla, flour, and vinegar. Spread pecans out in the bottom of the crust. Pour sugar mixture over the top. Bake for 40-50 minutes, or until the center is just set.

Cool completely and cut into squares.

Continue Reading