Spring Green Risotto

Last Saturday, I had drinks on a patio. Sunglasses were a necessity, as was a tall glass of something cold, and good conversation with friends.

All along 17th Avenue, patios were cracked open for the first warm weekend day in March. Tables were jammed with people laughing, drinking and turning their faces skyward to bask in the warm sun.

It’s as sure a sign of the changing seasons as the fact we had to put our clocks forward that night. (Though one is very much preferable to the other.)

It’s nearly spring.

But we’re not quite there yet.

After all, there are still patches of snow and, it being Calgary, we can be assured of one last blast of winter before spring truly arrives.

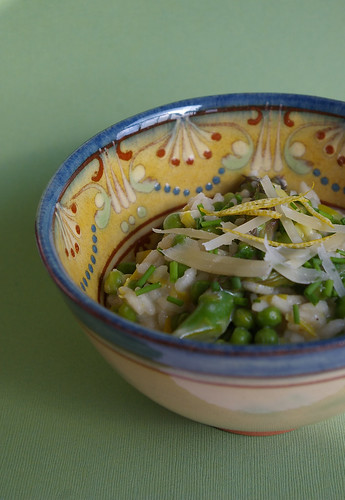
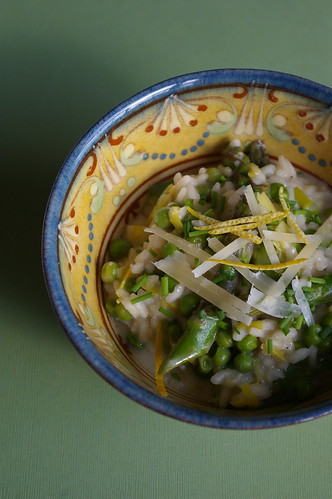
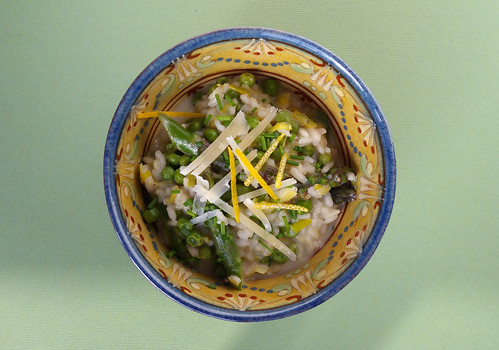
As I wait for those first green buds to appear, I find myself drawn to eating something that can at least remind me of spring. This Spring Green Risotto from the Barefoot Contessa is a good fit.

Spring Green Risotto I

The bright green of asparagus and peas, the bright flavour of lemon zest and juice are the tastes and sights of spring. The mascarpone (or, in my case, cream cheese as mascarpone was not to be found) brings a rich creaminess that’s a good last comfort-food hurrah as winter fades away.

Risotto is a bit fussier than other dishes because of the continual stirring, but I think it’s worth the effort. In my experience, you don’t have to be chained to the pot, constantly moving the grains of rice about. You just need to be nearby for frequent stirring.

(I’m sure someone is mentally scolding me right now for that statement, but if the thought of cooking a risotto has put you off because you believe it will be a major arm workout from stirring for 30 minutes non-stop, this is me suggesting you reconsider. No, you can’t walk away; yes, you can do light kitchen tidying at the same time. Or that’s what I did.)

The patience and frequent stirring is worth it. Especially with this recipe.

Spring Green Risotto III

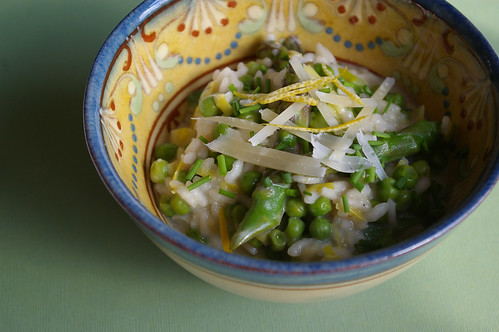
Those little green peas popped with flavour, while the lemon juice made it bright and the cream cheese (see the recipe notes) added a smooth, creamy flavour without too much richness.

It’s enough to tide me over until spring finally does break through. Or at least until the next day warm enough for patio drinks.

Leeks and Arborio Rice

Spring Green Risotto II

Spring Green Risotto IV

Spring Green Risotto V

Spring Green Risotto

Adapted from Barefoot Contessa Back to Basics. I omitted the 1 cup (250 mL) of chopped fennel, since I don’t like the flavour. Add it in with the leeks if you’re more of a fan. If you can’t find mascarpone (which I couldn’t – and didn’t want to go searching for in another store), spreadable cream cheese is a decent substitute. It’s less authentic, but was creamy and tangy enough. Using light cream cheese will also cut some of the calories.

  • 1 1/2 tbsp (22 mL) olive oil
  • 1 1/2 tbsp (22 mL) unsalted butter
  • 3 cups (750 mL) chopped leeks, white and light green parts only (about 2 leeks)
  • 1 1/2 cups (375 mL) arborio rice
  • 2/3 cup (150 mL) dry white wine
  • 4-5 cups (1 to 1.25 L) simmering chicken stock
  • 1 lb (500 g) asparagus, cut diagonally in 1 1/2-inch (4 cm) lengths
  • 10 oz (300 g) frozen peas, defrosted
  • 1 tbsp (15 mL) freshly grated lemon zest (about 2 lemons)
  • kosher salt and freshly ground black pepper
  • 2 tbsp (25 mL) freshly squeezed lemon juice
  • 1/3 cup (75 mL) mascarpone cheese
  • 1/2 cup (125 mL) freshly grated Parmesan cheese, plus extra for serving
  • 3 tbsp (50 mL) minced fresh chives, plus extra for serving

Heat the olive oil and butter in a medium saucepan over medium heat. Add the leeks and saute for 5 to 7 minutes, until tender.

Add the rice and stir for a minute to coat with the leeks, oil and butter. Add the white wine and simmer over low heat, stirring often, until most of the wine is absorbed. Add the chicken stock, a soup ladleful or two at a time, stirring often.

Most of the stock should be absorbed before adding another ladleful. This should take between 25 and 30 minutes.

Meanwhile, blanch the asparagus in boiling salted water for a few minutes, until just tender. Drain and cool in ice water.

When the risotto has been cooking for about 20 minutes, drain the asparagus and add it to the risotto with the peas, lemon zest, 2 teaspoons (10 mL) salt and 1 teaspoon (5 mL) of pepper. Continue cooking and adding stock, stirring almost constantly, until the rice is tender but still firm.

In a small bowl, whisk together the lemon juice and mascarpone.

When the risotto is done, remove from the heat and stir in the mascarpone mixture, plus the Parmesan and chives. Taste and adjust seasonings as necessary.

Sprinkle with chives and more Parmesan to serve.

Serves 4 for dinner, 6 as an appetizer.

This article first appeared in the Calgary Herald. For recipe ideas and stories about food, check out the Herald’s food page.

Continue Reading

White Pizzas with Arugula

That’s slush outside right now. Melting snow and ice are forming rivulets that wend their way along curbs, searching out drains, forming murky puddles. Patches of grass left exposed are at last revealed, mats of brown carpeting the landscape.

It’s that shoulder season between winter’s end and the birth of spring when everything is dirt-covered, mottled from months of being hidden under cold and damp and snow.

So, until those pops of green start to stand out in relief against the landscape, until those buds burst out along tree branches and from the once-frozen ground, the next best thing, as far as I’m concerned, is to eat like spring is already here.

It’s time to shed the stews and soups of winter comfort and embrace herbs, baby lettuces, tender chard, pencil-thin stalks of asparagus and peppery arugula.

Well, in my kitchen at least.

Arugula

There was something about this recipe for White Pizzas with Arugula that caught my eye at one point as I flipped through the Barefoot Contessa’s Back to Basics cookbook ages ago.

I like a good traditional pizza. And some of you may remember a version I did last year topped with shaved asparagus.

But this one appealed because I like the idea of garlic and cheese matched with an arugula salad that had been tossed in a lemon vinaigrette. It was like a salad and main dish combined to make something even better.

Arugula, which is also known as rocket, has a nice pepper bite to it, owed, apparently, to being a relative to radishes and watercress.

The lemon would add a nice bright kick, but the melted cheeses – Fontina, mozzarella and goat cheese – would lay a decadent foundation on the pizzas.

Oh, and garlic-infused olive oil? Well, that would take the whole thing over the edge.

Garlic and oil

The only thing that could have stood in my way was attempting to knead dough (a task that remains my culinary nemesis for now), but Ina Garten’s recipe calls for pretty much the entire thing to be done in a stand mixer.

Sold.

The pizzas are simple to put together and came out of the oven crisp, the cheese just starting to change to a soft golden colour. Topped with the arugula, they’re a food metaphor for the changing season: bright green emerging from white.

And the taste was a marriage between the comfort food of winter and the emerging flavours of spring: the peppery arugula and acidic zing of lemon vinaigrette played well against the rich pizza with its creamy cheeses and garlicky oil.

Don’t be intimidated by the rather lengthy recipe; it’s all pretty straightforward. And the result is worth it. Because even if this isn’t the last we see of winter -and, judging from the last several years here, I suspect it’s not – I can at least taste spring.

Dough ball

White pizzas

Arugula II

White pizza with arugula

White Pizzas with Arugula

This recipe comes from The Barefoot Contessa Back to Basics. To make all at six pizzas at once, you will need three parchment-lined sheet pans. But this recipe is easily halved if you want. She also calls for a few sprigs of thyme to steep in the olive oil with the garlic, but I didn’t have any on hand and I don’t think I missed out by not adding it.

I’ve found arugula at Lina’s Italian Market, at the farmer’s market and sometimes in clamshell-type packages at major grocery stores.

Pizza:

  • 1¼ cups (300 mL) warm water, 100?F to 110?F (38?C to 43?C)
  • 4½ tsp (22 mL) dry yeast
  • 1 tbsp (15 mL) honey
  • olive oil
  • 4 cups (1 L) all-purpose flour, plus extra for kneading
  • salt
  • 4 garlic cloves, sliced
  • 1/4 tsp (1 mL) crushed red pepper flakes
  • freshly ground pepper
  • 3 cups (750 mL) grated Italian Fontina
  • 1½ cups (475 mL) grated fresh mozzarella
  • 11 oz (300 g) creamy goat cheese

Salad:

  • 1/2 cup (125 mL) olive oil
  • 1/4 cup (50 mL) freshly squeezed lemon juice
  • 8 oz (250 g) baby arugula

For the dough, combine the water, yeast, honey and 3 tbsp (50 mL) olive oil in the bowl of an electric mixer fitted with a dough hook. When the yeast is dissolved, add 3 cups (750 mL) flour, then 2 tsp (10 mL) salt, and mix on medium-low speed. While mixing, add up to 1 more cup (250 mL) flour, or just enough to make a soft dough.

Knead the dough for about 10 minutes until smooth, sprinkling it with the flour as necessary to keep it from sticking to the bowl. When the dough is ready, turn it out onto a floured board and knead by hand a dozen times. It should be smooth and elastic. Place the dough in a well-oiled bowl and turn it to cover it lightly with oil.

Cover the bowl with a kitchen towel and allow the dough to rise at room temperature for 30 minutes.

Meanwhile, make the garlic oil. Place ½ cup (125 mL) oil, the garlic and red pepper flakes in a small saucepan and bring to a simmer over low heat. Cook for 10 minutes, making sure the garlic doesn’t burn.

Preheat the oven to 500F (260C). Dump the dough onto a board and divide into 6 equal pieces. Place them on a sheet pan lined with parchment paper and cover them with a damp towel. Allow the dough to rest for 10 minutes. Use immediately, or refrigerate for up to 4 hours.

Press and stretch each ball into an 8-inch (20cm) circle and place 2 circles on each parchment-lined sheet pan. (If you’ve chilled the dough, take it out of the refrigerator approximately 30 minutes ahead to let it come to room temperature.) Brush the pizzas with the garlic oil, and sprinkle each one liberally with salt and pepper.

Sprinkle the pizzas evenly with Fontina, mozzarella and goat cheese. Drizzle each pizza with 1 tbsp (15 mL) more of the garlic oil and bake for 10 to 15 minutes, until the crusts are crisp and the cheeses begin to brown.

Meanwhile, for the vinaigrette, whisk together ½ cup (125 mL) oil, the lemon juice, 1 tsp (5 mL) salt, and ½ tsp (2 mL) pepper. When the pizzas are done, place the arugula in a large bowl and toss with just enough lemon vinaigrette to moisten. Place a large bunch of arugula on each pizza and serve immediately.

Makes 6 pizzas.

This originally ran in the Calgary Herald. For more recipes, check out the Herald’s online food section.
Bonus pizza: Homemade pesto topped with tomatoes.

Bonus pizza: Pesto with tomatoes

Bonus pizza: Pesto with tomatoes

Continue Reading

Cheddar Corn Chowder

It’s cold. Ergo, I want soup.

Cheddar Corn Chowder - close crop

For one thing, it’s warm and soothing. And for a second, it doesn’t need to take much time to put together, which means I’m back under a blanket eating it without much fuss.

Soup for me often means throwing in random vegetables from the crisper, potatoes, onions and garlic, a Parmesan heel (the leftover rind, which I save in a tightly sealed bag in the freezer) if I have it, fresh herbs if there are any to be found and a few handfuls of a small pasta or rice. It’s about creativity and frugality. Emphasis equally on both.

Other times, I want a bowl of soup that requires no real thought on my part, but delivers with soothing flavour.

I want comfort in a bowl.

Without much hassle.

The Barefoot Contessa’s Cheddar Corn Chowder delivers.

Cheddar Corn Chowder - blue napkin

“It tastes like Thanksgiving,” a friend once said when she tried some.

It’s an apt description. The corn and potatoes, combined in the unexpectedly rich, chicken-y broth is a nod to the family holiday.

The turmeric adds a nice golden colour, while the addition of flour cooked in a decadent combination of bacon fat, olive oil and butter, thickens the soup to an almost gravy-like consistency. The sweetness of the corn works nicely in the savoury broth with the soft potatoes, and a few handfuls of white Cheddar.

Cheddar Corn Chowder - ingredients

And yet for a mid-week meal, it’s a good choice. The chowder is relatively quick to make — especially since you can easily substitute frozen corn for fresh, as I have done here, and the potatoes require no peeling. Paired with a salad, it can be a full, well-rounded meal.

Frankly, on its own, it’s quite filling.

And fairly fast.

From start to finish, this took less than 45 minutes. That could be partly because I prepped as I went along. Tossing the bacon into the pot, I started chopping onions. Onions starting to saute, and I moved on to dicing the potatoes. (I use baby potatoes, which need little more attention than cutting into quarters, so even less work this way.) Once the potatoes were cooking in the soup, I got on with grating the cheddar. And so on.

(That even includes the inevitable 30-second break I have to take after chopping onions to deal with my intensely watering eyes. Aside: I seem to have lost any immunity to raw onions. Sad but true.)

There are enough gaps between adding ingredients and letting them cook that there’s even a bit of time to tidy up before the soup is served.

That means when it’s ready, there’s less guilt about pouring a bowl and getting back under the blanket for some soup sipping.

And with temperatures slipping back down to the negative double digits this week, that’s exactly what I’m looking for.

Cheddar Corn Chowder - red napkin

Cheddar Corn Chowder

I cut this recipe from The Barefoot Contessa Cookbook (Clarkson Potter, 1999) in half because the original serves 10 to 12 people. Even halved it makes a lot of soup, which is great for leftovers.

Need more? Doubling it is easy. In the summer and fall, substitute frozen corn with fresh (from about 5 ears) by cutting off the kernels and cooking them for 3 minutes in boiling salted water.

  • 1/4 lb (125 g) bacon, chopped
  • 2 tbsp (25 mL) olive oil
  • 3 cups (750 mL) chopped yellow onions (about 2 large)
  • 2 tbsp (25 mL) unsalted butter
  • 1/4 cup (50 mL) allpurpose flour
  • 1 tsp (5 mL) salt
  • 1/2 tsp (2 mL) freshly ground black pepper
  • 1/4 tsp (1 mL) ground turmeric
  • 6 cups (1.5 L) chicken stock
  • 3 cups (750 mL) medium-diced white boiling or baby potatoes, unpeeled
  • 5 cups (1.25 L) corn kernels
  • 1 cup (250 mL) half-and-half
  • 1/4 lb (125 g) sharp white cheddar cheese, grated

In a large stockpot on medium-high heat, cook the bacon and olive oil until the bacon is crisp, about 5 minutes. Remove the bacon with a slotted spoon and reserve.

Reduce the heat to medium, add the onions and butter to the fat, and cook for 10 minutes, until the onions are translucent.

Stir in the flour, salt, pepper, and turmeric and cook for 3 minutes. Add the chicken stock and potatoes, bring to a boil and simmer uncovered for 15 minutes, until the potatoes are tender.

Add the corn to the soup, then add the half-and-half and cheddar. Cook for 5 more minutes, until the cheese is melted. Season to taste with salt and pepper.

Serve hot with a garnish of bacon.

Serves 5 to 6.

This originally ran in the Calgary Herald. For more recipes, check out the Herald’s online food section.

Bonus: I took a shot of the set up I used to make this photo work. Since it was earlier in the day than usual (I typically shoot in the afternoon), I needed to get the dish up even closer to the window. So, that’s why there’s a stool on the table. That’s a laptop sleeve propping up the edge of the white cardboard. Classy, right? Sometimes I have to also hold up the edge of the cardboard to ensure it’s a plain white background. This gets particularly tricky when dealing with things like soup. It’s really time to invest in a tripod.

This is how I shoot photos

Continue Reading

Fresh Corn Salad

A group of friends and I were talking about things we like to make for dinner a couple of weeks ago, when one mentioned her relatively recently acquired love of all things barbecue. And that, inevitably, led to a discussion about side dishes.

There has been a lot of recipes lately for grilled corn, which sounds delicious (especially when there is also talk about chili-lime butter to spread on after), but I am a sad city dweller with no patio/balcony/deck and, subsequently, no hibachi/grill/barbecue. But that doesn’t mean that I miss out when corn is in season.

Corn on the cob

Every summer I make a few rounds of Fresh Corn Salad, when corn on the cob is ripe and basil is plentiful at the Farmer’s Market. There are only seven ingredients in this salad, and that includes the dressing.

This is really easy to throw together and well worth the effort. (Okay, maybe the actual cutting-the-corn-off-the-cob is a bit messy.) (I recently saw this gadget that strips the kernels from the cob and while I love all things gadgety, even I feel that’s a bit much.)

I did initially have a tough time finding cider vinegar, but then found some at my local Safeway (along with another much-loved Barefoot Contessa ingredient: champagne vinegar. Um, actually, I just looked and mine is “champagne style.” What can I say? I’m a champagne girl on a “champagne-style” budget.) They come in pretty small bottles, but I don’t use cider vinegar all that often, so it works out.

basil and red onion

Corn off the cob

Fresh Corn Salad

This recipe is from The Barefoot Contessa Cookbook.

Fresh Corn Salad

  • 5 ears corn, shucked
  • 1/2 cup small-diced red onion (1 small onion)
  • 3 tbsp. cider vinegar
  • 3 tbsp. good olive oil
  • 1/2 tsp. kosher salt
  • 1/2 tsp. freshly ground black pepper
  • 1/2 cup chiffonade fresh basil leaves

In a large pot of boiling salted water, cook the corn for 3 minutes until the starchiness is just gone. Drain and immerse it in ice water to stop the cooking and set the colour. When the corn is cool, cut the kernels off the cob, cutting close to the cob.

Toss the kernels in a large bowl with the red onions, vinegar, olive oil, salt and pepper. Just before serving, toss in the fresh basil. Taste for seasonings and serve cold or at room temperature.

Continue Reading

Chocolate Cupcakes with Peanut Butter Icing

Most smart bakers know to make sure everything is ready to go in advance of getting started. I am, apparently, not a smart baker.

Chocolate cupcake with peanut butter icing

We were celebrating a (much belated) birthday for a good friend. Some wiggling around with the schedule had the celebration moved from brunch to Sunday night dinner and I volunteered (most willingly — any excuse to bake) to bring the birthday dessert. All week I Googled for moist, rich chocolate cake recipes and then sat there trying to decide which would be better: mayo-based or buttermilk; white icing or chocolate; cupcakes or layer cake. Finally, when I shared my dilemma with a friend, she queried why I wasn’t using a Barefoot Contessa recipe. Indeed! Why wasn’t I?

She has two recipes in her books and one online at Food & Wine. Since I already bought the books, I figured I may as well try one of those and, at last, settled on the Chocolate Cupcakes with Peanut Butter Icing. My love of this combination knows no bounds, so I’m kind of surprised I didn’t think of this recipe immediately.

Initially, it was all going very well. I ran out to the store to buy sour cream, buttermilk and coffee, along with whipping cream for the icing, then returned to begin. There was butter to soften and dry ingredients to sift (and, boy did I sift those. I learned my lesson from the Red Velvet cake when not sifting the cocoa with the flour led to brown swirls through the cake.) and, of course, photos to take to document my progress.

Cakes still make me a bit nervous. I’m worried I’ll overmix and make a tough cake and that is not eased by the fact most recipes have this whole “mix in thirds” step. What if it’s not exactly thirds? Also, I think a lot of recipes these days assume people have stand mixers, which makes this step (among others) much easier, then when trying to hold the mixer while pouring in a third of the dry mixture and not end up covered in cocoa and flour dust.

Butter and sugar and eggs, oh my!

The batter trifecta

Chocolate cupcake better

Chocolate cupcakes ready to bake.

But, for the most part, it all went really well. The batter seemed incredibly light at the end (Okay, and, yes, it did taste good.) and I was all ready to put the batter into the tins. I pulled out my cupcake liners and found I only had five left. Gah! Thankfully, there’s a grocery store a little over a block away, so I turned off the oven and bolted down there where I bought some liners and then raced back. I was really worried that extra time would ruin the batter somehow.

In the end, it was only a 15-minute delay and I don’t think it affected the cupcakes. They baked up perfectly, though for less time than the recipe suggested owing, I suspect, to the fact that my muffin tins are more shallow and took less batter to fill. (I used a 1/8 cup scoop, which worked perfectly. No spillage.)

Chocolate Cupcakes

Solo chocolate cupcake

The cupcakes are not overly sweet, which was a nice counterpoint to the rich peanut butter icing.

Peanut butter icing

Row of cupcakes

This recipe is from Barefoot Contessa at Home.

Chocolate Cupcakes with Peanut Butter Icing

  • 12 tbsp. unsalted butter, at room temperature (that’s 3/4 cup for those of us that don’t use sticks of butter)
  • 2/3 cup granulated sugar
  • 2/3 cup light brown sugar, packed
  • 2 extra-large eggs, at room temperature
  • 2 tsp. pure vanilla extract
  • 1 cup buttermilk, shaken, at room temperature
  • 1/2 cup sour cream, at room temperature
  • 2 tbsp. brewed coffee (Full disclosure: I don’t drink coffee. I made a cup of instant and it tasted awful to me, so I only threw in less than a tablespoon. I suspect good coffee may be a great addition.)
  • 1 3/4 cups all-purpose flour
  • 1 cup good cocoa powder
  • 1 1/2 tsp. baking soda
  • 1/2 tsp. kosher salt

Preheat oven to 350 degrees. Line cupcake pans with paper liners.

In the bowl of an electric mixer fitted with a paddle attachment, cream the butter and two sugars on high speed until light and fluffy, approximately five minutes. (For those of us without a stand mixer, a handheld is just fine. It just makes it a bit trickier when mixing in the wet and dry ingredients.) Lower the speed to medium, add the eggs one at a time, then add the vanilla and mix well. In a separate bowl, whisk together the buttermilk, sour cream and coffee. In another bowl, sift together the flour, cocoa, baking soda and salt. On low speed, add the buttermilk mixture and the flour mixture alternately in thirds to the mixer bowl, beginning with the buttermilk mixture and ending with the flour mixture. Mix only until blended. Fold the batter with a rubber spatula to be sure it’s completely blended.

Divide the batter among the cupcake pans (one rounded standard ice cream scoop per cup is the right amount). Bake in the middle of the oven for 20 to 25 minutes, until a toothpick comes out clean. Cool for 10 minutes, remove from the pans, and allow to cool completely before frosting.

Frost each cupcake with peanut butter icing and sprinkle with chopped peanuts, if desired.

Kathleen’s Peanut Butter Icing

  • 1 cup confectioners’ sugar
  • 1 cup creamy peanut butter
  • 5 tbsp. unsalted butter, at room temperature
  • 3/4 tsp. pure vanilla extract
  • 1/4 tsp. kosher salt
  • 1/3 cup heavy cream (I used whipping cream)

Place the confectioners’ sugar, peanut butter, butter, vanilla and salt in the bowl of an electric mixer fitted with a paddle attachment. Mix on medium-low speed until creamy, scraping down the bowl with a rubber spatula as you work. Add the cream and beat on high speed until the mixture is light and smooth.

Continue Reading

Guacamole

When the cravings for Guacamole come, they must be answered.

I love avocados. The pale green flesh, the rich buttery taste, the thwack sound the pit makes when I hit it with my knife. I like it sliced in salads or spread between two pieces of buttered toast with a little salt and pepper. But I really love it in guacamole with a handful of salty chips on the side.

The Ingredients

Sure, it’s high in fat, but I’m slightly mollified by the fact it’s a good fat and there are lots of vitamins and potassium in avocados. I also need that information to justify my decision to eat guacamole for dinner. (It’s flimsy justification, but justification nonetheless.)

The Ingredients

I like to make mine by cubing the avocados while still in their skins and then scooping the chunks out with a spoon before gently stirring with the other ingredients, so the meaty fruit retains some of its bite instead of becoming a paste. (You’ll see below that the instructions are slightly different. Obviously, do as you feel is best.)

Dicing the avocado

Red Onion

Ready to serve

It should come as no surprise that this recipe comes from my mentor, the Barefoot Contessa.

Guacamole

  • Four ripe Haas avocados (I just buy whatever is in the store)
  • 3 tbsp. freshly squeezed lemon juice — one lemon
  • 8 dashes Tabasco sauce
  • 1/2 cup small-diced red onion
  • 1 large clove garlic, minced (I use a rasp — best kitchen gadget ever — so there are no large chunks of garlic)
  • 1 tsp. kosher salt
  • 1 tsp. freshly ground black pepper
  • 1 medium tomato, seeded and small-diced

Cut the avocados in half, remove the pits, and scoop the flesh out of their shells into a large bowl. (I use my hands.) Immediately add the lemon juice, Tabasco, onion, garlic, salt and pepper and toss well. Using a sharp knife, slice through the avocados in the bowl until they are finely diced. Add the tomatoes. Mix well and taste for salt and pepper.

Continue Reading