Ricotta

I’ve bought my fair share of ricotta in my time from my local grocery store.

It’s good enough, especially since most of the time I’m simply folding it into lemon ricotta pancakes for Sunday breakfast.

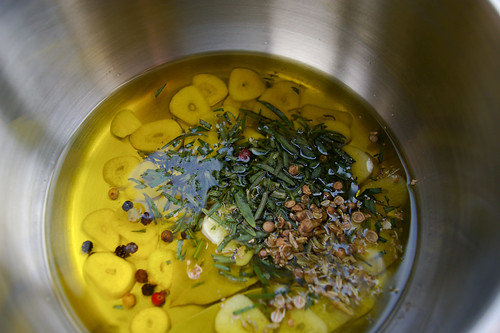
The first time I had really good ricotta was at Corso 32 in Edmonton. House-made from goat milk, it had been slathered thickly onto slabs of toasted bread, then drizzled with oil and sprinkled with crunchy flakes of salt.

It was the perfect start to dinner with a group of friends I don’t get to see often enough.

On my next trip to Edmonton, I had barely walked through the front door of my friend’s house before she announced that our project for that afternoon – in advance of friends coming for dinner – was to make homemade ricotta.

The recipe was laughably easy: heat milk, add lemon juice, watch it curdle and then strain.

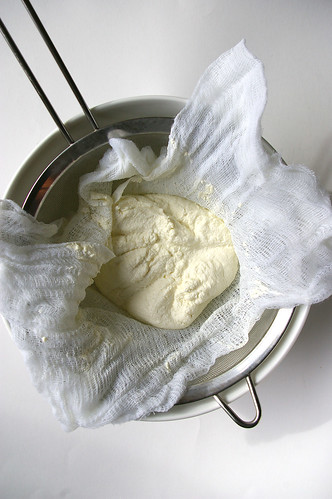
And yet it was unexpectedly exciting to watch the curds and whey separate with just a bit of acid thrown into the mix. Even more pleasing to unfold the cheesecloth after the whey had drained away from the curds and see the mound of thick, creamy ricotta.

(Check out the post Katherine did over here, complete with action photos.)

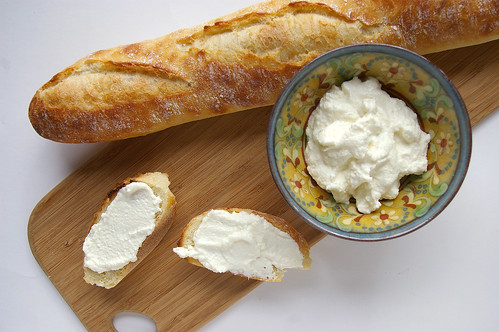
That recipe was good – we ate pretty much all of it that night, on toasted baguette with glasses of wine in hand, some olives and slices of prosciutto – but I’ve since found one that is made even more decadent with the addition of a full cup of whipping cream.

Technically, this may not be considered real ricotta, which in Italian means “twice cooked” and is made from whey – the byproduct of making other cheeses. But, when searching for ricotta recipes, almost all now use this method of adding an acid – lemon juice or vinegar – to heated milk (or a combination of milk and cream) and then straining off the curds.

(There are also a million variations, using more or less milk and cream, using different ratios of acid or using vinegar instead of lemon juice.)

Simple science, but it’s kind of like food magic.

The taste is also like food magic: rich and creamy, smooth and luxurious – a recipe that’s end belies how little effort went in.

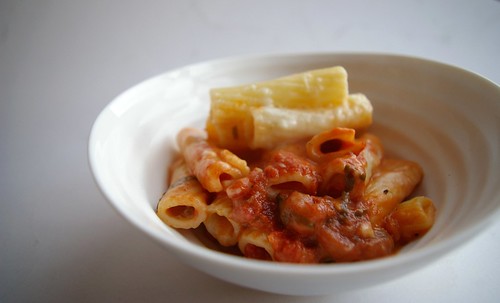
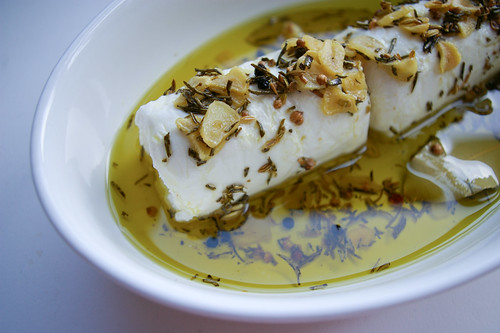
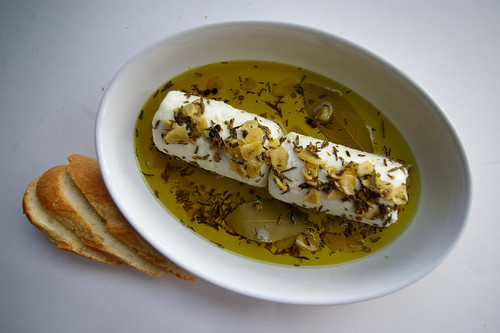
Serve this on slices of toasted bread drizzled with honey or some extra virgin olive oil. Grind on cracked pepper or stir in herbs.

Use in recipes that call for ricotta. Or simply eat it plain.
Ricotta draining

Ricotta and baguette

Ricotta

This comes from Smitten Kitchen, which suggest a ½ cup of whipping cream if a full cup is too much, just be sure to make up the difference with whole milk.

  • 3 cups ( 750 mL) whole milk (3.25 per cent)
  • 1 cup (250 mL) whipping cream
  • ½ tsp (2 mL) coarse sea salt
  • 3 tbsp (50 mL) freshly squeezed lemon juice

In a large pot, mix together milk, cream and salt. Heat until the mixture reaches 190 F, stirring every so often to keep it from burning. Remove from the heat and add the lemon juice. Stir, gently, once or twice and then let sit for 5 minutes to let the curds and whey separate.

Line a large sieve or colander with two or three layers of cheesecloth and place over a bowl. Pour the mixture into the sieve and let it strain for at least an hour or more, depending on how firm you like it. (I stopped draining mine around 1 hour and 15 minutes.) It will also firm up more once refrigerated.

Eat immediately or put in an airtight container and refrigerate. Makes little more than one cup (250 mL).

Continue Reading

White Pizzas with Arugula

That’s slush outside right now. Melting snow and ice are forming rivulets that wend their way along curbs, searching out drains, forming murky puddles. Patches of grass left exposed are at last revealed, mats of brown carpeting the landscape.

It’s that shoulder season between winter’s end and the birth of spring when everything is dirt-covered, mottled from months of being hidden under cold and damp and snow.

So, until those pops of green start to stand out in relief against the landscape, until those buds burst out along tree branches and from the once-frozen ground, the next best thing, as far as I’m concerned, is to eat like spring is already here.

It’s time to shed the stews and soups of winter comfort and embrace herbs, baby lettuces, tender chard, pencil-thin stalks of asparagus and peppery arugula.

Well, in my kitchen at least.

Arugula

There was something about this recipe for White Pizzas with Arugula that caught my eye at one point as I flipped through the Barefoot Contessa’s Back to Basics cookbook ages ago.

I like a good traditional pizza. And some of you may remember a version I did last year topped with shaved asparagus.

But this one appealed because I like the idea of garlic and cheese matched with an arugula salad that had been tossed in a lemon vinaigrette. It was like a salad and main dish combined to make something even better.

Arugula, which is also known as rocket, has a nice pepper bite to it, owed, apparently, to being a relative to radishes and watercress.

The lemon would add a nice bright kick, but the melted cheeses – Fontina, mozzarella and goat cheese – would lay a decadent foundation on the pizzas.

Oh, and garlic-infused olive oil? Well, that would take the whole thing over the edge.

Garlic and oil

The only thing that could have stood in my way was attempting to knead dough (a task that remains my culinary nemesis for now), but Ina Garten’s recipe calls for pretty much the entire thing to be done in a stand mixer.

Sold.

The pizzas are simple to put together and came out of the oven crisp, the cheese just starting to change to a soft golden colour. Topped with the arugula, they’re a food metaphor for the changing season: bright green emerging from white.

And the taste was a marriage between the comfort food of winter and the emerging flavours of spring: the peppery arugula and acidic zing of lemon vinaigrette played well against the rich pizza with its creamy cheeses and garlicky oil.

Don’t be intimidated by the rather lengthy recipe; it’s all pretty straightforward. And the result is worth it. Because even if this isn’t the last we see of winter -and, judging from the last several years here, I suspect it’s not – I can at least taste spring.

Dough ball

White pizzas

Arugula II

White pizza with arugula

White Pizzas with Arugula

This recipe comes from The Barefoot Contessa Back to Basics. To make all at six pizzas at once, you will need three parchment-lined sheet pans. But this recipe is easily halved if you want. She also calls for a few sprigs of thyme to steep in the olive oil with the garlic, but I didn’t have any on hand and I don’t think I missed out by not adding it.

I’ve found arugula at Lina’s Italian Market, at the farmer’s market and sometimes in clamshell-type packages at major grocery stores.

Pizza:

  • 1¼ cups (300 mL) warm water, 100?F to 110?F (38?C to 43?C)
  • 4½ tsp (22 mL) dry yeast
  • 1 tbsp (15 mL) honey
  • olive oil
  • 4 cups (1 L) all-purpose flour, plus extra for kneading
  • salt
  • 4 garlic cloves, sliced
  • 1/4 tsp (1 mL) crushed red pepper flakes
  • freshly ground pepper
  • 3 cups (750 mL) grated Italian Fontina
  • 1½ cups (475 mL) grated fresh mozzarella
  • 11 oz (300 g) creamy goat cheese

Salad:

  • 1/2 cup (125 mL) olive oil
  • 1/4 cup (50 mL) freshly squeezed lemon juice
  • 8 oz (250 g) baby arugula

For the dough, combine the water, yeast, honey and 3 tbsp (50 mL) olive oil in the bowl of an electric mixer fitted with a dough hook. When the yeast is dissolved, add 3 cups (750 mL) flour, then 2 tsp (10 mL) salt, and mix on medium-low speed. While mixing, add up to 1 more cup (250 mL) flour, or just enough to make a soft dough.

Knead the dough for about 10 minutes until smooth, sprinkling it with the flour as necessary to keep it from sticking to the bowl. When the dough is ready, turn it out onto a floured board and knead by hand a dozen times. It should be smooth and elastic. Place the dough in a well-oiled bowl and turn it to cover it lightly with oil.

Cover the bowl with a kitchen towel and allow the dough to rise at room temperature for 30 minutes.

Meanwhile, make the garlic oil. Place ½ cup (125 mL) oil, the garlic and red pepper flakes in a small saucepan and bring to a simmer over low heat. Cook for 10 minutes, making sure the garlic doesn’t burn.

Preheat the oven to 500F (260C). Dump the dough onto a board and divide into 6 equal pieces. Place them on a sheet pan lined with parchment paper and cover them with a damp towel. Allow the dough to rest for 10 minutes. Use immediately, or refrigerate for up to 4 hours.

Press and stretch each ball into an 8-inch (20cm) circle and place 2 circles on each parchment-lined sheet pan. (If you’ve chilled the dough, take it out of the refrigerator approximately 30 minutes ahead to let it come to room temperature.) Brush the pizzas with the garlic oil, and sprinkle each one liberally with salt and pepper.

Sprinkle the pizzas evenly with Fontina, mozzarella and goat cheese. Drizzle each pizza with 1 tbsp (15 mL) more of the garlic oil and bake for 10 to 15 minutes, until the crusts are crisp and the cheeses begin to brown.

Meanwhile, for the vinaigrette, whisk together ½ cup (125 mL) oil, the lemon juice, 1 tsp (5 mL) salt, and ½ tsp (2 mL) pepper. When the pizzas are done, place the arugula in a large bowl and toss with just enough lemon vinaigrette to moisten. Place a large bunch of arugula on each pizza and serve immediately.

Makes 6 pizzas.

This originally ran in the Calgary Herald. For more recipes, check out the Herald’s online food section.
Bonus pizza: Homemade pesto topped with tomatoes.

Bonus pizza: Pesto with tomatoes

Bonus pizza: Pesto with tomatoes

Continue Reading

Mac-Raff n’ Cheese

This is one of my favourite all-time childhood meals.

Mac-Raff n' Cheese I

I loved coming home to find a pot of Mac-Raff n’ Cheese bubbling away in the oven. My stepdad, Sean, would make it in our giant Corning Vision Ware pot (Do you guys remember those? The glass pots that came in a couple of colours? Ours was brown.), so if I peered through the oven door I could see the tomato sauce simmering up to mingle with the cheese-coated pasta.

For a long time I thought it was a creation of Sean’s, him being the head chef in our blended family. And what a chef he was! We were well-fed kids because that man knows his way around a kitchen. Lamb and mint sauce, chicken and rice with cream gravy, roast beef with all the fixings. There’s a reason I love to go home, even today. But when I was home a few months ago, my mum revealed that she was actually the mastermind behind the recipe.

She’s a Macdonald; he’s a Rafferty. So we were the Mac-Raff household. Hence the name of this dish.

It is a smart meal from a parent’s perspective. Quick, filling and can be assembled during the day and left at the ready to bake closer to dinner time when everyone is home and getting hungry. As an adult, I’ve also found it to be fantastic as a freezer meal. Since I generally make enough for a family of six (apparently, I am incapable of cooking for one or two like a normal singleton. But it’s OK because I love leftovers.) I have got into the habit of splitting the mac n’ cheese into two casserole dishes and jamming one into my freezer for later.

Mac-Raff n' Cheese III

I made it a couple of months ago when the days were still crisp and cold. Then it warmed up and I wondered if people’s appetites for hearty, homemade macaroni and cheese had waned, so I kind of put it on the back burner (nyuk nyuk). And then we had another, delayed, blast of winter. Oh! I thought, a second chance! And then, uh, well, let’s just say I lost track of time.

But I think this is a good recipe to have on hand. Although there is no official recipe. I, like my parents, kind of make it up as I go along each time depending on what I have lying around. But, fundamentally, it is macaroni and cheese with tomato sauce on the bottom that is all baked together in a casserole dish with a layer of cheese on top.

And it is far greater than the sum of its parts. Tomato sauce = good. Pasta doused in cheese sauce = good. That layer where the two mix = perfection.

I like to take a couple of big spoonfuls and top with some cracked black pepper, then eat it with a spoon.

But the real beauty of this is that it is infinitely adaptable. Don’t like the cheeses suggested? Use what you’ve got or what you like. Don’t have fresh herbs? Use a pinch of dried basil. Use your family’s own secret tomato sauce recipe for that matter. This is about using what you’ve got and experimenting with what you think it will taste good.

Tomato Sauce I

Tomato Sauce II

Grated Cheese

Pasta and Cheese

Oven ready

Hot from the oven

Mac-Raff n' Cheese II

Mac-Raff n’ Cheese

Tomato Sauce base:

  • 1 tablespoon olive oil
  • 1 onion, diced
  • 3 cloves garlic, minced
  • 1 28 oz. can whole tomatoes
  • 1 14 oz. can crushed tomatoes
  • 1 tablespoon balsamic vinegar
  • pinch sugar
  • 1/4 cup basil (or combination of mostly basil and some parsley), roughly chopped.
  • salt and pepper to taste

Heat oil in a pot over medium heat. When hot, add onion and saute until transluscent. Add garlic and stir for about a minute until fragrant. Using the can lid, drain the tomato liquid from the can of whole tomatoes into the pot. Let the liquid reduce by half and then add in the tomatoes. I dice them one by one in my palm using a basic dinner knife as I like small chunks of tomato. Another trick is to use kitchen scissors and just cut them up in the can. Add to the pot. Then add the crushed tomatoes. Stir in sugar and balsamic and let simmer until it has reduced and thickened. You don’t want it too thick because it will reduce further in the oven. Add salt and pepper to taste. Stir in herbs.

Macaroni and cheese:

  • 500 grams pasta (penne, macaroni or whatever tubular pasta you have sitting around)
  • 1/4 cup butter
  • 1/4 cup flour
  • 5 cups grated cheese, divided (I like a combination of asiago, cheddar, provolone and a bit of Parmesan; but I’m not afraid to use what’s already in the fridge.)
  • 3 cups milk
  • salt and pepper to taste

Cook pasta according to package directions. As the pasta boils, start on the cheese sauce. Melt butter over medium-low heat in a pot. When frothy and bubbling, add flour and mix with a whisk until well blended. Continue cooking for a couple of  minutes to cook out the raw flour taste. Slowly add milk, whisking constantly to prevent lumps. After it has thickened slightly, add 4 cups of the grated cheese. (I usually switch to a wooden or plastic spoon at this point.) Stir until melted, then add salt and pepper to taste. (If it is too thick, splash in a bit more milk.) Remove from heat.

Drain cooked pasta and return to pot. Top with cheese sauce and mix together.

Assembly:

Preheat oven to 425F.

Put tomato sauce in base of casserole dish. Top with macaroni and cheese and then sprinkle over remaining one cup of cheese. Bake covered for 45 minutes to an hour (depending on the size of your casserole dish). Remove lid and bake another 10 to 20 minutes until cheese is bubbling on top.

This is fantastic with a nice green salad.

Note: To make ahead, assemble the entire dish but stop just before baking it. Wrapped in plastic wrap and aluminum foil, this can be stored in the freezer. To cook later, let thaw and then bake as directed.

Continue Reading

Goat Cheese with Herbed Olive Oil

We have few Christmas traditions in my family. With all us kids grown up and no new generation to take our place, there are only a few activities we cling to during the holiday season. Gone are the days when we wrote letters to Santa and put out a plate of cookies. And we were never the type that gathered around the fire to listen to a parent read The Night Before Christmas.

But over the years we have created a few rituals that we still hold dear when the season finally arrives. The first is listening to Amahl and the Night Visitors – an opera about a poor widow and her lame son who are visited by the Three Kings en route to Bethlehem – while doing some Christmas baking.

A second, more recent, is watching the YouTube video of a house whose Christmas lights are coordinated to the operatically rock-and-roll Trans Siberian Orchestra’s Wizards in Winter – a song my mum and I both acquired permanently last year. This video, with its perfectly timed display of lighted Christmas trees and wreaths, never fails to bring on the giggles.

And third, and perhaps most important, we sit down on Christmas Eve and eat goat cheese doused in herb-and-garlic infused olive oil. With a lot of bread. And a glass or two of wine.

Goat Cheese in Herbed Olive Oil

This custom is so tied to our Christmas, in fact, that when I made it once for friends at some point outside of the holiday season, my little sister got mad at me. The word ‘sacrilegious’ may have even been used.

Like all good traditions, it is unclear when exactly it started or why.

What I do know is that the only reason we even discovered the recipe in the You Asked For It section of Gourmet Magazine was because we wanted the cookie recipe on the same page. At some point later, my mum thought to try out the goat cheese one as well.

It is almost too much to call it a recipe since the most taxing part appears to be gathering the spices and slicing the bread that goes with it. Heating olive oil with some rosemary, garlic and a few other goodies for five minutes is hardly cooking. And yet the combination of slightly grassy oil, softened garlic and the sharp heat of peppercorns mixed with rich goat cheese is so perfect. Add a slice of chewy baguette – making sure to scoop up a bit of each component – and it’s almost heaven.

Garlic, herbs and spices

Having read the recipe over before writing this, I see that it says to slice the goat cheese into eight rounds and then pour the herbed oil over top. I have no idea why we have never done this, but decided to stick to tradition – as we have so few – and leave the cheese in log form.

After all, what are the holidays without some traditions?

Flavouring the oil

Goat Cheese in Herbed Olive Oil II

Goat Cheese with Herbed Olive Oil
Adapted from Gourmet Magazine, January 1994

1 small bay leaf
4 garlic cloves, cut into thin slivers
1 tbsp. (15 mL) fresh rosemary leaves
¼ tsp. (1 mL) coriander seeds, crushed lightly
¼ tsp. (1 mL) fennel seeds, crushed lightly
10 whole black peppercorns
¼ cup (50 mL) extra-virgin olive oil
½ pound (250g) log of soft mild goat cheese
Sliced bread as an accompaniment

In a small saucepan simmer bay leaf, garlic, rosemary, coriander seeds, fennel seeds and peppercorns in oil for 5 minutes. Arrange goat cheese on a platter and spoon oil mixture over. Serve goat cheese with bread.

This story first appeared in the Real Life section in the Calgary Herald. For more delicious recipes, visit CalgaryHerald.com/life.

Continue Reading

Tuna Melt

I don’t like mayonnaise. And, as a rule, I don’t love tuna. But there is something about the combination of the two atop a doughy bagel and under a cap of bubbling orange cheddar that really turns my crank.

Tuna Melts

When leaving work tonight, debating whether or not to get take-out or try to make something fabulous out of the cooked chicken breast, lettuce and leftover red velvet cake still in the fridge, I was overcome by an undeniable desire for a tuna melt. It’s quick comfort food made from things I generally have on hand (though it did require a stop for bagels) and consumed my thoughts all the way home

No official recipe here; it’s pretty straightforward. But the results are delicious.

The Ingredients

Tuna Melt

  • bagel, your choice (I prefer Everything Bagels)
  • mayonnaise
  • celery
  • can of tuna
  • salt and pepper
  • cheddar

Drain the can of tuna and add diced celery, mayonnaise, salt and pepper. Spoon onto cut bagel and top with slices of cheddar. Pop in the oven set to a high temperature (450 degrees or so). Wait for the cheese to bubble and then pull out. Careful, they will be piping hot.

I usually toast the bagel too before adding the tuna mix. It keeps it a bit crusty, I believe.

Continue Reading