Fried Chicken Dine-Around

I don’t remember how the idea even first formed, what the precipitating discussion had been, only that at some point the idea was arrived upon that a group of us should have a night eating fried chicken from a variety of spots around Calgary.

A fried chicken tour – or dine-around as we later called it – seemed like one of those ridiculous ideas that is so decadent that you kind of can’t not do it.

So we did.

Saying yes was a no brainer. After all, fried chicken is one of those dishes that inspire made cravings. That juicy meat, crackle-crisp breading, spices and herbs, all check the boxes for a dish worth yearning for.

_MG_4078
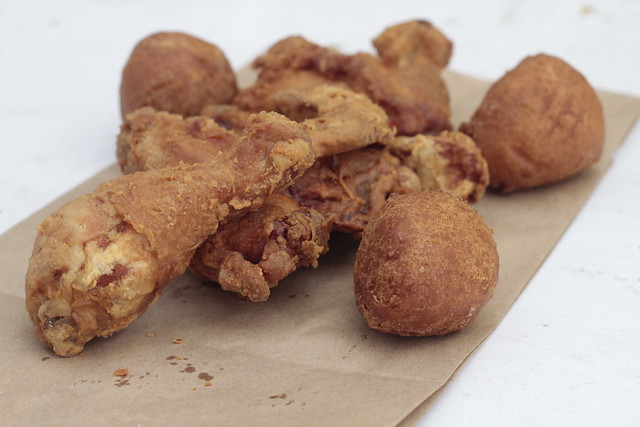
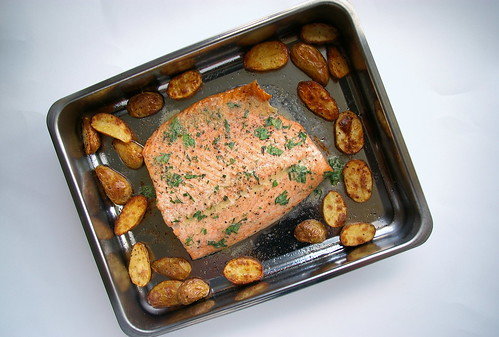
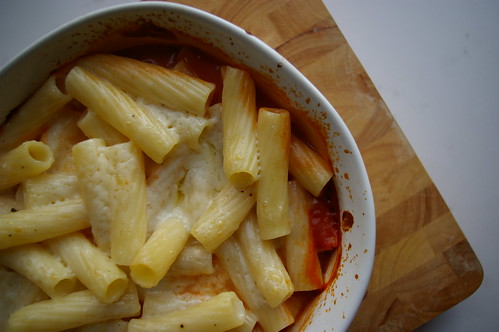
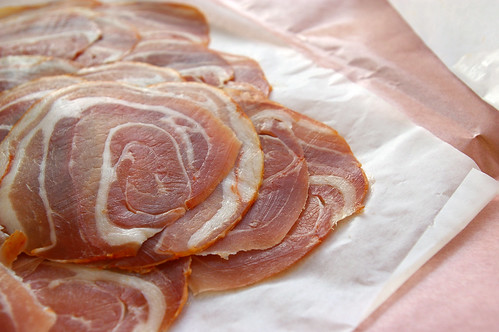
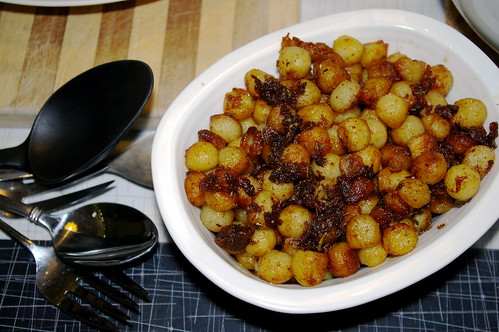
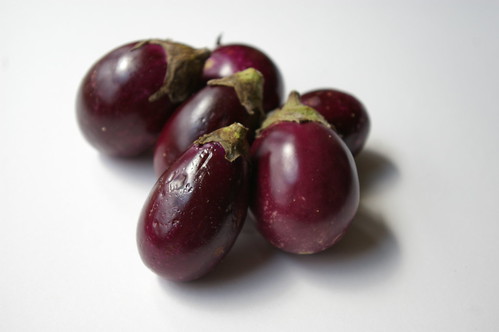
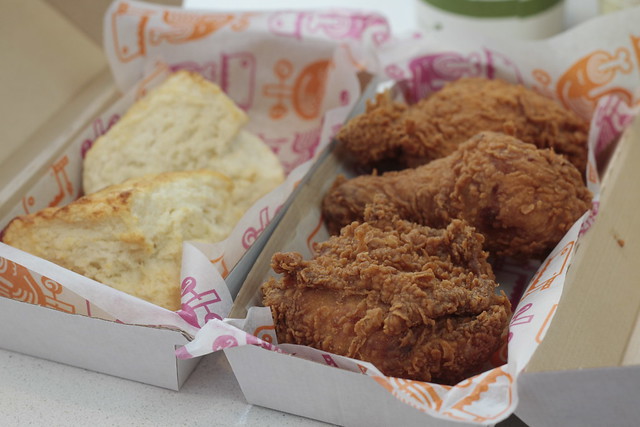
A selection from Chicken On the Way

The harder task was trying to narrow down the field from all the restaurants dishing up their versions of fried chicken around the city. Especially since – out of fear of heartburn or coronaries – we limited ourselves to four spots. Even that is not really for the faint of heart.

Chicken on the Way was a given, since it’s a Calgary institution and, well, the fritters are deadly good.
Cluck n’ Cleaver was added to the list as the newest on the scene.

And to cover off a variety of price points, we also wanted to include some sit-down restaurants, which meant Model Milk – which has been serving up fried chicken in some combination or another since it opened, including numerous iterations of southern classic combination chicken and waffles – and Anju which, while known maybe more for its yearn-worthy wings and sliders does offer large-format plates of fried chicken.

The original plan also included Olive Chicken, though I also love Ogam Chicken, which is down on Macleod Trail across from Chinook Centre.

In the end, we put those on the list for the inevitable round two of the Fried Chicken Tour.

I’ve dabbled in making fried chicken for a couple of dinner parties – where someone else was responsible for the waffles – and had a lot of success with recipes by Tyler Florence and J. Kenji Lopez-Alt – whose version I heartily endorse, as do my fellow dinner party diners.

Fried chicken looking so fine. Thanks @kenjilopezalt for the recipe! Not pictured: the waffles alongside.

A post shared by gwendolyn (@gwendolynmr) on

Dinner! Homemade chicken and waffles with bourbon syrup. Eff yes.

A post shared by gwendolyn (@gwendolynmr) on

I was mostly willing to tackle it because, well, I do love fried chicken and because the party hosts have one of those deep-fat fryers that’s all enclosed and maintains temperature and means no one is carefully watching a pot of boiling oil on a stove and dealing with splatter. Also, they cleaned up, so….

Because, as much as I love eating fried foods, I kind of hate cooking them. Though that may also be due to lack of experience (a chicken-and-egg situation, to be sure) and never quite getting the knack of keeping the temperature steady and so on.

Eating someone else’s fried chicken is so much easier.

With a date picked and an order selected, we set forth.

It started with Chicken on the Way.

After all, one should start at the beginning.

_MG_4081

A few people questioned why we would include this spot, but for me there was no doubt it had to be part of the tour. They’ve been frying up chicken and fritters and fries for nearly 60 years; they’re a Calgary institution.

Although the goal was to not fill up on side dishes, we couldn’t resist the corn fritters which are satisfyingly crusty on the outside with soft, corn-studded interiors.

The chicken itself has a rather thin coating when compared to Korean fried chicken or even the robust crust on Cluck n’ Cleaver. But it’s nice and crisp and the chicken underneath is juicy enough.

This is straightforward, know-what-you’re-going-to-get fried chicken – which is likely why it has remained a part of Calgary’s dining scene for so long. (And has expanded to other Calgary locations and other communities, like Airdrie, Brooks and Edmonton.)

The tour was off to a good start.

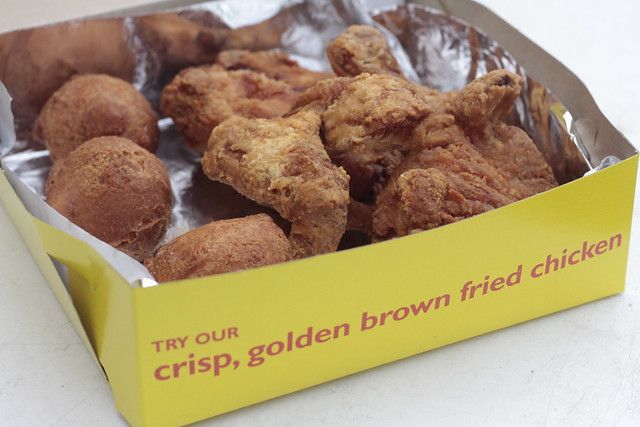
A straight shot south on 14th Street lands you at the front door of Cluck n’ Cleaver, the fried and rotisserie chicken spot opened by Nicole Gomes, of Nicole Gourmet Catering (who is currently competing on Food Network Canada’s Top Chef Canada: All Stars) and her sister Francine.

Like Chicken on the Way, you can stop and enjoy your food in the space, but mostly it’s to-go orders. (And, perhaps dangerously, they do delivery.)

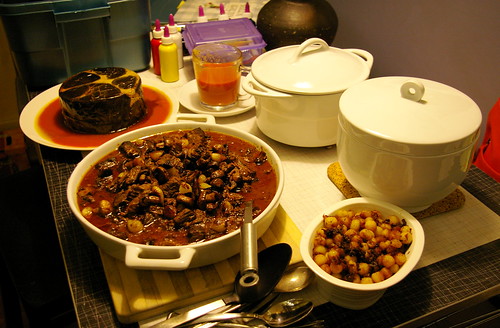
The “avoid ordering sides” decision went straight out the window here, as we tried three salads (coleslaw, black bean and corn, and a stick-to-your-ribs potato salad) along with biscuits and gravy. And a milkshake. Because why not?

_MG_4083
The camera eats first. At Cluck n’ Cleaver.

Where Chicken on the Way has a thin coating, Cluck’s is all thick and craggy with plenty of seasoning. Hiding beneath, deeply juicy chicken that counterbalances that crispy coating.

It’s excellent on its own but I wouldn’t stand in the way of anyone considering dipping some of that chicken into the gravy served on the side, which is also fantastic on the biscuits.

_MG_4089

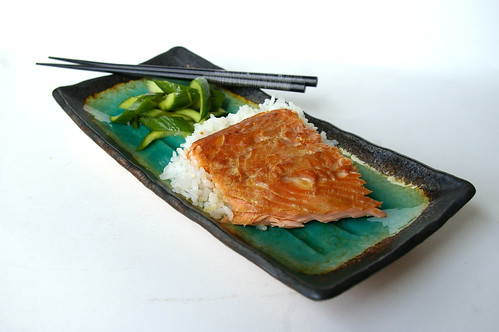
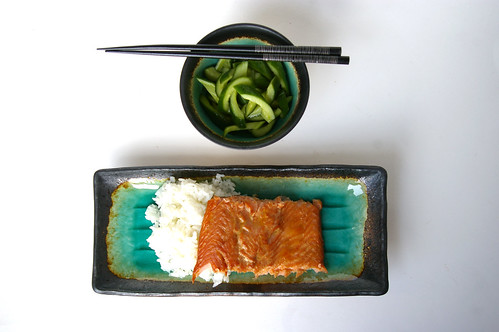
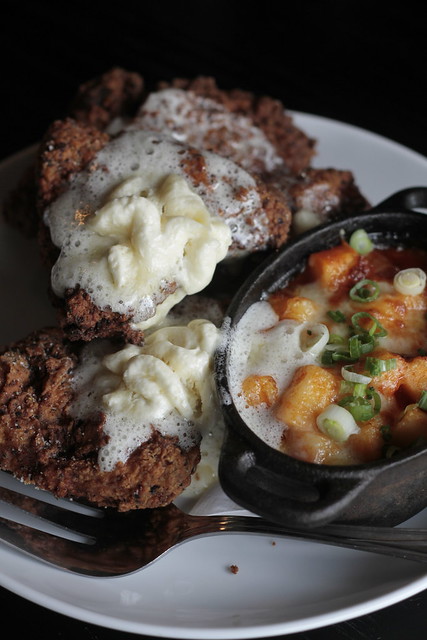
For an entirely different take on fried chicken – at least in terms of seasonings and spices – we then headed down 17th Avenue to Anju, home of some of the city’s most crave-able hot wings.

While a go-to order for me when stopping in, we forewent the gochujang wings for chef Roy Oh’s latest fried chicken creation, which he frequently changes to keep things interesting. There were only a few days left for the version then still on the menu, which was a spicy chicken topped with airy light honey-butter that melted into the crooks and crannies of the crispy skin. Alongside, a playful take on macaroni and cheese, but instead of pasta, Oh used rice stick.

Since the menu change was imminent, Oh also served up the newest iteration that is now on the menu: sriracha-brined fried chicken served with a black sesame-dressed salad. The cooling salad was a nice counterpoint to the hot chicken that, while spicy, didn’t blow out my tastebuds. (I’m, admittedly, a total spice wimp.)

_MG_4097

_MG_4102

No lie. We had to pause here for a bit before continuing.

Also no lie? I wasn’t sad because it meant time for one more Lock, Stock & Two Smoking Barrels – one of my favourite cocktails in the city. Into a smoked glass with a massive ice cube is a mixture of bourbon (yay!), ginger liqueur, sugar and bitters. So, it’s kind of like a super jazzed up Old-fashioned. (Also yay!)

I may enjoy trying all sorts of menu items while at Anju, but when it comes to the cocktail list, it’s Lock, Stock every time.

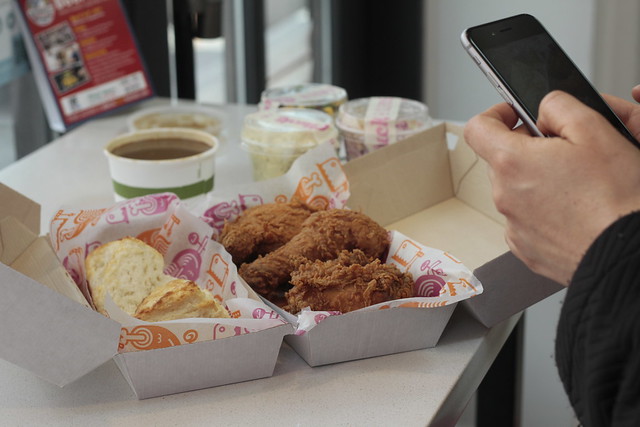
From Anju, it was a quick (much-needed) walk down to the other end of the block to hit up Model Milk.

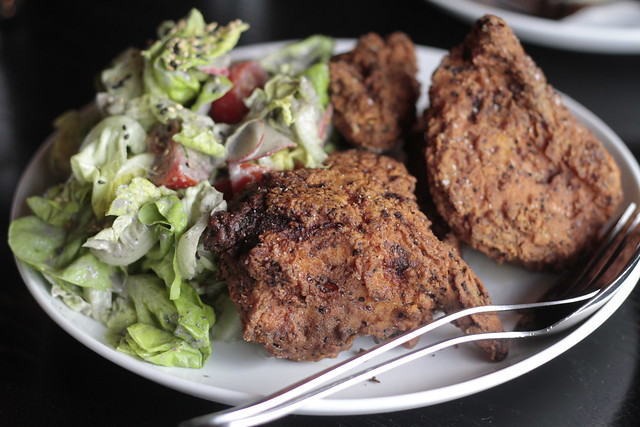
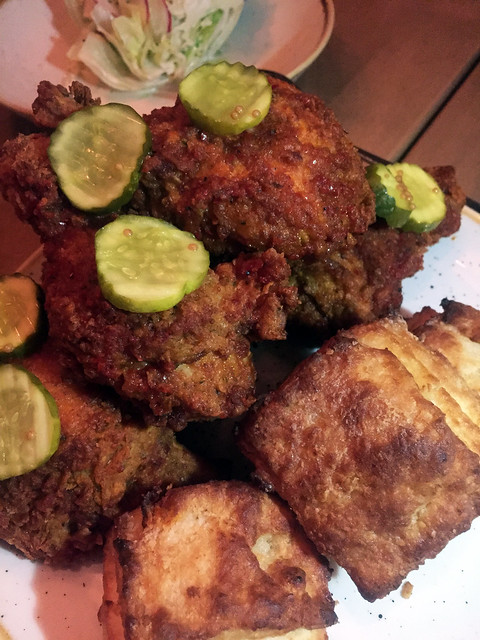
Fried chicken has been on their menu almost since the beginning, but how it’s prepared and what it’s served with is constantly evolving. First, it came with grits, then waffles entered the picture. At one point, those waffles were deep-fried to be, essentially, donuts. (This was my favourite iteration of them all.)

The latest edition comes with fluffy, flaky biscuits, a wedge of iceberg salad and dill pickle coins whose acidic tang play nicely against the chicken.

This chicken had some kick, to be sure. The salad was soothing, though and I couldn’t get enough of those light biscuits.
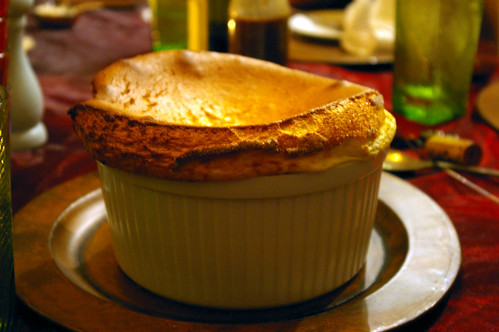
Sorry. Not the best photo. Trust me, it looks so much better than this.

IMG_0523

And so, some five hours later, the chicken dine-around came to a close. Amazingly – frighteningly – we were already discussing the next one as the plates were cleared.

Continue Reading

A day at SAIT’s culinary bootcamp

We are 10 minutes from lunch service when chef informs us the rabbit legs currently roasting in the oven will need 10 more minutes to finish, on top of the additional 10 we will need to pan fry them to get the bacon they are wrapped in crispy, as well as the time we need slice them and carefully plate them next to Pont Neuf potatoes, caramelized Brussels sprouts and thin, sweet carrots.

We are officially in the weeds.

Rewind three hours and we are a group of seven people sitting in one of the classrooms just off the massive kitchen that serves as the training ground for many of SAIT’s culinary programs. School is out for the semester, but the kitchen is open to us, the students of a four-day, intensive culinary bootcamp set to put us through the paces of working in a restaurant kitchen. For eight meals, those who have signed up for the course will rotate through appetizers, main dishes and desserts, preparing two dishes per day to chef’s standards. We will then dine on the three-course meal we have prepared in the oddly empty Highwood Dining room.

Ladles

At the invitation of SAIT, I am here to try out the program for one day. In the morning, dressed in my chef’s jacket and hat and oddly appropriate shoes — how very un-gwendolyn — I am excited and eager to get into the kitchen. By the end of the day, I am exhausted and have renewed my appreciation for the hard work chefs put in. I also leave, though, knowing some new skills — even if it’s unlikely I will never again butcher a rabbit. (Not that I was very good at it in the course either.)

Chef Jacket Selfie

A new program for SAIT, the culinary bootcamp is aimed at those with a solid base of cooking skills, those who have taken other continuing education-type courses on campus and are looking for something a little more challenging. The seven of us are treated similarly to the professional cooking students; we’re shown where things, are told our menu and given recipes, but are then mostly left to our own devices under the watchful eye of Michael Mandato, the chef instructor who oversaw the bootcamp.

One of the chefs on SAIT’s enviable team of cooking instructors, Michael came to Calgary after working in hotels all over North America. His New York accent, though, makes it clear where he was raised. He makes no bones about what his expectations are from us and it becomes clear early on that those are high.

This, I think at one point, is why I am likely not cut out to be a chef.

But that’s the point of the boot camp. This is not an easy-going, lunch-and-learn type of class. This is getting put through the paces of what it’s like to work in a restaurant (though thankfully not for any paying customers), with all the prep and scramble and cooking and trying to nail down timing, working backward from when your plate is supposed to hit the table. This is home ec on steriods.

I ask to join the entree team since I figure — correctly — it will be the most challenging part of the meal. Along with two other women, we are tasked with butchering rabbits and preparing the legs to be wrapped in bacon, roasted and then pan-fried, making a madeira sauce and Pont Neuf potatoes (fat, squat french fries, essentially). That’s just for lunch. For dinner, we will need to make a root vegetable gratin, a tamarind duck breast and some spiced fruit chutney for the side. And, because this is restaurant-type situation, we also need to do prep for the team taking over entrees the next day — that means searing off short ribs and wrapping and labelling them for a chill overnight in the cooler.

The rabbits — one of the first tasks — are my undoing. As in, I have no idea what I’m doing and have to repeatedly ask for help from a patient Mandato and one of my teammates, a home economics teacher well versed in skills that have escaped me.

This, I have no doubt, is partly why we are in the weeds, still waiting for our dish to come out of the oven to pan fry, to slice, to serve when the clock has technically already run out.

Slicing the rabbit leg

In a flurry, with the three of us — and a chef who I suspect would definitely be marking us down if we were in his class — working together quickly, the dish gets plated and we head into the Highwood Dining Room for a luxurious three-course lunch prepared by the bootcamp teams. A scallop ceviche starts the meal that is then capped off with a chocolate mousse.

Plating II

Ceviche appetizer

Rabbit with carrots and Pont Neuf Potatoes

It feels indulgent to sit down after racing around and I’m impressed with what we’ve all managed to pull together. Mandato praises and offers critiques on the dishes so we can learn where we can make improvements and it isn’t long before we’re back in the kitchen for round 2.

This time, at least, we are getting the hang of things. We know where the ingredients are, where the utensils and pots are located. There is now a rhythm to our team and we are quicker to jump in and offer to do things or help when it looks like one of us needs some assistance. The duck entree with its tamarind sauce, chutney and (ridiculously decadent and delicious) root vegetable gratin (can you decipher that this was the piece I worked on?) come together much more smoothly. (Though, as I am about to add all the different vegetables to the pot of boiling water at once, Mandato with a knowing nod and slightly cheeky smile asks if I am making sure only one type of root vegetable is going in at a time. “Yes, chef!” I say, though we both know he’s caught me from making an error that would lead to a mushy gratin.)

Plating

Grilled shrimp appetizer

Plated coconut panna cotta

And as we sit down for dinner, I survey the dish, pleased that I contributed to this plate, this meal that we are all enjoying with a glass of wine.

My feet ache, my bangs are aswirl from the heat of the kitchen and being trapped under the chef’s hat and I fear someone will need to roll me to my car I’m so tired, but I have a sense of accomplishment that wipes that all away. It’s been a long time since I was a student — and I’m not likely to sign up for the two-year program — but this taste of professional cooking, this challenge of being in a massive kitchen and needing to worry about timing and plating and helping my fellow cooks, that was delicious.

For more information about the SAIT bootcamps (there’s a pastry one!), visit SAIT. The next round will run May 30 to June 2, 2017.

Thank you to SAIT for allowing me to join the class.

Continue Reading

Khao Soi

As a general rule, I won’t complain about the weather. Snow happens. As does rain. As do those chinooks which bring a brief and welcome reprieve from the short days of winter.

But this year, for the first time, I’ve actually found myself daydreaming about a tropical holiday: aquamarine waters, warm beach, cold drink.

My bank balance, however, won’t allow it.

The next best thing is to eat like I’m somewhere exotic.

A spicy kick to warm the belly was the aim, a meal evocative of southwest Asia to cut through the grey afternoon with wind-whipped snow swirling outside. A little searching led me to Khao Soi, a Thai soup thickly spiced with red curry, but balanced with creamy coconut and spikes of lime. Chicken shredded after cooking in the broth and egg noodles add heartiness to this dish, which requires both fork and spoon to eat.

Pickled mustard greens or cabbage, crispy shallots and deep-fried noodles are traditionally added, but I craved a simpler soup that could be whipped up in less than hour without the need for all the pots in the cupboard. If I was going to pretend to be on a holiday, then coming up with something easily put together made sense.

As such, despite my recent vocal opposition to “recipes” that use cake mixes or jarred sauces – which I’m not against them as a general rule; I just expect when I click over to a food blog for a recipe that it will be how to make something, not just assemble it from pre-made parts – I admittedly came up with a version of Khao Soi that uses Thai red curry paste. I’d argue this falls more toward the practical end of the jarred sauce continuum since it’s comprised of numerous, and sometimes obscure, ingredients. But, since I could have technically made my own curry paste (recipes abound on the Internet), I’ll simply say there are times when shortcuts are warranted; this is one of those times.

I did enhance the curry paste with more garlic and ginger and a sprinkling of spices sautéed to enhance their flavour. The broth is rounded out with salty fish sauce and a bit of brown sugar then poured over bowls of chewy noodles and chicken cooked in the creamy, hot and spicy soup.

A bit of cilantro, lime wedges and bean sprouts added just before serving adds to the complexity.

The soup was all I had hoped for, hot and spicy enough – definitely at the upper end of my albeit low tolerance for heat – with the requisite sour, salty and sweet components that comprise a lot of southwest Asian cooking.

It wasn’t quite like sitting on a beach as aqua waters lap at the sandy shore, but it was at least a culinary escape from the dreary winter.

Khao Soi

I adapted this from a number of sources. I used chicken thighs which have more flavour, but boneless, skinless chicken breasts will work just as well in a pinch or if preferred. It can easily be made vegetarian by skipping out on the chicken and using vegetable broth. In that case, I’d add some fried tofu to round out the dish.

  • 2 tbsp (30 mL) vegetable oil
  • 2 cloves garlic, minced
  • 1 tbsp (15 mL) ginger, finely minced
  • 1 tsp (5 mL) curry powder
  • 1/2 tsp (2 mL) turmeric
  • 1/4 tsp (1 mL) cardamom
  • 3 tbsp (45 mL) red curry paste
  • 2 14-oz cans (796 mL) coconut milk
  • 2 cups (500 mL) chicken stock
  • 1 1/2 lbs. (750 g) chicken thighs, sliced in half lengthwise
  • 3 tbsp (45 mL) fish sauce
  • 2 tbsp (20 mL) brown sugar
  • 1 lb (500 g) fresh egg noodles (see note)
  • Lime wedges, cilantro, sliced shallots, bean sprouts for serving

In a large pot set over medium heat, warm the oil until it’s shimmering slightly. Add the garlic and sauté until fragrant, about 1 minute, then stir in the ginger. When the garlic and ginger are just cooked, but aren’t yet brown, add the curry powder, turmeric and cardamom. Sauté the spices until the form a paste with the oil and are fragrant, about 2 to 3 minutes. Add the red curry paste and stir with the spices, garlic and ginger. Work the paste and spices together and continue cooking, stirring nearly constantly and scraping it up off the bottom of the pot, until they are completely mixed and fragrant, another 2 to 3 minutes. Watch to ensure the spice mixture doesn’t burn. Scoop off the solidified coconut cream from the two cans of coconut milk and add to the pot. Mix well with the spice paste and cook, stirring often, until the red oil from the curry paste starts to separate, bubbling up to the surface, about 3 or 4 minutes. Add the rest of the coconut milk and the chicken stock. Bring to a boil. Add the chicken thighs, reduce the heat to a simmer and cover until the chicken has cooked, about 20 to 25 minutes. Remove the chicken to a dish and shred with two forks, setting aside until ready to serve.

Add the fish sauce and brown sugar and taste for seasonings, adding more of one or the other if desired.

Bring another pot of water to a rapid boil and cook the egg noodles until just tender with a slight chew. (Mine only needed about 45 seconds.) Drain and divide between 4 bowls.

Top with shredded chicken and ladle over the broth.

Serve with lime wedges, cilantro, sliced shallots and bean sprouts.

Serves 4.


Note: Find egg noodles at most grocery stores in the produce section or at Asian supermarkets.

Continue Reading

Eggs in Purgatory

Necessity is the mother of invention.

True in the world of technological advances. True also in the world of the kitchen.

Because, on those nights when there doesn’t appear to be anything in the cupboards and the fridge is down to just the basics, there are still meals to be made.

Such was the case the other night when I found myself hungry and with only the very basics in my cupboards and fridge. (Eclectic basics due to my bizarre impulse grocery shopping skills, but basics nevertheless.)

Among them, a can of diced tomatoes I’m sure I bought for a Bolognese that never ended up getting cooked, a chunk of Parmesan, part of a red onion, some rapidly wilting herbs and eggs.

In short, all the ingredients for a dish known as Eggs in Purgatory.

(It’s sometimes also known as Eggs in Hell, though I’d argue that’s for a spicier version than I can handle.)

Eggs in Purgatory II

There are millions of variations for this recipe, but they all start with the basic concept of cooking eggs in a tomato sauce. Beyond that, it can be as creative as one wants or dependent on what one has on hand: wilt in some greens like spinach or kale, add sausage, spicy chorizo or strips of prosciutto, sauté onions and garlic to give the sauce more flavour. Make a more “hellish” version by throwing in some chopped jalapenos or chilies while sautéing the onions. The options are limitless.

With my limited supplies, however, I kept it pretty basic. Thankfully, basic doesn’t mean boring.

With only 10 minutes and a very small amount of effort, I had a flavourful and filling dinner. The rich eggs with slightly runny yolks are a nice foil to the spicy tomato sauce. I mopped it all up with a crusty piece of bread slathered with some butter.

Using just one pan to make a meal means this dish is near perfection.

Next time, I probably won’t wait until necessity forces me to make this for dinner; I’ll make sure I have the ingredients for Eggs in Purgatory.

Eggs in Purgatory I

Eggs in Purgatory

For a spicier version, add more red pepper flakes or add some diced jalapeno. For some more green, wilt spinach or kale just as the onions have softened before adding the diced tomatoes.

  • 1 tbsp (15 mL) olive oil
  • 2 tbsp (30 mL) diced onion, about ¼ of a small onion
  • 1 clove garlic, diced
  • ¼ tsp (1 mL) red pepper flakes
  • 1 13.5-oz (398 mL) can diced tomatoes
  • ¼ tsp (1 mL) salt
  • freshly ground pepper
  • 2 eggs
  • ¼ cup grated Parmesan
  • ¼ cup chopped herbs

In a pan over medium heat, warm the oil and then add the onion, letting it sauté until softened and slightly transluscent. Add the garlic and red pepper flakes and sauté until fragrant, about a minute longer. Pour in the diced tomatoes and juice, stir and let come to a simmer. Add the salt and a few grinds from the pepper mill, then let the tomato sauce cook until the liquid reduces and the sauce thickens slightly. Taste for seasonings, adding more salt or pepper as needed.

Using the back of a spoon, make two divots in the sauce and crack the eggs into the spaces. Sprinkle the parmesan over the sauce and egg whites.

Cover with a lid and let the eggs cook until the whites are set and the yolk is slightly runny (or to your desired doneness).

Remove from the heat, then sprinkle with the chopped herbs.

Serve immediately.

Serves 1 to 2.

Continue Reading

Fettuccine con Prosciutto e Piselli

The joke goes that my grandfather was born on the kitchen table and so his love affair with food began right from the start.

His passion for cooking fostered my own love of being in the kitchen and eating good food from the time I was a child.

My grandfather and me

My memories of him revolve around food: making fresh pasta, picking basil in his greenhouse and making little pots of pesto to be eaten on bread with cheddar, and eating plates and plates of pasta.

(The other joke is that my grandfather is secretly Italian.) I still feel that influence today.

When I cook the dishes he would make for me as a child, I am back in the kitchen with him. Comfort dishes are often those I associate with him: tomato and red onion salad, sweet peppers braised in tomato sauce and served with chunks of crusty bread, soft-boiled eggs with toast and, of course, pasta.

He makes a wicked carbonara, but the dish I have inextricably linked to him is Fettuccine con Prosciutto e Piselli – a much more romantic way of saying pasta with cream, peas and ham.

Piselli e Prosciutto

I’d sit at the dining room table and he would bring in heaping bowls of it, steaming hot and speckled with pink ham and green peas, dusted over with Parmesan and a sprig of parsley from the plant on his front deck.

There have been unusual and unexpected variations over the years, depending on what ingredients he had available. At one point, it was a truly bastardized version made from army green-coloured canned peas and canned flaked ham.

When I moved out on my own to go to university, my grandfather bought me a copy of The Umbergo Menghi cookbook containing the actual recipe which had spawned all his own versions. (And also the braised sweet peppers recipe.) Making it in the early ’90s on a student budget and without much experience finding specialty stores meant using more readily available types of ham since most grocery stores back then weren’t carrying prosciutto. Still, combining some version of ham with some cream and frozen peas and tossing it all with cooked pasta felt luxurious when competing against whatever food was being served in the cafeteria. (Lucky me to have had a boyfriend who lived off campus and, therefore, had a kitchen I could putter in occasionally.) Nowadays, prosciutto is easy to spot in the deli section, which means when I make this dish, it’s as Menghi intended.

Most of the time, though, I cook it from memory. Typically that also means adding more peas and prosciutto than called for. Partly because who doesn’t like all the good bits mixed with the pasta and also because that’s exactly how my grandfather does it.

A couple of years ago, while visiting my grandfather on the coast, we made some pesto together.

Then I let him sit at the dining room table sipping a glass of wine while I made Fettuccine con Prosciutto e Piselli for him, serving up a bowlful, sprinkled with Parmesan and a scattering of parsley from the plant on his front deck.

Piselli e Prosciutto

Fettuccine con Prosciutto e Piselli

While the measurements are quite specific, I won’t tell if a few extra peas and a slice or two of prosciutto find their way into the mix. I also like to let the cream reduce a little bit more than the recipe suggests. For reheating leftovers – if there are any – I find a touch more cream, or even milk in a pinch, helps. (ETA: if the mixture is too thick before serving — which happens when the cream reduces a bit too much — another splash of cream or some reserved pasta cooking water can thin it a bit.)

  • 1 lb (500 g) fettuccine
  • 2 tbsp (30 mL) butter
  • 2 tbsp (30 mL) dry white wine
  • 6 tbsp (90 mL) peas
  • 2 cups (500 mL) whipping cream
  • 2 oz (60 g) prosciutto, julienned
  • salt
  • pepper
  • 1 1/2 cups (375 mL) Parmesan cheese, divided
  • 2 tsp (10 mL) fresh parsley, finely chopped

Cook pasta in boiling, salted water until al dente, about 3 to 5 minutes for fresh pasta and 5 to 7 minutes for packaged fettuccine.

Sauté peas in butter and wine in a large skillet on medium heat for 2 to 3 minutes. Add cream to peas and cook on medium heat until cream begins to bubble. Add prosciutto to peas and cream and simmer on medium heat for 2 to 3 minutes. Season with salt and pepper, but use less salt than you would normally use. The prosciutto will give you some salt.

Add fettuccine to peas, cream and prosciutto. Gradually add 1 cup (250 mL) Parmesan cheese to fettuccine. Toss together and heat thoroughly until cheese has melted.

Put fettuccine into a warm serving bowl or on warm plates. Sprinkle with remaining 1/2 cup (125 mL) Parmesan and parsley and serve.

Serves 4 to 6.

Continue Reading

Roast Salmon and Potatoes with Mustard-Herb Butter

Some meals are made perfect simply by the company and the conversation.

There’s something about gathering together good friends and good food that makes a meal so much greater than the sum of its parts.

The first time I had this Roast Salmon and Potatoes with Mustard-Herb Butter was in Edmonton while visiting friends. For the last day of the weekend, we decided to have some fun in the kitchen and, after flipping through Martha Stewart’s Dinner at Home, we settled on it.

A trip to the farmers’ market netted us the fingerling potatoes and herbs, a stop at the fishmonger, the salmon, and the final stop was at the wine store for some rose. (I drink what I like and do not profess to know anything about pairings; but I did like this match.)

The recipe comes together so quickly that there was more time to chat and set the table for the early afternoon meal.

And when the coral pink salmon and lightly browned potatoes came out of the oven and we smothered on the green-flecked butter, we knew it was going to be good.

Roasted salmon and potatoes with mustard-herb butter

But it was the combination of the rich salmon, crisp-edged potatoes and fresh herbs, along with the crisp rose and the inevitable laughs and conversation that made the the meal so memorable. That said, when I made it again Monday night, alone in my apartment, and ate it with a now-requisite glass of rose, it was still incredibly tasty.

The Dijon is not overwhelming and the rich fish is brightened by the slight mustard tang and fresh herbs.

And I love the idea of a one-pan dish, particularly since I’m the one doing the dishes.

Maybe that’s another great reason why this should be enjoyed with friends.

Roasted salmon and potatoes with mustard-herb butter

Roast Salmon and Potatoes with Mustard-Herb Butter

I’ve had this with fingerling potatoes, which are great, but this time around I used the more readily available Yukon Golds.

  • 1 tbsp plus 2 tsp (25 mL) extra-virgin olive oil, plus more for the pan
  • 1 lb (500 g) fingerling potatoes, halved lengthwise
  • coarse salt and freshly ground pepper
  • 2 lb (1 kg) fillet salmon, skin on
  • Mustard-Herb butter (see below)
  • fresh herbs, plus more leaves for garnish

Preheat oven to 400°F (200°C). Brush the bottom of a roasting pan with oil. Place potatoes in pan; season with 3/4 tsp (3 mL) salt and a pinch of pepper, and drizzle with 1 tbsp (15 mL) oil. Toss to coat, and spread in a single layer.

Roast 30 minutes, turning with a spatula after potatoes begin to turn golden underneath (about 20 minutes). Season salmon on both sides with salt and pepper. Push potatoes to edges of pan, and place salmon, skin side down, in centre of pan. Brush with remaining 2 tsp (10 mL) oil, and roast until salmon barely flakes on the edges when pressed, 25 to 28 minutes for medium-rare (it will still be pink in the centre). Brush salmon and potatoes with herb butter while still hot.

Serve, garnished with herbs. Serves 4.

Mustard-Herb Butter

While the original recipe calls for chervil, thyme and parsley, I used dill, tarragon and parsley.

Use what you like or what you have on hand. I didn’t use all of the butter, so don’t feel you need to put it all on. Stewart suggests it goes well with roasted, grilled or broiled fish, chicken or pork.

I’m thinking of roasting the rest of my potatoes and tossing it with them.

  • 1/2 cup (125 mL) unsalted butter, room temperature
  • 1 tbsp (15 mL) Dijon mustard
  • 1/4 cup (50 mL) tightly packed small herb leaves, such as parsley, thyme and chervil, plus more for garnish
  • coarse salt and freshly ground pepper

Stir butter and mustard together in a small bowl until smooth. Stir in the herbs and season with 1/4 tsp (1 mL) salt and 1/8 tsp (0.5 mL) pepper, or to taste.

(The compound butter can be made ahead, rolled tightly in parchment paper to form a log, and then wrapped in plastic; store in the refrigerator up to 1 week, or in the freezer up to 1 month.)

This article first appeared in the Calgary Herald. For more recipes and meal ideas, check out CalgaryHerald.com/food.

Continue Reading

Teriyaki Trout and Quick Japanese Pickles

When I’m nostalgic for Japan, there is one recipe I pull out.

Though, oddly, I didn’t find it in Japan nor use it when I was there.

Instead, this recipe for Teriyaki Trout was one I inherited from my family, who has been cooking it for years.

Teriyaki trout with quick pickles IV

Although only really a nod to a traditional teriyaki, it is my fallback recipe when I’m longing for the Land of the Rising Sun. There, I often made an authentic teriyaki salmon that I would serve with steamed rice and a selection of tsukemono (pickles).

But this tastes just as good and the ingredients are readily available, unlike the two types of soy and mirin that usually went into my marinade when I was overseas. (These can, of course, be found at Asian grocery stores, but this recipe is built on ingredients most people have readily available in their cupboards: soy, sugar and sherry.)

This is not the thick gloppy sauce you find on supermarket shelves. This is a thin marinade that infuses the fish with that salty-sweet teriyaki flavour.

A few cloves of smashed garlic perfume the marinade without overpowering the flavours. (And, bonus, they are easy to fish out when it’s time for the trout to go in the oven.)

In the beginning, my parents made this with salmon, as the original recipe calls for, but when the price of that got too dear, they started using steelhead trout. Now that’s what I grab as well.

Teriyaki trout with quick pickles II

My version is a photocopy of the original, with no notation of where it came from. Even the amount of fish called for is absent from the recipe.

But I’ve found the marinade is enough for about two pounds of fish. I prefer to do whole sides rather than individual fillets or steaks, though please use what you want.

Since it’s usually only me dining, I often make the full batch of marinade and divide it between two pieces of fish, throwing one into the freezer for dinner at a later date. I’ll pull it out in the morning and let it sit in the fridge. As it thaws, it continues to infuse the teriyaki flavour into the fish and by the time I get home from work, it’s ready to cook, which, some nights, is exactly the kind of meal I like to have around.

When I’m a little homesick for the rice paddies and stunted hills of the small town in Japan where I lived, I make this dish, serving it with rice and some steamed green vegetables. Sometimes, when I’m really feeling nostalgic, I also make quick pickles -thin slices of de-seeded cucumbers left to sit in a bath of rice vinegar, sugar and salt.

The tangy flavour is a nice balance to the rich fish.

Cucumbers

Sliced Cucumbers

Teriyaki trout with quick pickles

Teriyaki Trout

  • 2 pounds (1 kg) steelhead trout, side or steaks
  • 1 cup (250 mL) soy sauce
  • 1/4 cup (50 mL) sherry (drinking, not cooking)
  • 2 tablespoons (25 mL) sugar
  • 3 cloves garlic, crushed
  • 2 tablespoons (25 mL) grated ginger or ginger paste

Combine the soy, sherry, sugar, garlic and ginger in a bag or flat dish. Add the trout. Let marinate for at least 30 minutes or up to overnight.

Preheat oven to 450°F (230°C). Place fish in a casserole dish (if using steaks, grease the dish slightly so they can be easily removed) and bake until fish is cooked and flakes easily, about 12 to 20 minutes depending on the thickness of the fish.

Quick Japanese Pickles

The amount of salt and sugar can be easily adjusted for taste. I use Maldon flaked sea salt, which has a milder flavour. Sea salt can be easily substituted, but start with just 1 tsp (5 mL) and add more only if needed. The rice vinegar should be unseasoned.

  • 1 English cucumber (or 3-4 small cucumbers)
  • 1/2 cup (125 mL) rice vinegar
  • 1 tablespoon (15 mL) sugar
  • 1½ teaspoons (7 mL) flaked sea salt
  • 2 tablespoons (25 mL) water

Slice cucumbers in half and use a small spoon to scrape out seeds. Slice on a diagonal into ½-cm half-moons. Stir together vinegar, sugar, salt and water and mix until salt and sugar have dissolved. Add cucumber slices, tossing them with brine. Let rest in the fridge for at least an hour, tossing occasionally.

This originally ran in the Calgary Herald. For more recipes and food stories, head to the Calgary Herald’s Food page.

Continue Reading

Asparagus and Pea Salad with Mint

You ever notice how one recipe can beget another?

Last summer when I was making my shaved asparagus pizza, I found myself snacking on the strands of asparagus that had been tossed with olive oil, salt and pepper. (I’m completely unable to resist “testing” ingredients as I go along.)

It made me wonder why so few recipes I have stumbled across call for raw asparagus, which, when lightly dressed, is lovely.

Now that the stalks are appearing again on grocery shelves, it got me thinking. And then I stumbled across a salad recipe, which combined asparagus shavings with some other great loves of mine: Parmesan, prosciutto, mint and lemon.

Asparagus and Pea Salad with Mint

This salad is kind of like six degrees of separation.

Mint goes well with peas, which are lovely with asparagus, a natural match to prosciutto.

Well, really, what doesn’t prosciutto go well with?

And a lemon-based dressing adds some refreshing tartness, while a little bit of honey brings out the natural sweetness of the peas.

Now, I am the first one to up the amounts of salad goodies — more Parmesan, more prosciutto, please and thank you.

But in this case, I’m going to, unexpectedly, advise restraint. Messing with the fine balance between salt and sweet, meat and cheese, mint and vegetables can upset the equilibrium.

Too much cheese and the salt overpowers the delicate flavours of asparagus and mint.

Too much prosciutto overwhelms the texture of the salad.

When the proportions are right, this salad is perfection.

Right after finishing the photo shoot, I inhaled a bowlful.

I loved the spring green flavour of the thinly shaved asparagus, the sweet peas and bright mint with the slight tang of the mustard and lemon dressing.

The prosciutto didn’t hurt either.

All the greens contrasted with the pink of cured ham and cream of Parmesan is quite pretty and makes this a great dish for entertaining.

Serve it out on the deck with some crusty bread and a nice bottle of wine.

Asparagus and Pea Salad with Mint II

Asparagus and Pea Salad with Mint

This salad is from Epicurious by way of Serious Eats.

If fresh peas are in season, feel free to use them instead of frozen peas. Frozen peas are perfectly tasty, though. Just defrost in a sieve with some hot water. To get nice Parmesan shavings, let the cheese sit out on the counter for 10 or 15 minutes and then use a vegetable peeler.

  • 1½ cups (375 mL) peas
  • 1 lb (500 g) asparagus
  • 6 cups (1.5 L) salad greens
  • 2 tbsp (25 mL) chopped mint
  • 1/4 cup (50 mL) shaved Parmesan
  • 8 slices prosciutto, cut in strips
  • 2 tbsp (25 mL) lemon juice
  • 2 tsp (10 mL) Dijon mustard
  • 1 tsp (5 mL) honey
  • salt and pepper to taste
  • 1/2 cup (125 mL) olive oil

Whisk together lemon juice, Dijon mustard, honey and salt and pepper.

Drizzle in the oil slowly while still whisking to emulsify the dressing.

Test the dressing and adjust seasonings as necessary.

Place salad greens in a large bowl, add chopped mint and peas.

Using the woody end as a handle, hold the asparagus against a cutting board and use a vegetable peeler to make long strips. (These will vary in thickness, which is fine.)

After shaving, you will be left holding the rough end, which can be discarded.

Repeat with all the asparagus and then add the shavings to the salad.

Add sliced prosciutto. Toss with dressing (start with only a portion of the dressing and add more as necessary; the salad may not need all of it).

Top with shaved Parmesan.

Serves 4.

This first appeared in the Calgary Herald. For more recipes and instructional videos, check out the Herald’s Food page.

Continue Reading

Beef Bulgogi

I had never tried Korean food before I moved to Calgary.

There had been Thai and Vietnamese, Japanese and Chinese, of course. But in all my opportunities to eat Asian food, there had been no kimchee or bulgogi.

Beef Bulgogi II

And then a group of friends formed an ad hoc supper club where we would all go out for dinner on Thursday nights, typically for ethnic foods.

We dined on Indian and pho and then, finally, a Korean place where I had my first taste of beef bulgogi.

I didn’t know what to expect, but was in beef heaven by the time I took that first bite. The marinated short rib meat was almost as soft as butter, flavoured with ginger, garlic, soy and sesame. I wedged it into crisp, cold lettuce leaves and savoured each bite. (Or as much as I could, as it was so fantastic it was hard to remember to eat slowly.)

I went back a couple of months later and there was only one thing on the menu I wanted.

Later, I stumbled on a recipe in my oft-thumbed Everyday Food cookbook (Clarkson Potter, March 2007) for a version of beef bulgogi. Instead of the more traditional Korean short ribs, it called for thinly sliced rib-eye and it required no ingredients more exotic than sesame and chili oils and some staples found in most kitchens: brown sugar, soy, ginger, garlic.

Craving the taste again of that distinct mix of salty soy, garlic and the hint of sweet from the brown sugar, I thought it was worth a try.

The book now cracks open to that page, left slightly spattered by being set too close to the fry pan when cooking — the sign of a successful recipe.

At home, the first time I tried this out, I couldn’t be bothered with the lettuce wraps; it seemed too fussy for eating in front of the TV. So, I just put a couple of scoops of it on cooked rice and ate it with chopsticks. The rice soaked up the extra sauce, making for a very satisfying and flavourful meal. (And the leftovers were a nice lunch at work the next day.)

But I also like the idea of rolling up the beef and onions and peppers in soft butter lettuce, so this time around I did exactly that.

Beef Bulgogi I

The leaves of butter lettuce (or Boston lettuce, as it is also known) are tender and pliable, making them a perfect container for the bulgogi mixture. The thin leaves also don’t interfere with the flavours and softness of the meat.

Either way, it’s a delicious and fast way to taste Korea.

And one I’ll come back to again and again.

Beef Bulgogi III

Beef Bulgogi

This recipe from Everyday Food calls for hot chili sesame oil, which I have never found in my grocery store travels. Instead, I use half sesame oil and half chili oil. In a pinch, you can use all sesame oil and a dash of red pepper flakes.

  • 1½lbs (750g) rib-eye steak, trimmed of excess fat
  • 1/4 cup (50 mL) soy sauce
  • 1½ tsp (7 mL) sesame oil
  • 1½ tsp (7 mL) chili oil
  • 2 tbsp (25 mL) dark brown sugar
  • 6 garlic cloves, minced
  • 1 tbsp (15 mL) finely grated, peeled fresh ginger
  • 2 medium red onions, halved and cut lengthwise into 1-inch (2.5-cm) wedges
  • 1 green bell pepper, seeds and ribs removed, sliced into ½-inch (1-cm) strips
  • 4 tsp (20 mL) vegetable oil, divided
  • 1 small head Boston (also known as butter) lettuce

Freeze the beef for 20 minutes; transfer to a clean work surface. Slice diagonally (across the grain) into 1/8-inch (3-mm) thick strips.

In a small bowl, whisk together the soy sauce, sesame and chili oils, brown sugar, garlic and ginger. Place the onions and peppers in a small bowl; toss with half the soy marinade. Toss the steak in the remaining marinade; let stand for 15 minutes

Heat 2 tsp (10 mL) of the vegetable oil in a large non-stick skillet over medium-high heat. Add the onions and peppers; cook until softened, about 5 minutes. Transfer to a plate. Wipe the skillet clean with a paper towel.

Heat the remaining 2 tsp (10 mL) vegetable oil over high heat. Cook half the meat, turning often, until browned, about 2 minutes. Transfer to a plate. Cook the remaining meat. Return the first batch and any accumulated juices to the pan; add the onion mixture. Cook, tossing, until heated through, about 1 minute.

To serve, roll up the beef mixture in lettuce leaves.

Serves 4.

This first ran in the Calgary Herald. For more recipes and food stories, check out www.CalgaryHerald.com/life.

Continue Reading

Peach, Prosciutto, Rosemary and Goat Cheese Flatbread

I bought a few peaches from the farmer’s market a few weeks ago, thinking they would be a great and simple addition to bagged lunches for work. And when they were perfectly ripe, they were fantastic. Sweet and juicy and just oh-so-peachy tasting. Then I got home from work one night and just wanted a salad. But, you know, not just a salad. And then a brainwave: what if I took the final sweet peach and combined it with some goat cheese, prosciutto and pecans.

Peach

Good god, that was a fine salad. Dressed in a light vinaigrette made with blood orange vinegar. I ate it with a few pieces of crusty baguette and it was a fantastic dinner.

It should come as no surprise that I made it again a week later when I had another group of peaches ripe and at hand.

But later, I thought I would like to try combining the bread and the salad by creating a flatbread that used the peach-prosciutto-goat cheese combination. This time with a little rosemary added in.

Is it cheating if I used some pizza dough I bought at the local Italian market? I’m going to say no. I can make dough, but when you’re at the market anyway and they have perfectly risen balls of dough for a little more than a toonie, I figure there’s no harm in taking shortcuts once in a while.

Got home, stretched it out on a baking sheet covered in a thin layer of olive oil and then just topped it with slices of peach, chopped rosemary, some ragged pieces of torn prosciutto and blobs of goat cheese. Into the oven and baked until golden, which took probably only 10 to 15 minutes, and it was good to eat.

It was delicious, though next time I may omit the goat cheese which, frankly, felt a bit like gilding the lily.

So this is less a recipe as much as a suggestion but one worth trying.

Flabread pre-oven

Peach, prosciutto, rosemary flatbread

Peach, Prosciutto, Rosemary and Goat Cheese Flatbread

  • ball of pizza dough or homemade focaccia/pizza dough, enough to cover a baking sheet
  • olive oil to lightly coat baking sheet – 1 to 2 tablespoons
  • one peach
  • 5 slices prosciutto, torn or cut into smaller pieces
  • 1 tablespoon rosemary, roughly chopped
  • 2 – 3 ounces goat cheese, crumbled OPTIONAL

Set oven to 500F. Stretch out dough on lightly oiled baking sheet. Top with sliced peaches, prosciutto, rosemary and goat cheese.

Bake until dough is golden, about 10 to 15 minutes.

Continue Reading

Shaved Asparagus Pizza

I have a confession: I am incapable of kneading. I don’t know if it’s a character defect, a lack of practice or sheer laziness, but I cannot seem to take a mix of flour and water and yeast and make it into a smooth mass that balloons into a beautiful ball of dough. I end up with something shaggy and ragged and, well, downright ugly.

When it comes to pizza crusts, I have tried to persevere. There have been a few successes (and one colossal failure where I essentially made a giant, pizza-sized cracker), but I was typically undone by my less-than-stellar kneading skills.

And then, a revelation: no-knead pizza dough.

It was a circuitous route that brought me to a place where I realized I too could easily make homemade pizza dough.

It started with shaved asparagus pizza.

Shaved aspargus pizza IV

I stumbled onto the idea on Smitten Kitchen — a popular food blog written by the charming Deb Perelman — and was immediately enchanted. Warm chewy crust, melted cheese and thin shavings of asparagus that would roast on top? Yes, please.

But, as Perelman pointed out, she was not the only one to think this would be a fantastic combination. Indeed, Jim Lahey, who revolutionized bread baking with his no-knead concept, serves a high-end version at his restaurant.

Surely, Lahey must have a pizza dough recipe.

Yes, yes he does. And it doesn’t involve kneading.

Sold!

This time, the dough is intentionally shaggy and ugly. And, after a few stirs and some squishing together of the ingredients (I can’t even bring myself to call it kneading), it only wants to be left alone for two hours.

When finally baked, it has a pleasing crispness with just an appropriate amount of chew. Topped with a tangle of shaved asparagus that had roasted and intensified in flavour, along with the richness and slight salt of the cheese, this is something I could eat over and over.

Shaved aspargus pizza II

My first taste of asparagus came in Grade 10 when my boyfriend made me dinner one night and steamed some to go with steaks. I don’t remember much about that meal other than feeling overwhelmingly shy and excited to have a boy I liked cook for me.

Since then, I’ve grown to love the green-stalked vegetable and I’ll take it just about any way it can be prepared. Roasting, though, is my favourite because I like how it slightly caramelizes the tops and intensifies the flavour.

This pizza takes advantage of that, particularly because you shave the asparagus. None of the stalks shave perfectly, so you end up with varying thicknesses of asparagus strips, each of which cook slightly differently. Some will caramelize, while others will still retain a slight bite to them.

The beauty of pizza is that it is infinitely adaptable and this recipe is no exception.

While I used buffalo mozzarella cut into rounds and a sprinkle of Parmesan, I was tempted to throw on some bits of goat cheese as well and will probably try that next time. A squeeze of lemon would have been nice at the very end. Like it spicy? Toss on some red pepper flakes.

Lahey’s version uses some rather fancy cheese, quail eggs and shaved black truffles.

But even with slightly less-glamorous ingredients, this dish is delicious.

P.S. This crust was so good that I made another batch about four days later. Yes, I have a pizza problem.

Buffalo Mozzarella

Asparagus bunch

Shaved Asparagus

Asparagus shavings

Shaved aspargus pizza I

Shaved aspargus pizza III

Shaved Asparagus Pizza
Crust, from Jim Lahey’s My Bread

  • 3 ¾ cups (925 mL) bread flour
  • 2 ½ teaspoons (12 mL) instant yeast
  • ¾ teaspoon (3 mL) table salt
  • ¾ teaspoon (3 mL) plus a pinch sugar
  • 1 1/3 cups (325 mL) room temperature water (about 72F or 23C)
  • 1 to 2 teaspoons (5 to 10 mL) olive oil for pans

In a medium bowl, stir together the flour, yeast, salt and sugar. Add the water and, using a wooden spoon or your hand, mix until blended, at least 30 seconds. Cover the bowl and let sit at room temperature until the dough has more than doubled in volume, about two hours.
Using a bowl scraper or rubber spatula, remove the dough from the bowl onto a floured work surface. Gently form into a rough ball. Then divide the dough into two halves (to make his two 13×18 – 33×45 cm – pizzas or, do as I did, and divide into three parts for round pizzas) spacing them 4 inches (10 cm) apart, and cover with a moistened kitchen towel for 30 minutes.

Pizza, from Smitten Kitchen:

  • ½ pound (250 g) asparagus
  • ¼ cup (50 mL) grated Parmesan
  • ½ pound )250 g) mozzarella, cut into rounds, shredded or cubed
  • 2 teaspoons (10 mL) olive oil
  • ½ (2 mL) teaspoon coarse salt
  • black pepper to taste

Preheat oven to 500F (260C).
Using the rough end as a handle, hold the asparagus against a cutting board and use a vegetable peeler to make long strips. (I got anywhere between two to five shavings from each stalk depending on how thick they were or how easily the peeler went through the asparagus. They were also of varying thicknesses, which is fine.) After shaving, you should just be left holding the rough end, which can be discarded. Repeat with all of the asparagus.
In a bowl, toss together asparagus, olive oil, salt and pepper.

Roll out or stretch dough to create 12” (30 cm) round. (Lahey calls for it to be stretched by hand, but I used a rolling pin and did only a bit of hand stretching after getting the dough on the pan.) Brush olive oil on pan and transfer dough.
Sprinkle on Parmesan, then add mozzarella. Top with asparagus strands.
Bake for 10 to 15 minutes until crust is golden, cheese is melted and asparagus is roasted.

This story first appeared in the Real Life section in the Calgary Herald. For more delicious recipes, visit CalgaryHerald.com/life.

Continue Reading

Roasted Tomato Tart

(I am so proud of this post because it marks my first food article in the Herald’s revamped Sunday edition. My photo of my little roasted tomato tart was on the cover of the ‘mix’ section. For those that haven’t seen the new Sunday edition, that means the photo was the entire front of the ‘mix’ section. Yay! And a warning, this post is photo heavy! What can I say? I had a hard time paring it down.)

And now, back to the article.

I have an unabashed love of tomatoes. Meaty slices of them wedged between two pieces of buttered toast with a sprinkle of salt and pepper is my idea of comfort food. Roma tomatoes drizzled with a little balsamic vinegar and good olive oil make a simple side dish. And I love that burst of seeds and flavour that comes when biting into a plain cherry tomato.

Tomatoes II

I once bought a perfume called Tomato because it smelled like the aroma given off after brushing up against the green stalks of a tomato plant — that verdant scent of heat and summer. A few spritzes on my wrist could transport me back to being a kid and visiting my grandparents on one of the Gulf Islands where I sometimes helped in the garden.

Enclosed in chicken wire to protect it from ravenous deer, the garden produced sweet tiny carrots I ate straight from the ground after a quick rinse from the hose, grape vines that tangled their way along trellises, and rows of tomato plants.

I would use a plastic watering can to fill the coffee tins with water, from which my grandfather had removed the bottoms, nestled into the earth next to the plants — a trick that allowed the water to get right at the plant’s roots. And I would brush up against the stalks, filling the air with that distinct smell.

If any were ripe, I’d pull them sun-warmed from the dark green plants and eat them unadorned.

There is no taste like a vine-ripened tomato.

Tomatoes

But sometimes I like to roast them to intensify their essence and bring out more of their natural sweetness.

Baking halved Roma tomatoes in the oven with a few unpeeled garlic cloves is an excellent base for a good tomato soup.

Cherry tomatoes, when roasted, shrink and wrinkle to softish pouches of concentrated tomato flavour. I’ve made simple pasta sauces like this, topped only with shaved Parmesan and a sprinkle of basil or parsley if I have them lying around.

Roasted Tomato Tart-round

I thought recently — after seeing a clamshell package of multicoloured cherry tomatoes at the farmers market — that they would make a good savoury tart, particularly if paired with a hearty crust.

When I began imagining a roasted cherry tomato tart, I thought there was potential in adding a few handfuls of Parmesan cheese to the dough to bring out a nice nutty, rich taste when baked.

A little research led me to realize I wasn’t the first person to think of this, but I didn’t love any of the recipes I came across. I am by no means a pastry expert, but was willing to give myself a chance to experiment.

Using ideas from several different recipes, I decided to create a hybrid pastry that used cream instead of water and a cup of Parmesan cheese, finely grated and blitzed with the other ingredients in the food processor.

The dough was easy to work with and resulted in a golden crust that played nicely against the sweet, soft tomatoes.

(This would likely work just as well, though, with a regular pastry.)

Because cherry tomatoes are so juicy, there was a lot of liquid bubbling away as the tart was baking. (Truth be told, I was a bit nervous about just how much I could see as I peered through the oven door.) Some of it did cook off in the process, but there was definitely a thin layer of tomato liquor when I pulled the tart out. Some may call it soggy; I prefer to think of it as tomato-infused pastry. Either way, the base of the tart pastry was crisp and I liked the taste of it.

A sprinkle of basil gave it a nice fresh taste when added as the tart cooled slightly. (And yes, you’ll want to let it sit for a few minutes because cutting into the tomatoes will likely cause some to burst. Ouch.)

Chilled parmesan pastry

Pastry in tart dish

Tomatoes III

Tart pre-oven

Roasted Tomato Tart II

Tomato Tart and slice

Sliced Tomato Tart

Roasted Tomato Tart Sliced

Roasted Tomato Tart

  • 1½ cups (375 mL) flour
  • 7 tbsp (115 mL) butter, cold and cut into small cubes
  • ½ cup (125 mL) cream
  • 1 cup (250 mL) finely grated Parmesan
  • pinch salt
  • 1-1¼ lb. (500 to 625 grams) cherry or grape-sized tomatoes
  • 1 tbsp (15 mL) olive oil
  • 1 tsp (5 mL) salt
  • ½ tsp (2 mL) fresh ground pepper
  • 2 tbsp (25 mL) fresh basil, chiffonade (rolled like a cigar and cut into strips)

Add the flour and pinch of salt to the bowl of a food processor, then sprinkle the butter cubes on top. Pulse two or three times until the butter starts to break down, then add the Parmesan. Pulse until the mixture is crumbly and the butter is in pieces no larger than a pea.

Add the cream slowly while pulsing until the dough starts to come together. (It will bunch up and the food processor noise will change.)

Empty the contents onto a lightly floured surface and knead it a few times to pull the dough together.

Wrap in plastic and refrigerate for at least 30 minutes or as long as overnight.

Preheat oven to 325 F (160 C).

Toss the tomatoes in a bowl with the olive oil, 1 tsp salt and pepper. Set aside.

On a lightly floured surface, roll out the dough until it is about 1/3 inch to 1/4 inch (8 millimetres to 6 mm) thick. Press into tart tin (9 inch/23 cm round tin or a 14-inch/35 cm rectangular tin), stretching it as little as possible, and cut off excess. Arrange tomatoes in the tart tin.

Bake for an hour until tomatoes are soft and pastry is golden brown. Remove and let cool on a rack for 10 minutes. Roll basil leaves like a cigar and then slice them to make herb strips. Sprinkle over tart.

Serve while still warm.

Cook’s note: The amount of tomatoes will vary depending on how tall or fat they are and how well they fit together in the tart tin.

This story first appeared in the Real Life section in the Calgary Herald. For more delicious recipes, visit CalgaryHerald.com/life.

Continue Reading

Mac-Raff n’ Cheese

This is one of my favourite all-time childhood meals.

Mac-Raff n' Cheese I

I loved coming home to find a pot of Mac-Raff n’ Cheese bubbling away in the oven. My stepdad, Sean, would make it in our giant Corning Vision Ware pot (Do you guys remember those? The glass pots that came in a couple of colours? Ours was brown.), so if I peered through the oven door I could see the tomato sauce simmering up to mingle with the cheese-coated pasta.

For a long time I thought it was a creation of Sean’s, him being the head chef in our blended family. And what a chef he was! We were well-fed kids because that man knows his way around a kitchen. Lamb and mint sauce, chicken and rice with cream gravy, roast beef with all the fixings. There’s a reason I love to go home, even today. But when I was home a few months ago, my mum revealed that she was actually the mastermind behind the recipe.

She’s a Macdonald; he’s a Rafferty. So we were the Mac-Raff household. Hence the name of this dish.

It is a smart meal from a parent’s perspective. Quick, filling and can be assembled during the day and left at the ready to bake closer to dinner time when everyone is home and getting hungry. As an adult, I’ve also found it to be fantastic as a freezer meal. Since I generally make enough for a family of six (apparently, I am incapable of cooking for one or two like a normal singleton. But it’s OK because I love leftovers.) I have got into the habit of splitting the mac n’ cheese into two casserole dishes and jamming one into my freezer for later.

Mac-Raff n' Cheese III

I made it a couple of months ago when the days were still crisp and cold. Then it warmed up and I wondered if people’s appetites for hearty, homemade macaroni and cheese had waned, so I kind of put it on the back burner (nyuk nyuk). And then we had another, delayed, blast of winter. Oh! I thought, a second chance! And then, uh, well, let’s just say I lost track of time.

But I think this is a good recipe to have on hand. Although there is no official recipe. I, like my parents, kind of make it up as I go along each time depending on what I have lying around. But, fundamentally, it is macaroni and cheese with tomato sauce on the bottom that is all baked together in a casserole dish with a layer of cheese on top.

And it is far greater than the sum of its parts. Tomato sauce = good. Pasta doused in cheese sauce = good. That layer where the two mix = perfection.

I like to take a couple of big spoonfuls and top with some cracked black pepper, then eat it with a spoon.

But the real beauty of this is that it is infinitely adaptable. Don’t like the cheeses suggested? Use what you’ve got or what you like. Don’t have fresh herbs? Use a pinch of dried basil. Use your family’s own secret tomato sauce recipe for that matter. This is about using what you’ve got and experimenting with what you think it will taste good.

Tomato Sauce I

Tomato Sauce II

Grated Cheese

Pasta and Cheese

Oven ready

Hot from the oven

Mac-Raff n' Cheese II

Mac-Raff n’ Cheese

Tomato Sauce base:

  • 1 tablespoon olive oil
  • 1 onion, diced
  • 3 cloves garlic, minced
  • 1 28 oz. can whole tomatoes
  • 1 14 oz. can crushed tomatoes
  • 1 tablespoon balsamic vinegar
  • pinch sugar
  • 1/4 cup basil (or combination of mostly basil and some parsley), roughly chopped.
  • salt and pepper to taste

Heat oil in a pot over medium heat. When hot, add onion and saute until transluscent. Add garlic and stir for about a minute until fragrant. Using the can lid, drain the tomato liquid from the can of whole tomatoes into the pot. Let the liquid reduce by half and then add in the tomatoes. I dice them one by one in my palm using a basic dinner knife as I like small chunks of tomato. Another trick is to use kitchen scissors and just cut them up in the can. Add to the pot. Then add the crushed tomatoes. Stir in sugar and balsamic and let simmer until it has reduced and thickened. You don’t want it too thick because it will reduce further in the oven. Add salt and pepper to taste. Stir in herbs.

Macaroni and cheese:

  • 500 grams pasta (penne, macaroni or whatever tubular pasta you have sitting around)
  • 1/4 cup butter
  • 1/4 cup flour
  • 5 cups grated cheese, divided (I like a combination of asiago, cheddar, provolone and a bit of Parmesan; but I’m not afraid to use what’s already in the fridge.)
  • 3 cups milk
  • salt and pepper to taste

Cook pasta according to package directions. As the pasta boils, start on the cheese sauce. Melt butter over medium-low heat in a pot. When frothy and bubbling, add flour and mix with a whisk until well blended. Continue cooking for a couple of  minutes to cook out the raw flour taste. Slowly add milk, whisking constantly to prevent lumps. After it has thickened slightly, add 4 cups of the grated cheese. (I usually switch to a wooden or plastic spoon at this point.) Stir until melted, then add salt and pepper to taste. (If it is too thick, splash in a bit more milk.) Remove from heat.

Drain cooked pasta and return to pot. Top with cheese sauce and mix together.

Assembly:

Preheat oven to 425F.

Put tomato sauce in base of casserole dish. Top with macaroni and cheese and then sprinkle over remaining one cup of cheese. Bake covered for 45 minutes to an hour (depending on the size of your casserole dish). Remove lid and bake another 10 to 20 minutes until cheese is bubbling on top.

This is fantastic with a nice green salad.

Note: To make ahead, assemble the entire dish but stop just before baking it. Wrapped in plastic wrap and aluminum foil, this can be stored in the freezer. To cook later, let thaw and then bake as directed.

Continue Reading

Sautéed Chard over Polenta with Fried Eggs

I came into a plethora of eggs over the weekend.

Farm fresh eggs

I was at work on Sunday when a colleague came up to me.

Him: You like X, right?

Me: Oh yes, that’s how I get through the day sometimes. (In my best, most sarcastic and slightly confused voice.)

Him: Uh, OK. Well, I have some and I wondered if you wanted to buy some.

Pause.

Me: Wait, did you say eggs?

Him: What did you think I said?

Me: Um…..

Anyway, he had a few dozen from this totally organic, self-sustaining farm outside of Calgary called Thompson Small Farm. I’ve been searching for really good eggs since I moved here from Vancouver. I’ve found the ones here, even from area farms, to be pretty anemic looking and I’ve craved those with those golden-orange yolks that are so beautiful. So, the thought of finding those was enough to tempt me to buy two dozen. Plus, well, he said one of them was blue-green and that was just a bonus.

So, for the next two days I dreamed up things to make with these pretty eggs in their multicoloured shells. And I realized I wanted to do something that would really showcase the egg itself. Somewhere in my food-related Internet travels, I came across a post where someone had topped polenta with cooked greens and a poached egg. Since I have come to love chard mostly owing to this, I thought it would be cool to do a riff on that idea.

Polenta and chard with egg

For the most part, I made this up as I went along, taking inspiration from the chickpeas and chard entry. But I did a lot of research on poaching eggs (vinegar, no vinegar, swirl, boiling water, stainless steel etc. Who knew there were so many variations?), so that I would be fully prepared when it came time to make them. On the drive home, though, I realized I just wanted to do something fast and, in all honesty, I really didn’t want to dirty another dish. I figured frying the egg in the pan where I had just sautéed the chard would add even more flavour.

I have about three different grinds of cornmeal as I keep thinking I have the wrong one for polenta. In the end, I used the instant stuff. What? It was in my cupboard already and I’m desperately trying to clear space. Plus, that stuff is INSTANT and that makes for a very, very quick dinner. I followed the instructions and then just doctored it up with a bit of cream (er, yes, well, it was already in the fridge . . . .) and some butter and a nice pinch of flaked salt.

This was quick, easy and delicious. I loved the soft polenta, garlicky chard and the ever-so-slightly oozing egg yolk all combined into one. Maybe next time I will try poaching the eggs, but, in a pinch, this was just fine.

Chard

Egg

Blue eggshell

Chopped chard stems

Polenta and chard with egg II

I’d call these more guidelines than a recipe, so adjust as you see fit.

Sautéed Chard over Polenta with Fried Eggs

  • 1 bunch chard
  • 2 cloves garlic, minced
  • 1 tablespoon olive oil
  • 1/4 cup white wine (or water or chicken stock)
  • 2 eggs
  • butter
  • cooked polenta
  • salt and pepper to taste

Cook polenta according to directions, adding some butter/cream/salt/pepper/cheese or whatever else you desire.

Remove the stems from the chard, then dice finely. Chop leaves into thin strips and set aside. In a large frying pan, heat up olive oil over medium heat. Add stems and a pinch of salt. Saute until they start to soften, about five minutes. Add the garlic and cook for about a minute, until it gets fragrant. Add wine (or water or chicken stock) and then the strips of chard leaves. Stir, then top with a lid and cook for about five minutes until the leaves are wilted. Scrape out pan and add a small knob of butter to melt. When bubbling add eggs and fry to desired doneness.

Dollop polenta onto plate, top with chard and fried egg.

Continue Reading

Pasta with Shaved Brussels Sprouts and Pancetta

I eat one brussels sprout a year.

At Christmas.

Under duress.

Brussels Sprouts

It’s a family rule, though it punishes only me — the sole holdout in a family of sprout fanatics. With enough gravy to dunk the sprout in, I can power through the yearly ordeal.

This year, however, no one seemed to notice that my plate remained sprout-free. But it made me think: was there a way I could learn to love my vegetable nemesis? The short answer is yes.

The longer answer is yes, and it involves spaghetti and bacon’s Italian cousin.

Behold, Pasta with Shaved Brussels Sprouts and Pancetta.

Pasta with Brussels Sprouts and Pancetta I

Once I made the decision to try this recipe out, I made a shopping list. Somehow sprouts failed to make it onto the scrap of paper: it seems my subconscious couldn’t believe I really did want them.

At the Italian deli where I bought my pancetta, I wasn’t paying enough attention either. I think the idea was to use a couple of thickish slices of the cured meat that could then be sliced into matchsticks. My slices were thinner than regular bacon, so I just chopped it into small pieces. Considering thinner slices meant better pancetta distribution, I didn’t really see a problem.

Pancetta

I also didn’t notice the clerk was slicing up “hot” pancetta. But I kind of liked the kick of heat to this dish. If you like a little spice and can find hot pancetta, I say go for it. Otherwise, if you still want some heat, you can probably add a pinch or two of red pepper flakes.

The original recipe suggests using the slicing blade of a food processor to thinly slice the sprouts. The photo on the web-site shows lovely green pieces of sprout. I ended up with vegetable confetti. If you’re looking for pretty, I’d suggest trying the mandoline route. Otherwise, the food processor is fine.

While waiting for the spaghetti to finish cooking, I took a test bite of the sprout mix and couldn’t stop myself from eating more. Sure, any vegetable cooked with pancetta, pasta and pine nuts is probably going to be fantastic, but I really did enjoy the flavour of the sprouts.

Sauteed sprouts and pancetta

A quick saute with garlic and shallots, rounded out with just salt and pepper, brought a nice simplicity to the dish. And because the sprouts don’t cook for long, they were tender, not mushy.

Perhaps this is the start of a whole new, sprout-loving me.

Pasta with Brussels Sprouts and Pancetta II

Pasta with Brussels Sprouts and Pancetta IV

Pasta with Shaved Brussels Sprouts and Pancetta

From The Kitchn

  • 1 lb (500 g) brussels sprouts
  • 1 tbsp (15 mL) olive oil
  • 6oz (170g)pancetta, diced or cut into strips
  • 2 shallots, thinly sliced
  • 2 cloves garlic, minced
  • 1/4 cup (50 mL) chicken broth
  • 1/2lb (250g)spaghetti
  • 1/3 cup (75 mL) pine nuts, toasted
  • salt and pepper

Bring a large pot of water to boil. Season generously with salt. Trim the ends off of the brussels sprouts and remove the toughest outer leaves. Shred them in a food processor, using the slicing attachment, or slice them carefully on a mandoline or as thinly as possible with a knife.

Heat a large skillet over medium-high heat and add the olive oil. Add the pancetta and cook for about 5 to 6 minutes, until fairly crispy and cooked through. Clear some space in the middle of the pan and add the shallots. (If you don’t have enough room in your pan to create space, you can remove the pancetta with a slotted spoon and add it back in when you add the sprouts.) Cook for about 5 minutes, until the shallots are soft. Add the garlic and cook until fragrant, about 1 minute or so.

While the shallots are cooking, add the pasta to the boiling water and cook until al dente.

Add the brussels sprouts and the chicken broth to the large skillet, season with salt and pepper, and toss all of the ingredients together. (Go easy on the salt initially because pancetta can be quite salty.) Cook, tossing occasionally, until the brussels sprouts are tender but not too soft, about 5 minutes.

When the pasta is finished cooking, drain and add it to the skillet. You can add a splash of the pasta water (or more broth) if the mixture seems dry. Add pine nuts, toss everything together, season to taste and serve. Serves 3 to 4.

Continue Reading

Vichyssoise

What do you get when you bring together four food bloggers and the idea to all cook something from Julia Child’s Mastering the Art of French Cooking? A helluva lot of delicious food and many full bellies. Not that any of us were complaining, that’s for sure.

It was all Julie’s idea. In honour of the move Julie & Julia coming out, she invited over myself, Cheryl of Backseat Gourmet, Pierre of Kitchenscraps and Gail of The Pink Peppercorn, along with everyone’s significant others. Our only task was to bring one dish out of Child’s cookbook. Since I had to work that day, there seemed to be only one logical choice: a chilled soup. That way I could make it the day before and just let it sit in the fridge at work without doing any harm and no need to reheat. The fact that it turned out to be about -29C that day made my choice seem to be a bit ridiculous. After all, who wants to eat cold soup when it’s stupidly freezing out? But, after a first course of delicious French cheeses and Julie’s homemade Raincoast Crisps (along with a glass or two of bubbly), we had all warmed up enough that it didn’t seem so bad.

Soup on the table

There is something a bit daunting too about cooking for other food lovers, particularly two who have cookbooks out and are serious players on the local (and beyond) food scene. But, I’m happy to say, this soup is stupidly good.

“Potato milkshake!” Pierre declared.

Leek and Potato

Vichyssoise

And he’s not wrong. It was a rich, thick, creamy soup (I’m sure in no small part to the 3/4 cup of whipping cream that went into it!) that was intensely flavoured. I definitely could have eaten more the bowl I had, but I’m glad I didn’t because there was more courses to come.

The other thing that happens when you bring together four food bloggers is that the actual eating doesn’t take place until after all the photographing. We were all jammed into Julie’s kitchen snapping away for a good 15 minutes or so; what the significant others were doing during that time, I know not.

Bloggers

(For the record, yes, I shot the soup earlier in the day at work because the light was better. I really need to get better at flash photography.)

And it was a fine spread that needed to be documented. Boeuf Bourguignon with mashed potatoes, ratatouille, Pommes Parisien (read: cooked in delicous oil and butter) and a work-of-art Moussaka that had us all holding our breath as it was unmolded.

Unmolding

Moussaka

Potatoes

The Spread

And that was just dinner. For dessert, Cheryl outdid herself with Reine de Saba (a chocolate cake, though that is an understatement) and a Grand Marnier Souffle that I sous-chefed with her (thanks Cheryl!)

Grand Marnier Souffle

The food was fantastic; I stuffed myself silly and felt like I needed to roll myself out to the car after. The next time we do one of these, I’m wearing stretchy pants.

All done

Most of all, though, it was great to meet some great new people and hang out with some old (as in known for longer, for the record) friends.

Conversation

This is the original recipe from Julia Child’s Mastering the Art of French Cooking.

Vichyssoise
[Cold Leek and Potato Soup]

  • 3 cups peeled, sliced potatoes
  • 3 cups sliced white of leek
  • 1 1/2 quarts of white stock, chicken stock or canned chicken broth
  • salt, to taste
  • 1/2 to 1 cup whipping cream
  • 2 to 3 tablespoons minced chives

Simmer the vegetables in stock for about 40 to 50 minutes until tender. Puree in a blender or through a food mill. Stir in the cream. Season to taste, oversalting very slightly as the salt loses savor in a cold dish. Chill. Serve in chilled soup cups and decorated wtih minced chives.

The recipe says it serves 6 to 8. We stretched it to nine with no great effect. But, then again, we had about 10 other things to eat….

Continue Reading

Roasted Chickpeas with Chard

I can’t say I’ve ever gone out of my way to buy/cook/eat chard. But there was something about Julie’s entry during her year-long, post-a-day, blog-a-thon involving roasted chickpeas and chard that, for some unknown reason, really appealed to me. I filed it away, figuratively, for a future date and carried on with things.

Chard II

So, when a friend at work was extolling the virtues of her chard crop, I was immediately reminded of my plan to try out this dish. And, very fortuitously, she was happy to provide me with a large bunch of chard to use in my attempt.

Bundled Chard

Oh chard! Why have I foresaken thee for so many years? You are quick to prepare and delicious! And I’m pretty sure you’re good for me too!

Chard I

I’m just sad now that the chard season (at least in my friend’s garden) is over for another year. Most of the generous bunch she gave me went into the dish with the roasted chickpeas. But I held back a few stalks that I sauteed quickly with garlic and topped with a fried egg for breakfast one day.

The original recipe just calls for the leaves from what I can tell. But I liked the rainbow stalks so much that I diced them finely and fried them for a few minutes before adding the leaves to the mixture.

I can only hope that next year my friend’s chard crop is even bigger and she is as giving as this time around with it….

This recipe has been adapted ever so slightly from the original, as seen here. Mostly because I didn’t have enough garlic to do it properly and, as mentioned before, because I used up the stalks too.

Chickpeas, garlic, shallots and bay leaves

Chard III

Chopped chard stalks

Roasted chickpeas with garlic and bay leaves

Roasted Chickpeas with Chard

Roasted Chickpeas with Chard

For the chickpeas
1 19 oz.  can chick peas, rinsed and drained
3 cloves garlic, peeled (original calls for entire head; will try this next time)
2 shallots, roughly chopped
2 bay leaves
1/3 cup olive oil

For the chard:
2 tablespoons olive oil
1 large bunch Swiss chard, center stems removed and chopped finely, and leaves coarsely torn
2 garlic cloves, crushed
1/2 cup vegetable, chicken or beef broth

Preheat oven to 400. In a baking dish, combine chickpeas, garlic, shallots, bay leaves and oil. Roast for about 45 minutes, shaking the pan at least once (twice is probably even better) until everything is golden. Remove from oven and set aside.

In a frying pan on the stove, add olive oil and heat until hot. Saute garlic for about 30 seconds until it is fragrant, add chard stems and saute for a minute or two until tender. Add chard and continue cooking until it has wilted — about five minutes. Pour over stock, cover and cook for another 10 minutes. Remove lid and drain excess liquid. Add chickpea mixture, season with salt and pepper and mix until heated through. Add a little more olive oil if desired.

Continue Reading

Fettucine with Roasted Tomato Sauce

The actual title of this blog post would have been far too long:

Fettucine with Roasted Tomato Sauce and Balsamic Reduction, as well as testing out the new KitchenAid pasta attachment.

Roasted tomato sauce on fresh fettucine

It’s a bit of a double barreled post, really. Call it multi-tasking.

Actually, that’s a bit of a lie too. The actual, actual title of this post should have been:

Fettuccine with Roasted Eggplant and Tomato Sauce and Balsamic Reduction, as well as testing out the new KitchenAid pasta attachment.

But I’ve realized I really don’t like eggplant when I cook it and, in the end, did not end up eating any of it. You will notice its absence in the final photos, but had to include a photo of the palm-sized eggplants because they were just so darn cute.

Baby Eggplants

Which pretty much illustrates the fact that I make the worst impulse food buys known to man.

At any rate, a couple of months ago I was approached by a marketing company asking if I’d be interested in reviewing the KitchenAid pasta kit on my blog. As a huge pasta fan, I was definitely intrigued.

I’ve typically shied away from making it homemade, even though the boxed stuff pales in comparison to the tender noodles that come from real pasta.

The real issue here is my inability to knead properly. Unsure if that’s because I’m impatient, don’t have a feel for it, or just generally have no idea what I’m doing. But whether one of these reasons or a combination of all three, it basically adds up to me never quite reaching the smooth, elastic stage needed to make bread or pasta.

Full disclosure: I was sent the KitchenAid pasta kit, as well as the mixer required to run the attachments, by the marketing firm in order to review them. This is my unbiased review of the kit. I am not required to return the items (which, really, makes sense. I mean, what are they going to do with a used mixer, pasta roller and cutter?).

The mixer and kit arrived a few weeks after some back-and-forth emailing and I set aside an afternoon to give it a whirl.

The kit itself includes two boxes of pasta dough mix (just add water), a pasta roller, fettucine cutter, cleaning brush and cooking utensils. The roller and cutter attach to the front of the stand mixer and are powered by the appliance.

Pasta Mixes

Roller and Cutter

Roller and Cutter

Cleaning brush

Making the dough was pretty simple. Add water, mix, produce crumbly dough and mush it together.

As always, I was nervous from the get-go that I had done something wrong. But I divided the dough into about eight pieces and then gave them each a quick knead before powering up the roller attachment and letting the dough slide through.

On its widest setting, the roller can actually be used to knead the dough. I sent one chunk through, then folded it in half and let it run through the rollers again. I did this about five or six times until the dough was shiny and elastic and stretched out into a long rectangle. Then I started on the next chunk of dough.

Pasta first run

Once that was all done. I then put the roller onto a thinner setting and ran them all through again. And then again on a thinner setting. And so on.

When it was thin enough, I exchanged the roller attachment for the fettucine cutter and watched as the flat sheets of pasta were cut into perfect (albeit extremely long) ribbons.

Fresh Fettucine

It was, all in all, astonishingly easy. And a bit hypnotic.

I liked that I could forego all the annoying kneading and with relative ease make a batch of homemade pasta. I liked the chew of the noodles I made and how quickly it cooked.

The next test, of course, will be to make my own actual dough.

While I loved the roller and cutter, I was initially not 100 per cent sure I would have been tempted to buy the entire kit. Most food lovers are already going to have their own slotted spoon and pasta server and probably would enjoy the challenge of making their own dough rather than using a boxed mix, I reasoned.

I would, however, definitely be tempted to buy the roller and cutter separately.

Roller

Fettucine cutter

Then after a bit of research, I found the kit is not a bad deal considering a pasta roller, motorized drive and a fettucine cutter is going to cost roughly the same as the KitchenAid’s kit, which comes with the utensils, dough mix and cleaning brush. If you already have the stand mixer, it’s not a bad way to go.

The pasta kit retails for about $180.

And here’s what I did with the noodles. The recipe is not so much a recipe as much as me just fiddling around, but, since it turned out so well, I’m going to recommend it anyway.

Roasted tomato sauce on fresh fettucine II

Fettucine with Roasted Tomato Sauce

  • 1 pound tomatoes, cut into 1 or 1/2″ chunks
  • 3 cloves garlic, whole, unpeeled
  • olive oil
  • balsamic vinegar
  • salt
  • pepper
  • pasta
  • parmesan
  • balsamic reduction

Set oven to 375. Chop tomatoes into roughly 1/2″ to 1″ pieces (depending on how chunky you want the sauce to be), place in baking dish, scatter in unpeeled garlic cloves, then drizzle with olive oil, balsamic and sprinkle on kosher or sea salt and pepper. Bake for about 30 to 45 minutes until tomatoes are starting to carmelize and break down.

Cook pasta according to directions or, if using fresh, cook in boiling, salted water for just a few minutes until al dente. (Depending on the thickness of noodle, this can take anywhere from about three minutes and up.)

Slip cloves of garlic out of their peels and then mush with fork into tomatoes. Scoop sauce onto cooked pasta, sprinkle with grated parmesan and fresh chopped parsley (if you have any). Drizzle lightly with extra virgin olive oil and balsamic reduction.

Continue Reading

Penne alla Vodka

I don’t cook much with alcohol.

Vodka

Sure, there’s been the odd wine reduction sauce, a shot or two of brandy to a roasted tomato soup to round out the taste or a splash of sherry in my chicken tetrazzini. But the goal in these recipes is to add that hint of flavour, to enhance the other ingredients, not to dominate the dish.

So, I was a bit intrigued the first time I heard about Penne alla Vodka. There was no way the liquor was taking a back seat in this recipe; it’s in the name, after all. But how would the drink I associate with martinis and Caesars work over a plate of steaming pasta?

Vodka II

Let me be frank: it worked like a charm. So charming, in fact, I made it twice in one week–the sign of any good recipe, as far as I’m concerned.

I was a bit worried at first, because the instructions call for the vodka to be poured over the hot drained pasta instead of letting the alcohol cook out in the tomato part of the sauce. I feared it would be like eating a Bloody Mary for dinner with a scraping of Parmesan over it.

The tomato sauce

But a strange sort of alchemy happens once the butter starts to melt over the hot pasta and mingle with the boozy vodka.The flavours smooth together. (Because, yes, for experimentation purposes I did try a piece of penne with just the butter and vodka. You know, for scientific reasons and certainly not because I was getting hungry and curious.)

Adding the butter

Dumping in the tomato mixture, delicately perfumed with garlic and scattered with bits of soft, slightly caramelized onions, transformed some very basic pantry ingredients into a rich, guilty-pleasure type dish.

It should be said here that I like it saucy–as in, the pieces of penne should merely act as sauce conveyors. Spiked on the end of my fork, the pasta is swept around the bowl to pick up the last bits of onion and tomato, the last dribble of rich sauce.

And this sauce is dangerously good — enough to make you want to lick the bowl when no one else is looking. Ahem, not that I’m condoning that. So, I’ve adjusted the recipe slightly to al-low for my preference for more sauce. Feel free to add more pasta if desired.

Before the mixing

Unexpectedly, this is fantastic cold the next day. Perhaps it’s be-cause vodka is best when straight from the freezer? I ended up eating most of the leftovers straight from the fridge rather than waiting for the workplace microwave to be freed up. After all, with a dish like this, who would want to delay taking a bite?

Penne alla Vodka

The original Nigella Lawson recipe calls for garlic-flavoured olive oil. I don’t tend to keep that around, so I’ve adjusted accordingly. Of course, if you do have it, just go ahead and use it and skip the part about sauteing garlic in the first step.

Penne alla Vodka

  • 1 large onion, diced
  • 2 tablespoons (25 ml) olive oil
  • 2 garlic cloves, roughly chopped
  • Salt
  • 2 tablespoons (25 ml) whipping cream
  • 1 28-oz (796-ml) can diced tomatoes
  • 1 lb (500 g) penne
  • ½ cup (125 ml) vodka
  • 4 tablespoons (60 ml) unsalted butter
  • Parmesan

Add olive oil to large frying pan and bring up to medium-low heat. add garlic and saute for one or two minutes to flavour the oil. don’t let the garlic burn.

Remove the garlic and add the onion, along with a pinch or two of salt. Cook the onion, stirring occasionally until soft and just starting to caramelize. add the can of tomatoes and let simmer so the liquid has reduced. (this took about 10 minutes when i made it, so i put the pasta on to boil as the sauce was cooking.) when the sauce has thickened, remove from heat and stir in whipping cream.

Add pasta to salted, boiling water and cook as instructed until the noodles are al dente. drain and return the pasta to the pot. pour vodka over pasta and add butter and another pinch or two of salt. stir until the butter has melted, then add the tomato mixture. toss all together until coated evenly, then check for seasonings. add more salt if necessary.

Serve with fresh parmesan serves 5.

This story first appeared in the Real Life section in the Calgary Herald. For more delicious recipes, visit CalgaryHerald.com/life.

Continue Reading

Pasta Bolognese

I grew up in a family of six (four kids, two parents). I like to think this is why I’m completely incapable of making meals for just one or two people. It just never really occurs to me to halve a recipe. Or when I’m just creating something, it never looks to me like I’m making too much. Mostly, it’s not a problem. I, unlike most, like leftovers. I like them for breakfast or lunch or dinner. (There is nothing like pasta for breakfast. Mmmmm.) And, since I tend to cook big, I can usually feed myself for all three of those meals based on whatever I made for dinner the night before.

In the last year or so, though, I’ve finally come to appreciate my freezer. Sure, it was always a happy home to ice cream and the odd frozen pizza. Now I tend to freeze some leftovers for those crazy times when work is insane and there is a strange absence of groceries and I’m contemplating a dinner of peanut butter on crackers. And this Bolognese sauce is the perfect thing to have stashed away for dinner emergencies.

Ready to eat

I got it out of Real Simple magazine; the only magazine I’ve subscribed to since Chickadee and Owl when I was a kid.

So, I used to make this with fettuccine and then one time when I went to buy pasta there was no De Cecco fettuccine. But there was fettuccelle. Sure, that’ll do. But it was so much better than that. It’s now my pasta of choice. It’s flat like fettuccine, but better. Thicker, I think. Or something. Sigh. Just better; let’s leave it at that.

Pasta

There is nothing more comforting than a big bowl of hot noodles (al dente, please!) with thick, rich sauce all chock full of tomatoes and beef that’s been simmering for an hour or so. So, I’m happy to make the whole batch of this, freeze half in ziplock bags and then eat the rest for a handful of meals. Then, the next time a craving comes, I still have my freezer stash.

And let me offer this handy ‘recycling’ tip. Don’t throw away the heels of your parmesan wedges. Throw them in as the sauce simmers; they will add a nice richness. (When I’m down to the heel of the cheese, I throw them in a ziplock and into the freezer so they are ready to go when I make the sauce.)

As usual, this is with my adaptations. (These are, for the most part, another carrot — yeah for more vegetables — and no pancetta. I have nothing against pancetta — mmmm bacon-y goodness — but I don’t typically have it on hand and can’t be bothered to go get some for this recipe as I generally have all the other ingredients. Oh, and I add the garlic later than they suggest. There is nothing worse than burnt garlic, so adding it with the celery and carrot seems a bit premature.)

Carrots, onions, celery and garlic

Parmesan heels

mirepoix

Beef, carrots, garlic, onions and celery

A good use for parmesan "heels"

Pasta Bolognese

Pasta Bolognese

  • 1  tablespoon  olive oil
  • 1 large yellow onion, diced
  • 2 stalks celery, diceed
  • 2 carrots, diced
  • 4 cloves garlic, minced
  • 1 1/2  pounds  lean ground beef
  • 1  cup  dry white wine
  • 1  cup  milk (I use 1 per cent)
  • 1 6-ounce can tomato paste
  • 1 14-ounce (398 mL) can diced tomatoes, undrained
  • 1/4  teaspoon  red pepper flakes
  • 1 tablespoon dried oregano
  • 2 1/2  teaspoons  kosher salt
  • 1/4  teaspoon  black pepper
  • 1/4  teaspoon  ground nutmeg
  • Parmesan heels (if you’ve got them)

In a Dutch oven or large, solid frying pan (I use one with straight sides), heat the oil. Add the onion and saute until they start to go transluscent, about three minutes. Add the celery and carrot and cook for five minutes more until they too start to soften. Add garlic and saute until you can smell it, about a minute. Add beef and cook until browned. Add wine, milk and the rest of the ingredients. (Don’t fret, the milk is going to look like it’s curdling a bit. It’s not.) Add the cheese heels and simmer for 45 minutes, stirring occasionally. Serve over hot, drained pasta with fresh Parmesan.

Continue Reading