No-Bake Chocolate Cream Pie

This post is dedicated to the lovely woman I met (and whose name I, naturally, embarrassingly forgot) at the Half Your Plate fundraiser dinner at Winsport. I don’t know if you’re even going to check my blog again after such a long absence, but please know I have not forgotten your kind words and encouragement.)

My thoughts are bubbling over as I try to figure out how to start talking about this pie.

I mean, part of me isn’t really sure any words are needed.

No-Bake Chocolate Cream Pie
Right? (TL:DR version, if you’re skipping to the bottom: this tastes like the chocolate cream pie of your dreams.)

I guess I could start with how the tweet from Bon Appetit stopped me in my tracks when I was scrolling through Twitter the other day and I immediately favourited it, so I could return to it later.

Now, truthfully, I probably have a few hundred recipes bookmarked this way and have never actually got around to making any of them. But this pie? I don’t know. It felt… doable. More importantly, it requires no oven to be turned on. And, frankly, I’m already no good in a heat wave. Heat my apartment by turning on the oven and I’d be passed out in front of a fan while whatever I was baking burned.

Or I could start with the fact that it was perfect timing to have found this recipe just as friends invited me over for a barbecue feast dinner party, complete with ribs, brisket, cornbread and deep-fried balls of macaroni and cheese. Would I consider bringing dessert? Yes, I absolutely would. After all, it’s more motivating to make a massive chocolate cream pie when you get to enjoy it with good friends. (And also because you’ve had these ribs before, they are ridiculously good and I feel that making an awesome pie is only a drop in the bucket when it comes to returning the favour.)

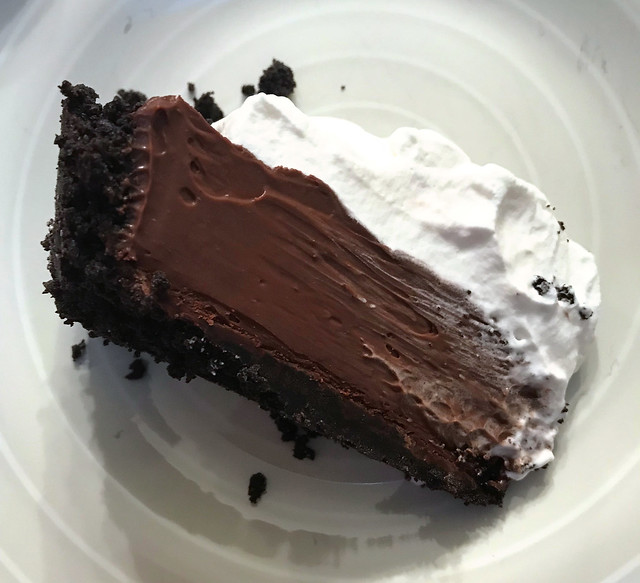
Or maybe I’ll just point out that while in high school I never once ate in the cafeteria (opting to play cards in the hallway in front of my locker), but on the rare occasion I would head there for a snack — either this doughy, saucy pizza bread or a slice of McCain’s chocolate cream pie. You know the one. With the star-tipped “cream” frosting over a pudding-like piece of pie.

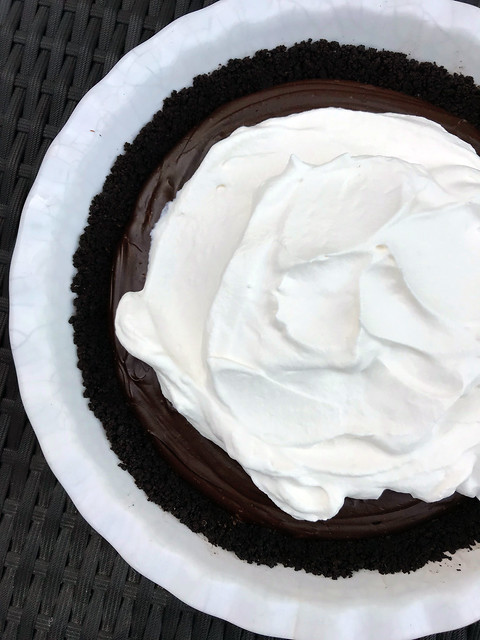
It might actually be blasphemous to compare that to this Bon Appetit version, but I couldn’t help drawing comparisons as I put it together and, eventually, finally got to slice into it and try a piece. The original recipe, yes, calls for a torched meringue on top. But I really liked the idea of a gently sweetened whipped cream slathered on top instead. Bonus points: no need for a kitchen torch.

No-Bake Chocolate Cream Pie

Double bonus: I can make a pavlova with the leftover egg whites and top it with more whipped cream and big handfuls of juicy summer berries.

Lastly, I could have started this post by talking about how I generally loathe comments posted below recipes online. That’s because they’re often things like, “I made this but I swapped this ingredient for that one and didn’t add butter because I’m on a diet and blah blah blah. It didn’t taste very good, so I’ll never make this again.”

In this case, though, I’m super glad to have read the comments because one person spent a lot of time and energy posting extensive recipe instructions far more detailed than the original and I have absolutely no doubt the only reason I had great success with this pie is because of that. Bless you, anonymous person!

(I do love that the only other comment on this recipe, posted before the helpful instructions, was: Biggest waste of my time. Tried this twice. Evidently you have to be a bloody witch to make this. Each time it cooked the egg yolks. Dumbest recipe EVER.)

The total trick to this pie is tempering THE HELL out of the yolks and corn starch. That’s going to make or break the pie filling.

Yes, it’s a bit complicated to make. Patience is going to be the main ingredient. But…. Let me put it this way: whenever I make a dessert and take it to someone’s house for dinner, I generally want to come home with an empty serving dish because I kind of lose interest right after eating a piece of whatever I’ve brought. This time, I offered the last, healthy-sized wedge of pie to a friend to take back to her house and eat later.

No-Bake Chocolate Cream Pie slice

Five minutes later, I wondered why I’d been so nice.

I guess I’ll just have to make this again.

IMG_7884

IMG_7892

IMG_7894

IMG_7908

No-Bake Chocolate Cream Pie

No-Bake Chocolate Cream Pie

Adapted slightly from Bon Appetit

  • 9 tablespoons butter
  • 6 ounces chocolate wafer cookies
  • Salt
  • 8 ounces bittersweet chocolate, melted, divided
  • 2 1/2 cups whipping cream, divided
  • 2 tablespoons unsweetened cocoa powder
  • 1 1/2 cups whole milk (aka 3.25 per cent)
  • 3/4 cup sweetened condensed milk
  • 4 large egg yolks
  • 3 tablespoons cornstarch
  • 1 – 2 tablespoons sugar

Melt butter in a small pot over medium heat. Set aside.

Blitz cookies in a food processor until finely ground and transfer to a medium bowl.

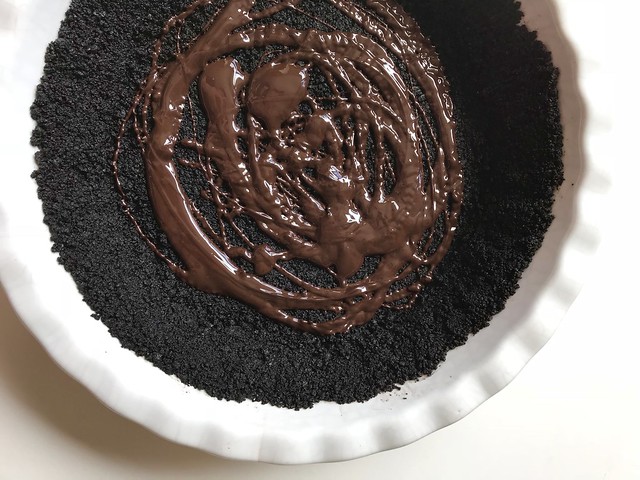
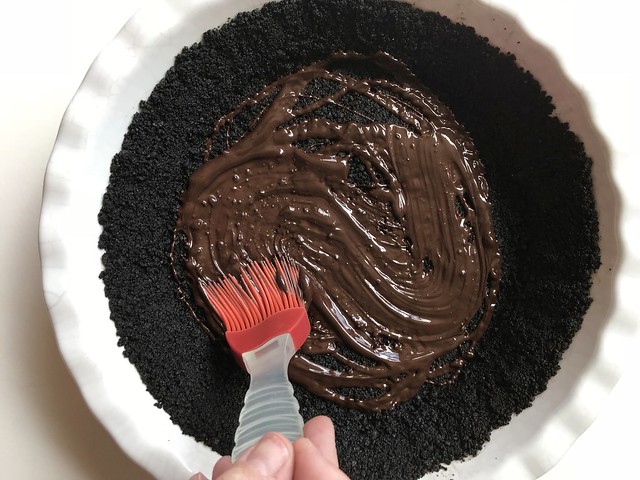
Add 5 tablespoons of the butter and a nice pinch of salt to the bowl with the cookie crumbs and mix until thoroughly combined. Transfer to a 9-inch pie dish and press evenly into the bottom and up the side using the bottom and side of a measuring cup to really pack it down. Put in the fridge to chill for 20 minutes.

Brush the bottom of the crust with 2 ounces of the melted chocolate and put the pie dish back in the fridge.

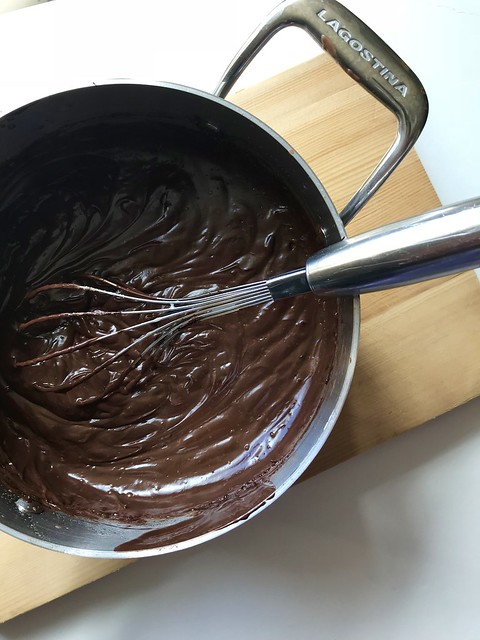
Whisk cream and cocoa powder in a medium saucepan until there are no lumps, then mix in the milk and sweetened condensed milk. Over medium-low heat, warm until the cream mixture just reaches 180F. While it’s heating, whisk the egg yolks and corn starch in a medium bowl.

Scoop up about 1/4 cup of the heated cream mixture and dribble a little bit at a time into the egg yolks while constantly whisking. This is where you need to go slowly because this keeps the eggs from scrambling! Once that’s all mixed in, repeat with another 1/4 cup of the cream. Repeat until you’ve added about half of the cream mixture to the yolks.

Pour the yolk mixture into the pot on the stove. Whisk, whisk, whisk as the entire mixture heats up. This will initially take what feels like a while, but then it will fairly suddenly thicken up to a pudding-like texture. Once it has a pudding consistency, remove the pot from the heat, add the remaining melted chocolate and the rest of the melted butter and whisk until completely combined.

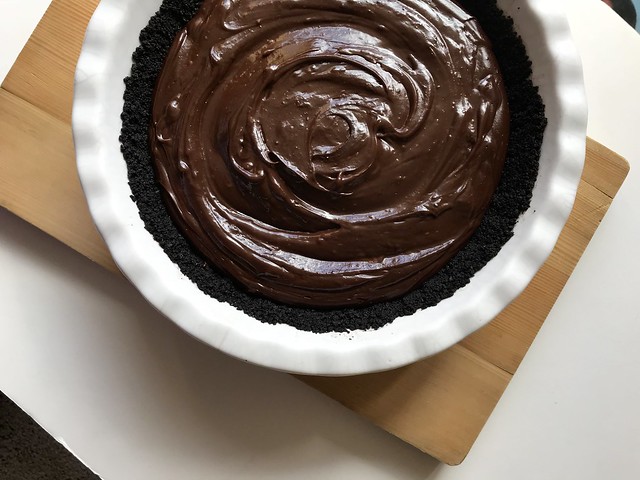
Scrape into the pie crust and chill until the chocolate custard is cold and set — at least two hours.

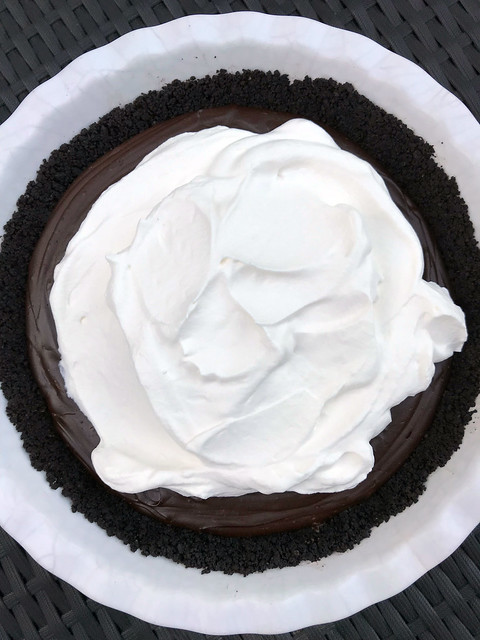
Just before serving, make the whipped cream. In a bowl (chilled, if possible, as this makes it faster to whip the cream), beat the remaining 1 cup of cream with 1 tablespoon of sugar until fluffy. (I like mine to slump a little bit, so it’s a bit softer than a really stiff whipped cream.) Taste partway through the beating process to see if it’s sweet enough for your liking. Add the rest of the sugar as you see fit.

Scoop over the pie and serve.

Continue Reading

Grilled Zucchini with Feta and Lemon, and Grilled Panzanella

It’s been summer for all of one day this year – and by that I mean that we’ve had, cumulatively, about one full day of hot, sunny, bright, lovely weather.

The next storm is rolling in as I type, grey clouds muting the sky.

I can smell the dampness in the air, that fresh greenness that announces the rain about to fall.

No matter, I ate summer for dinner, even if the weather wasn’t cooperating.

Despite the near-daily storms, hail and thunder, the markets and grocery stores are at least full of seasonal bounty: corn, zucchini, basil and a medley of tomatoes.

Tomatoes

Judging from Instagram, people are also having a banner year for zucchini, which always prompts questions of what to do with it all.

Sure, you can make chocolate zucchini loaf, but I like to celebrate them in all their natural – un-cake-like – glory. I had been bandying around grilled zucchini ideas the other day and came up with a plan to play off that flavour with some salty feta and oh-so-summery mint.

Grilled Zucchini

I actually can’t even quite bring myself to call this a recipe; it’s more like a suggestion of things that go well together. Want more feta on top? Go for it. Think some pine nuts might be nice? You’re probably right; try that too.

Grilled Zucchini with lemon and feta I

Grilled Zucchini with lemon and feta II

And since I was going to be grilling, and I have oodles of tomatoes because I just can’t resist buying so many when they’re finally in season, I thought I’d do a riff off a traditional Panzanella salad.

I’ve been joking a lot that this has been the summer of salad and toast. Well, this is basically the combination of those two things.

Though, instead of actual toast, I brushed slices of really good sourdough with some olive oil and then grilled them so they had those delicious char marks, which adds just a hint of summery smokiness.

Bread slices

Panzanella is one of those dishes that is really best in the summer months when tomatoes are in all their glory and you want to eat as many as possible because they actually taste like they’re supposed to and they arrive in stores in a rainbow of colours.

Traditionally, this salad is made with stale bread, but I’ve found I’ve preferred to roast roughly ripped up bits of bread in the oven or, now, this method. The roasting and grilling helps the bread retain a slight crunch and chewiness, even when soaking up the tomato juices and simple dressing.

Panzenella I

Panzenella II

(Don’t have a grill? No problem. Grill pans will mimic this quite well, just set one over medium-high heat and then follow either of these recipes the same way. Except, with the bread, weighting down the slices with something – I have used a can of cranberries wrapped in aluminum foil, so, really, anything goes – helps get those grill marks just right.)

With any luck, we’ll get an actual summer in the next few weeks – and hopefully into September. However, even if we have to stick indoors in the evenings, at least the eating can be seasonal.

Grilled Zucchini with Lemon and Feta

Think of this more as guidelines for a great side dish; you may find you want more lemon or cheese – or less, though I’m not sure how that would be possible. Don’t fret about making the zucchini slices perfectly the same thickness, just watch them on the grill and turn when they’ve got nice grill marks.

  • 1.5 pounds of small zucchini, about four or so
  • Olive oil
  • Salt
  • Freshly ground pepper
  • 3 to 4 tablespoons feta, crumbled
  • Juice of 1/2 a lemon
  • 3 tablespoons fresh mint
  • Good extra-virgin olive oil for drizzling, optional

Preheat the grill to medium-high.

Remove the ends and then slice the zucchini lengthwise as thinly as possible.

Brush one side with olive oil and sprinkle over a scant amount of salt and then freshly ground pepper. (The feta is also salty, so you don’t want to add too much to the zucchini.)

When the grill is hot, place the zucchini strips on the grate, oil side down, and then brush the tops with a little more oil and sprinkle with salt and pepper. Grill until they have nice char marks have gone soft. Remove to a serving dish or platter.

Scatter over the crumbled feta. Squeeze the 1/2 lemon overtop, cut side up to keep the seeds from ending up on the plate.

Stack the mint leaves on top of each other and then roll into a cigar. Thinly slice them into ribbons and then scatter over the zucchini and feta.

If desired, use some good extra-virgin olive oil to do a very light drizzle over top.

Serve immediately.

Panzanella

Traditionally, stale bread is used for this, but I love grilling the bread (or roasting it in the oven when it’s not summer). You can use all the same types of tomatoes, but I love to grab all sorts of colours to make this really stand out.

For the grilled bread:

  • 1/2 lb (250 g) ciabatta, sourdough or hearty bread, sliced 1/2-inch thick
  • Olive oil
  • Salt
  • Freshly ground pepper

For the salad:

  • 1/2 small red onion, thinly sliced
  • 3 tbsp (45 mL) red wine vinegar
  • 2 lb (1 kg) tomatoes
  • 1 garlic clove, peeled and minced
  • Salt
  • Freshly ground pepper
  • Pinch or two of sugar
  • 1/4 to 1/3 cup (60 to 80 mL) extra-virgin olive oil
  • 1/2 cup fresh basil leaves

Turn on the grill to medium-high heat.

In a small bowl, pour the red wine vinegar over the onion slices and let sit, stirring occasionally, while you prepare the rest of the recipe.

Brush the sliced bread with the olive oil and then sprinkle with some salt and pepper. When the grill is hot, place the slices, oil side down, on the grates. Grill until the bread has nice char lines. Remove from the grill and set aside.

Core and slice or dice large tomatoes – smaller ones can be halved or quartered – and add to a large bowl. Strain the onion slices, reserving the vinegar for the dressing, and add them to the tomatoes. In a jar or small bowl, combine the vinegar, garlic, salt, pepper and sugar. Shake or whisk until the salt and sugar have dissolved.

Add 1/4 cup (60 mL) of the olive oil and shake or whisk again until the vinaigrette is emulsified. Taste for seasonings, adding more oil if the dressing tastes too acidic.

Pour most of the dressing over the salad and toss until well mixed.

Cut the bread into rough, bite-sized squares.

Add the bread pieces to the tomatoes and toss again, making sure they get saturated with the vinaigrette. Add more dressing as necessary. The bread pieces will soak up some of dressing.

Let sit for about 5 minutes and then toss again.

Tear the basil leaves roughly, add to the salad and mix until combined.

Serve immediately.

Serves 4 to 6.


Continue Reading

S’mores Brownies

It could have been summer a week or so ago, even if the last couple of days have felt more like the spring we should be in. Still, I’ll take it. Everything is already green and lush; even the lilacs are already blooming — something I’m not sure has ever happened this early in the year since I moved here.

Inevitably that means gathering around backyard fire pits and camping . And those things mean s’mores.

S'Mores Brownies ingredients

Except when there’s a fire ban on.

Or, if you’re unlucky enough to not have a yard. <Raises hand.> Or perhaps don’t love camping. <Raises other hand.>

Marshmallow top I

There’s a simple way around this, provided the weather isn’t so hot you’re left wilted over a piece of furniture: put some marshmallows on a baking sheet lined with parchment paper and broil them for a minute or two, until golden and melty — or your preferred level of roasted-ness (I like a dark shade of golden myself, which can be tricky over a crackling fire but easy to monitor under the steady heat of a broiler.) — before squishing them between two graham crackers and a slab of chocolate.

However, there’s a more portable and far more decadent way of eating something evocative of a s’more. Behold the S’mores Brownies.

S'Mores Brownies I

The backbone is the same, of course. Combining graham crackers, chocolate and marshmallows into a tasty sweet. In this form, however, the graham crackers are amped up by being turned into a graham cracker crust (enriched with butter and sugar, naturally), the chocolate becomes a thick layer of fudgy brownie and the marshmallows, well, they stay pretty much the same other than you get at least two of them per brownie instead of one lonely one per s’more.

Just like the originals, these are gooey and sticky as all get out, so prepare accordingly.

Sticky

Of course, this version of a s’more does require washing dishes after, so that may be a point in favour of their original counterparts.

Then again, you can still easily make and eat them when the weather isn’t cooperating.

 
Marshmallow top II

Marshmallow top III

S'mores Brownies II


S’mores Brownies

Adapted from The Kitchn. And by that I mean that I made the method a little more streamlined (read: lazier).

For the crust:

  • 6 tablespoons butter, melted and cooled
  • 1 1/2 cups graham cracker crumbs (about 10 full crackers)
  • 2 tablespoons sugar
  • 1/4 teaspoon salt

For the brownies:

  • 1/2 cup butter
  • 7 ounces bittersweet chocolate
  • 1/4 teaspoon salt
  • 2 large eggs
  • 1/2 cup sugar
  • 1/2 cup brown sugar
  • 1 teaspoon vanilla
  • 1 cup flour
  • 10 ounces large marshmallows (most of a large bag)

Preheat the oven to 325°F.

Butter an 8×8-inch pan and line with parchment with a slight overhang, like a sling, then butter the parchment that’s inside the pan.

In a bowl, mix together the graham cracker crumbs, sugar and salt. Pour over the melted butter and then stir until well combined. Pour into the prepared pan and press firmly along the bottom. (You really want to tamp it down here; I used the bottom of a small metal measuring cup.) Bake the crumb mixture for 20 minutes, until the edges are starting to get golden. Remove from the oven.

While it bakes, start preparing the brownie layer. In a medium saucepan set over low heat, slowly melt the butter and chocolate together, stirring often. Stir in the salt. Remove from the heat and let cool completely.

Once the crust is baked and out of the oven, raise the oven temperature to 350°F.

In a large bowl, whisk the eggs until slightly paler in colour. Add the two sugars and whisk again for several minutes, until the mixture is well incorporated. Whisk in the vanilla. Pour in the chocolate mixture and stir gently until just combined. Add the flour and use a spatula to fold it together, mixing gently and only until no white flour can be seen.

Pour the brownie batter over the cooked graham cracker crust and return the pan to the oven. Let it bake for 22 to 25 minutes, until no longer raw-looking in the centre when check with a toothpick. (It will still look fudgy and not come out entirely clean, but it will look cooked.)

In a stand mixer fitted with a paddle attachment, beat the eggs and sugars until fluffy, 2 to 3 minutes. Beat in the vanilla extract. Gently mix in the melted chocolate. Fold in the flour.

Evenly pour the brownie batter over the cooked graham cracker crust. Transfer the pan to the oven and cook for 23 to 25 minutes. Remove the pan from the oven.

Set the oven to broil and arrange the marshmallows over the cooked brownie layer. Cover the brownies well, but don’t pack them in too tightly. They will spread a bit in the oven. Set the pan back into the oven under the broiler and watch carefully to make sure they roast to your preferred level of doneness. Turn the pan frequently to ensure even broiling. This can take anywhere from 1 1/2 to 2 minutes for golden, a minute or two longer for a brown, bruleed topping.

Remove when the marshmallows are golden (or darker, depending on your preference) and let cool completely. Use the parchment sling to remove the brownies from the pan and slice. The marshmallows will be incredibly gooey, so keep a glass of hot water and a cloth at hand to wipe down the knife between slices.

Makes 8 to 16 brownies, depending on how they’re sliced.

Continue Reading

Strawberry Scones with Strawberry-Black Pepper Butter

It’s hard to be creative when it’s this hot and my laptop is cooking my thighs.

It’s probably even too hot to be turning on the oven, but I did it today anyway. The idea of fresh scones overpowered my hatred for the heat. Especially the idea of scones studded with fresh and sweet strawberries.

I had bought the strawberries yesterday for no reason other than I wanted that taste of summer. As I lay in bed last night, I was thinking Strawberry Shortcakes would be the perfect vehicle. And then I started to think about some scones where the strawberries are actually baked into them instead of being served on the side. Cream scones, I thought. Playing with the whole idea of strawberries and cream. And also, not dealing with trying to keep cold butter actually cold on a hot day.

The idea isn’t original; there are a lot of recipes out there on the web for Strawberry Scones. But I also thought of putting a twist on them by serving alongside some compound butter made from strawberries and a bit of freshly cracked black pepper.

It was tempting enough to turn on the oven.

The beauty of cream scones is how quickly they come together and how little forethought is needed. The dangers of cream scones are exactly the same.

But when you don’t want to put in the kitchen for very long, they are ideal. Stir together flour, baking powder, sugar and salt. Add cream. Stir. Pat together. Cut and bake. Done.

Compound butter is just about as easy. Mix softened butter with herbs, zest, bits of fruit, spices or whatever else and then refrigerate.

So, as baking projects go, this one couldn’t be much more straightforward.

When I started trying to figure out what to say about these recipes, I joked on twitter that I should just write, “Makes these, they’re tasty.”

But, really, make these, they’re tasty.

Strawberry Cream Scones

Adapted slightly from Joy the Baker who, in turn, adapted them slightly from King Arthur Flour.

  • 3 cups all-purpose flour
  • 1 tablespoon baking powder
  • 1 teaspoon salt
  • 1/3 cup granulated sugar, plus more for sprinkling
  • 1 1/2 cups whipping cream (approximately), plus more for the egg wash
  • 1 teaspoon vanilla
  • 1 cup strawberries, cored and chopped
  • 1 egg

Preheat the oven to 425F and line a baking sheet with parchment paper.

In a medium bowl, whisk the flour, baking powder, salt and sugar. Add the chopped strawberries. Pour over the whipping cream and then drizzle in the vanilla before gently stirring it all together. If there are a lot of dry patches, add another tablespoon or two of cream — just enough to create a dough. Scrape the dough out onto a clean surface and gather it together, kneading slightly until it all comes together. Pat into a circle about 1 inch thick and cut into eight wedges. (Or, alternatively, use a biscuit cutter to cut out circles of the dough.)

Place the wedges on the baking sheet.

In a small bowl, whisk together the egg and a splash of whipping cream. Brush over the top of the dough wedges and sprinkle with sugar.

Bake until golden and cooked through, about 14 to 18 minutes.

Serve as is or with the Strawberry-Black Pepper Butter (recipe below).

Strawberry-Black Pepper Butter

  • 1/4 cup butter, softened
  • 1 large strawberry, minced (approximately 2 tablespoons)
  • 1/8 teaspoon freshly ground black pepper
  • Pinch sea salt
  • Pinch or two of sugar

In a small bowl, mix together the butter, strawberry pieces, black pepper, salt and sugar. While stirring, press bits of the strawberries against the side of the bowl to squish them and release some of their juice. Taste for seasonings, adding more sugar, pepper or salt.

Refrigerate until ready to serve.

Continue Reading

Norwegian Rhubarb Cake

Around this time every year, I wait for them to appear, those ruby red or speckled green-and-pink stalks of rhubarb.

More than any other fruit or vegetable, rhubarb to me is a sign of the changing season. It is the signal that summer is arriving in bundles of tart stalks to be baked into pies and cakes, stewed to make a bright pink syrup for cocktails.

I snap up what I can when I see it at the farmers’ markets and I’m not above begging friends with healthy supplies to share their wealth. I take all I can and more, slicing and freezing the excess for rhubarb cravings that come later in the season.

Year-round, I save rhubarb recipes as I wait, imagining the hand pies, scones and fools I will make once I get my hands on the first stalks of the season.

A few weeks ago, tweets began appearing in my timeline that the time for rhubarb was finally here. But I was going to be away for the following two weekends and didn’t want to buy any without having the proper time to dedicate to making all the things I had been craving over the past several months. I would have to wait.

On the final day of being away, as I played fetch with my friend’s dog in the backyard of their Victoria, B.C., home, I spied in the corner of their garden a mass of rhubarb.

Sure, he only has three legs but I tired of playing fetch long before he did.

The giant, lushly green leaves created a canopy over the bed, hiding away a forest of ruby stalks that had visions of baking filling my head. Could I please, I asked, take just a little bit of it home with me?

“Take as much as you’d like,” I was instructed. “We probably won’t use much of it.”

With knife in hand, I culled a huge bundle of the stuff (trying to still show some restraint, though tempted to take it all), rolled it into a plastic shopping bag and packed it in my luggage for the flight back to Calgary. I was glad I hadn’t bothered to take much out to the coast, giving me that much more room for this care package of rhubarb.

It was the best souvenir of the trip.

A few days later, I finally had enough time to get into the kitchen and put that souvenir to use.

In the past, I’ve fallen in love with crumb cakes and little cobblers. I have serious plans for pie. And no summer is complete without a rhubarb cocktail from a recipe my grandmother gave me several years ago.

But for the first rhubarb of the season, I wanted to start simply. A recipe for Norwegian Rhubarb Cake seemed like the right place.

A very straightforward cake, there’s no need to cream butter and sugar, no fussing over letting the rhubarb macerate in sugar. There’s not even a need to break out the mixer.

So, in the space of less than 45 minutes, I had cake — and the first bite of rhubarb this year.

Still warm from the oven, it was the perfect afternoon snack. Not overly sweet, it’s punctuated with tart pieces of rhubarb that played nicely against the tender cake.

Thankfully, too, it only put a small dent in my rhubarb supply, leaving me plenty more for the next project. I just need to decide which one.

Norwegian Rhubarb Cake

I found the recipe on a blog called Outside Oslo and adapted it only slightly, upping the amount of rhubarb and omitting a dusting of icing sugar, which people should still feel free to do just before serving. A dollop of sweetened whipped cream would be nice, as well, but is not necessary.

  • 1/4 cup (60 mL) butter
  • 1/3 cup (80 mL) milk
  • 2 eggs
  • 1 cup (250 mL) sugar
  • 1 1/4 cup (310 mL) flour
  • 1 1/2 tsp (7 mL) baking powder
  • Pinch salt
  • 1/4 to 1/3 lb (125 to 170 g) rhubarb, sliced into 1/2-inch (1-cm) coins

Preheat the oven to 350F (180C).

Butter an 8- or 9-inch springform pan.

In a small saucepan set over medium heat, melt the butter, then stir in the milk. Remove from the heat and set aside to cool slightly.

In a large bowl, beat the eggs and sugar until pale and well mixed. While still mixing, slowly pour in the butter and milk. Add the flour, baking powder and salt and stir until just combined, then pour into the prepared springform pan. Sprinkle over the rhubarb slices.

Bake until lightly golden and a toothpick inserted in the middle comes out clean, about 35 minutes. (Cakes baked in a smaller springform pan will take a bit longer because the cake is deeper.)

Let cool for 5 to 10 minutes, then run a knife around the edge of the cake, if necessary, before removing the springform side.

Serve warm.

Makes 1 cake.

Continue Reading

Berry Buttermilk Pancakes

I have a friend who delights in eating breakfast for dinner.

When she and her husband decide to have eggs and bacon, or maybe some pancakes, instead of more typical supper fare, it’s a treat.

She likes breakfast for breakfast just as much.

So, she was downright gleeful this weekend when she was able to order a full meal deal — eggs, sausage and a tall stack of fluffy pancakes — over the weekend after missing out for many months while living in France. (Coffee and a croissant is just not the same, understandably.)

Berry Buttermilk Pancakes II

I never order pancakes when out for breakfast because my tastes lean more toward savoury dishes in the morning. But there was something about that pile of pancakes, topped with melting butter and spilling over with syrup, that was oddly tempting.

When I got home from a weekend away and found my fridge devoid of groceries (as was expected), but, oddly, with a nearly full carton of buttermilk (which I had forgotten about), I knew exactly what I wanted to make.

Not just any Buttermilk Pancakes, but a stack of them speckled with fresh berries and then doused with real maple syrup. Tartness and sweetness packaged together. And maybe with a side of bacon, since I discovered an unopened package of that in my fridge too (a very pleasant surprise).

Berry Buttermilk Pancakes I

Although blueberries are the most common pancake addition, I wanted to use tart raspberries, which kind of squish and caramelize when flipped to cook against the hot pan.

They become these little pockets of bright berry colour and flavour, hidden in the golden-tinged fluffiness of the pancake. When right side up, the pancakes don’t reveal their hidden gems.

Also, it seemed a particularly summery addition, since they’re coming back into season.

Breakfast for dinner has many benefits, not the least of which is it’s pretty quick to prepare. Whisk together some flour and leaveners; do the same with buttermilk, eggs and melted butter for some added richness. Mix them together gently, fry and enjoy.

Even better, the trick with pancakes — much like muffins — is the batter shouldn’t be overmixed. It’s not only OK, it’s preferable that it be a bit lumpy.

Once done, the light pancakes spotted with juicy berries were just the right mix of rich and tart, soaked with the sweetness of syrup.

They were enough to make me think I need to adopt my friend’s breakfast-for-dinner plan a little more often.

Berry Buttermilk Pancakes III

Berry Buttermilk Pancakes IV

Berry Buttermilk Pancakes

I like tart raspberries in here, but blueberries would work just as well, or a mix of the two. I like smaller-sized versions rather than plate-sized pancakes — better for stacking — so I use a 1/3-cup measure to pour the batter. If you like a larger pancake, use a 1/2 cup measuring cup; those will fit about two to the pan, depending on its size.

  • 2 cups (500 mL) all-purpose flour
  • 3 tbsp (35 mL) sugar
  • 2 tsp (10 mL) baking powder
  • 1 tsp (5 mL) baking soda
  • 1/2 tsp (2 mL) salt
  • 2 1/2 cups (625 mL) buttermilk
  • 2 eggs, lightly beaten
  • 1/4 cup (60 mL) butter, melted and cooled, plus more for the pan
  • 1 cup (250 mL) raspberries

In a large bowl, whisk together the flour, sugar, baking powder, baking soda and salt. In a separate bowl, mix together buttermilk, eggs and melted butter. Add the wet ingredients to the dry and whisk together gently until just combined. There will be some lumps.

Heat a pan over medium-high heat until a bit of water added to the pan bounces and sizzles. Add butter and let melt, swishing around the pan to evenly coat the bottom. Using a 1/3-cup measuring cup or similar sized ladle, pour pancake batter into the pan. (Mine fit about 3 pancakes with some room for flipping.)

Drop four or five raspberries on each pancake and let cook until bubbles form and those at the edges don’t fill in when they pop — about 2 to 3 minutes. Flip the pancakes and let cook for another minute or so.

Remove to a plate and continue cooking the rest of the pancakes.

Makes about 16 pancakes.

Continue Reading

Easy Butterscotch Sauce

When it comes to ice cream sundaes, there has never been any waffling for me. You can keep your hot fudge, I’ll take butterscotch (or caramel – since there doesn’t seem to be a difference in the ice cream world), please and thank you.

Butterscotch Sauce II

It’s not that I don’t like chocolate at other times. But there’s something about the combination of vanilla ice cream and the buttery richness of a warm butterscotch sauce that pleases me immensely.

It was a good thing I didn’t have a recipe for making it at home.

And then I did.

And that was a good and bad thing.

I stumbled onto a recipe for “Ridiculously Easy Butterscotch Sauce” on Smitten Kitchen one day and gave it a shot.

It’s nothing more complicated than melting some butter and then boiling it with cream and brown sugar and then rounding it out with a bit of vanilla and a pinch or two of flaky salt – which has a milder flavour to emphasize the salty-sweet flavours of a tasty butterscotch without being overtly salty.

It comes together frighteningly – I may even dare to say, dangerously – quickly. Even if you give it several minutes to cool down so it’s thicker and doesn’t melt your ice cream on contact.

And in 10 minutes, I was doing just that.

I did get a bit frustrated the first few times I made this, as mine never looked quite as thick as it did in Smitten Kitchen’s photos. But after scrolling down through the comments one day, I noticed a discussion about having it reach a certain temperature.

I’ve since learned (through trial, error and a bit of impatience) that it’s the 220 F (104 C) mark that seems to make the difference. And also that it has to boil for a lot longer than I would have guessed.

Some other things I’ve learned: don’t be like me and absent-mindedly use your finger to get that little drop off the end of the whisk or thermometer. And don’t be afraid to double the batch; you will thank yourself later.

It should last in the fridge for several days. But, to be honest, mine never sticks around that long.

Butterscotch Sauce


Easy Butterscotch Sauce

Adapted from Smitten Kitchen

  • 1/4 cup (50 mL) butter
  • 1/2 cup (125 mL) packed brown sugar
  • 1/2 cup (125 mL) whipping cream pinch flaky salt, plus more to taste
  • 1 tsp (5 mL) vanilla extract, or more to taste

In a pot over medium heat, melt the butter. Add the sugar, cream and salt and whisk until blended. Bring to a boil and cook for several minutes, whisking often. It will boil up, so watch carefully. Cook until it reaches a temperature of about 220°F (104°C), give or take a degree or two. Remove from heat and stir in 1 tsp of vanilla.

Let it cool slightly and taste, adding more vanilla or another pinch of salt to suit your tastes.

Store in the refrigerator. Reheat gently on the stove or in the microwave to make it pourable.

Makes about 3/4 cup.

This article first appeared in the Calgary Herald. For more recipe ideas, check out CalgaryHerald.com/food.

Continue Reading

Rhubarb Snacking Cake

Oh blergh.

I’ll spare the apologies for not being a good blogger lately. Mostly, I really should be apologizing to my blog because I’ve been careless, letting our anniversary slip by (four years!) with not even a cheap greeting card or cake (which I usually make to celebrate this little milestone) to mark the occasion. (Actually, I think the real loser here is me since it also meant that I didn’t get to *eat* cake for my blog’s anniversary either. Fails all around.) As these things go, I suspect these means I’ll have to do something absolutely stupendous to make up for it. What that will be, I know not.

Until then, though, I’ve got a Rhubarb Snacking Cake for you all. (And, ahem, for myself, as I have certainly enjoyed a slice or two.)

Rhubarb Snacking Cake III

My back went out a couple of weeks ago. Annoying as hell, but I’m on the mend. I had to take a handful of days away from the office since being flat out on my front was about the only comfortable position I could find and I returned to find a massive bundle of rhubarb on my desk. As in, the stalks — some a good 5 centimetres or so in diameter — were at least two feet long and the entire bundle had been wrapped up using two plastic bags end-to-end and a good binding of tape. I was amused at how I had to hobble out to my car at the end of the day with this bundle, but mostly I was grateful because I do love rhubarb. (Pudding cakes, large crumb coffee cake, upside-down cake, anyone? Or, perhaps my favourite, how about a rhubarb-based cocktail? Yes, click through; they’re named after my grandmother!)

Fortuitously, I had just come across Smitten Kitchen’s latest, a so-called Rhubarb Snacking Cake that she had put together, loosely based on a Martha Stewart recipe, so I knew exactly what I was going to do with at least part of the rhubarb bundle.

It was my first baking project in a number of weeks and it felt great to be back in the kitchen, even if it meant stopping to take breaks to lay down on the floor in between.

This cake has a fabulous crumb and I like how it’s not very tall, which does make it very easy to eat by hand, which my friends and I did that afternoon while sitting out on a back deck drinking Gewurztraminer and soaking up some sun.

(And later, a glass or two of Pinot Noir.)

Pinot Noir afternoon

While I normally follow a recipe exactly the first time I make it, I did make a couple of changes this time around. Namely, I omitted the cinnamon in the crumb topping (although a fan of cinnamon, I don’t love it with rhubarb, I’ve decided) and adding a bit more butter since the crumb wasn’t exactly “crumb-ing” with the four tablespoons called for. Next time (and there will be a next time), I think I’ll cut back on the flour a bit as the crumbs still seemed a bit dry. I know our Canadian flour is a bit stronger than that of our southern neighbours, so that may be why it wasn’t quite dead on. (If you click over and look at Deb’s photos on her post, you’ll see her topping looks different.)

But, really, minor quibble in the great scheme of things.

It should also be no surprise, but I upped the amount of lemon zest and maybe splashed a bit more of the juice in with the chopped rhubarb. The recipe below reflects that, but if you’re not as much of a fan of lemon as I am, feel free to rein things back in.

Lastly, as going through the recipe again, I just realized I mucked it up, putting only 1/3 cup sugar in the topping and a full cup in the batter. I actually thought it was quite tasty this way since then the rhubarb layer more tart (but not alarmingly so). Below is the recipe as it should be, but feel free to do it the wrong (and yet still super delicious) way that I did it.

Sliced rhubarb

All Scraped Out

Rhubarb Snacking Cake from the Oven I

Rhubarb Snacking Cake from the Oven II

Rhubarb Snacking Cake II

Rhubarb Snacking Cake I

Rhubarb Snacking Cake

From Smitten Kitchen, as inspired by Martha Stewart Living.

Cake:

  • 1 1/4 pound rhubarb, trimmed and cut into 1/2-inch lengths on the diagonal
  • 1 1/3 cup  granulated sugar, divided
  • 1 1/2 tablespoons lemon juice
  • 1/2 cup unsalted butter, softened
  • 2 teaspoons finely grated lemon zest
  • 2 large eggs
  • 1 1/3 cups all-purpose flour
  • 1 teaspoon baking powder
  • 3/4 teaspoon table salt
  • 1/4 teaspoon ground ginger
  • 1/3 cup sour cream

Crumb:

  • 1 cup all-purpose flour (though I might do a tablespoon or two less next time)
  • 1/4 cup brown sugar
  • 1/8 teaspoon table salt
  • 5 tablespoons unsalted butter, melted

Preheat your oven to 350°F.

Grease the bottom and sides of a 9×13-inch baking pan with butter or cooking spray, then line with parchment paper, extending it up two sides to make a sling.

Stir together rhubarb, lemon juice and 2/3 cup sugar, then set aside.

Beat the butter, remaining sugar and lemon zest until light and fluffy. Add eggs, one at a time, making sure to scrape down the sides of the bowl each time. In a separate bowl, whisk together the dry ingredients. Add one-third of the flour mixture to the batter, mixing on low until just combined. Add half of the sour cream and continue mixing on low, then add another third of the flour mixture, then the rest of the sour cream and finish with the rest of the flour. (I mixed the last addition until just barely combined, finishing it off with the spatula.

Scoop the batter into the pan and spread evenly. (Deb suggests using an offset spatula. I agree; it made it much easier to make the layer even and get it into the corners.) Top with rhubarb, spreading evenly.

For the crumb mixture, whisk together flour, brown sugar and salt, then mix in the melted butter with a fork. Scatter over the rhubarb.

Bake for 50 to 60 minutes until a tester comes out clean of cake batter. Cool in the pan on a rack.

To serve, use the sling to lift the cake free from the pan and cut into squares.

Continue Reading

Rhubarb Upside-down Cake

Before I get down to this (and, baby, this is well worth getting down to), a little apology and a tease of what’s going to be coming up on P&P. First, sorry for the delay in updating. Life, it has been hectic of late. That’s not a bad thing, except when it comes to keeping the blog a little more lively. But, my friends, I’ve got posts coming on my trip to Portland (hint: there are burgers. And they are t-a-s-t-y.), a scape pesto and some other goodies.

So, thanks for your patience. And now, let’s look at some cake, shall we?

Rhubarb Upside-Down Cake III

It’s rhubarb season again and one of my most favourite times of the year (right up there with that point when cherry blossoms finally burst forth in frothy clouds of pink).

In the last few weeks, people have regaled me with stories of how their rhubarb patches are growing like weeds and they have no idea what to do with all those stalks. (Including one friend who actually didn’t know it was rhubarb in her garden. If I lived anywhere near her, I would have been tempted to drive over and take them all.)

I give them all the same response: I’m more than happy to take it off their hands.

I have no shame when it comes to rhubarb.

Red Rhubarb Stalks

I love it, those rosy-pink or mottled green stalks with their sour punch that mellows with a little sugar and heat.

I like it in crumb cakes and muffins, crisps and cocktails. (And here are a couple more.)

And when I saw this Rhubarb Upside-Down Cake from Martha Stewart, I knew exactly what my next project would be once I got my hands on a pound or two of the fruit.

My only real experience with upside-down cakes is the images from the ’60s and ’70s of the pineapple version with each golden ring dotted by a bright red maraschino cherry.

This version is all rhubarb with the top awash in rosy pink.

The question with upside-down cakes is always, will this upend properly to a gorgeous display of fruit on a golden-crumbed cake? The backup question follows: if it doesn’t, can I at least make it look like it did?

Except for a few errant pieces of rhubarb that slid off the cake’s edges, it came out beautifully. (Perhaps don’t jam them into the edges of the pan quite as enthusiastically as I did, since these were the ones that escaped from the top of the cake.)

I will say that I followed Stewart’s instructions exactly and she suggests removing the cake after only 10 minutes of cooling; otherwise, she says, it will stick.

As I lifted off the cake pan, rosy pink juices glided down the cake edge and settled on the cake stand like a thin moat.

It was definitely juicier than the image of Stewart’s perfect cake, but when it comes to that sweetened rhubarb syrup that forms when the fruit is cooked with a bit of sugar, I’m OK with that. And I’ve never heard anyone complain of an overly moist cake.

This was light and fluffy, slightly perfumed with orange and topped with softened rhubarb, sugar-kissed and slightly tangy.

And the unusual addition of a crumb topping (which then becomes the crumb bottom) added an unexpected, but nice, texture.

I thought it was a weird touch and was tempted to skip it initially, figuring rhubarb and cake alone would be tasty, but it added another dimension to the cake, which I liked.

And, with this, rhubarb season is on for me.

I can only hope other friends feel overwhelmed by an excess of rhubarb and they don’t mind me suggesting they feel free to pass it along.

Rhubarb and Sugar

Rhubarb and Sugar II

Crumb Topping

Cooked Crumb Topping

Rhubarb Upside-Down Cake

Rhubarb Upside-Down Cake II

Rhubarb Upside-Down Cake Slice

Rhubarb Upside-Down Cake

This comes from Martha Stewart. She suggests when putting the rhubarb in the cake pan to put the pinkest edges facing down so the cake, when upended, will have the best colour.

For the topping:

  • 4 tbsp (60 mL) unsalted butter, melted
  • 1/2 cup (125 mL) all-purpose flour
  • 1/4 cup (50 mL) sugar
  • coarse salt

For the cake:

  • 3/4 cup (175 mL) unsalted butter, divided, at room temperature, plus more for buttering pan
  • 1 lb (500 g) rhubarb, trimmed and cut on a very sharp diagonal about ½-inch (1-cm) thick
  • 1¾ cups (425 mL) sugar, divided
  • 1½ cups (375 mL) all-purpose flour
  • 1½ tsp (7 mL) baking powder
  • coarse salt
  • 1/2 tsp (2 mL) finely grated orange zest
  • 1 tbsp (15 mL) fresh orange juice
  • 2 large eggs
  • 1 cup (250 mL) sour cream

Preheat oven to 350°F (180°C).

Make the topping: Stir together butter, flour, sugar and 1/4 tsp (1 mL) salt until moist and crumbly.

Make the cake: Butter a 9-inch (23-cm) round cake pan (2 inches/5 cm deep). Dot with 4 tbsp (60 mL) butter, cut into pieces. Toss rhubarb with 3/4 cup (175 mL) sugar; let stand for 2 minutes. Toss again, and spread in pan.

Whisk together flour, baking powder and 1½ tsp (7 mL) salt. Beat remaining butter and cup of sugar with a mixer on medium speed until pale and fluffy. Beat in zest and juice. Beat in eggs, 1 at a time, until incorporated, scraping down sides of bowl.

Beat in flour mixture in 3 additions, alternating with sour cream, until smooth. Spread evenly over rhubarb. Crumble topping evenly over batter.

Bake until a toothpick inserted into the centre comes out clean and top springs back when touched, about 1 hour. Let cool for 10 minutes. Run a knife around edge of cake, and invert onto a wire rack. Let cool completely.

Cook’s Note: Let the cake cool for 10 minutes before removing it from the pan. The rhubarb will be too hot to handle safely right after baking. But if the cake sits much longer, it may stick.

This first appeared in the Calgary Herald. For more recipes and instructional videos, check out the Herald’s Food page.

Continue Reading

Fruit Cobbler Cake

Look! It’s more peach-related baking.

Actually, that’s not entirely true. I only had one peach by the time I finally got around to this cake from Julie over at Dinner with Julie, so I had to get a little creative with the other fruit I had bought from the Farmer’s Market the weekend before, adding a nectarine and some blackberries to the mix.

(And I feel a little bit badly posting this since peach season is just about over for the year. Sorry!)

Julie’s version used rhubarb (and I kind of wish I had thought of this recipe when that fruit was still available. Must keep in mind for next year), but pretty much any fruit will work. The only adjustment that needs to be made is to the amount of sugar you sprinkle on over top. Rhubarb, with it’s tart flavour, needs more sugar. These needed barely any. And in an effort to get creative, I actually used large-grained raw sugar, which probably gave it a much more caramel-like flavour on top.

As you can see in the photo, it, uh, caramelized the edges of the cake. Actually, truth be told, I was freaking out the whole thing was going to burn before the centre was finally cooked. But people seemed to like it quite a bit (favouring the edges where it hit more of the batter and less of the fruit), but next time I’d like to try it with straight-up sugar to see what kind of difference it makes.

I liked the idea of this cake, the way it bakes up around the fruit, enveloping it even. And it didn’t disappoint.

Peaches and Nectarines

Scattered Fruit

Fruit Cobbler Cake

Fruit Cobbler Cake Slice

It’s definitely one to keep in mind when next summer gets going or, even better, when you are craving a taste of summer and the fruit isn’t exactly ripe and delicious enough to eat on its own. Baking it into this cake will elevate it, I swear.

This recipe, like so many good ones, comes from Julie over at Dinner with Julie. (And hey, while you’re over there, check out her peach bran muffins recipe, which I also made and was fabulous.)

Fruit Cobbler Cake

  • 1/2 cup butter, at room temperature
  • 1 1/2 cup sugar
  • 4 large eggs
  • 1 teaspoon vanilla
  • 2 cups all-purpose flour
  • 2 teaspoon baking powder
  • pinch salt
  • 2 – 4 cups assorted fruit (rhubarb, strawberries, peaches, plums, nectarines, blackberries etc. I used a peach, a nectarine and a scattering of blackberries in my version)
  • 1/8 to 1/2 cup sugar (depending on the tartness of the fruit; rhubarb, for example, would need a greater amount of sugar)

Preheat the oven to 350F.

In a large bowl, beat together the butter and sugar until well combined and starting to get fluffly. Add the eggs one at a time, beating after each, then beat in the vanilla.

Add the flour, baking powder and salt and stir by hand or beat on low speed just until combined; the batter will be thick. Spread into a 9″x13″ pan that has been sprayed with nonstick spray, and scatter the fruit over top. Sprinkle with sugar and bake for 45-50 minutes, until the cake is golden and the cakey parts springy to the touch.

Makes one large cake.

Continue Reading

Microwave Lime Cheesecake

Under normal circumstances, microwave cheesecake would be an ideal summer dessert for the sole reason that it doesn’t require you to turn on your oven.

However, this summer has been anything but normal.

So, instead, I’m going to tell you that these little cheesecakes are ridiculously easy, super tasty and highly transportable and those are three very fine reasons to consider trying it out. And, hey, if the forecasters are right and we’re going to sail through the rest of August on a heat wave, then feel free to use not wanting to turn on your oven as an excuse, too.

The more rationale, the better, I say.

Not that cheesecake should require any rationale.

These ones certainly don’t.

Microwave Lime Cheesecake I

Now, I’m not going to lie. If you’re looking for a silky smooth cheesecake with nary a crack marring the surface, lovingly cooked in a water bath and chilled overnight in the fridge, this isn’t the recipe for you.

If you’re looking for something you can whip up in seven minutes — including cooking time — that sits in the fridge for an hour and then can be devoured, giving you the same tart lime cheesecake taste as the regular kind with almost the same amount of smoothness, then this is the recipe for you.

It was for me.

The hardest part was waiting for it to chill enough.

And the best part was because I used mason jars, I could just slap on a lid and take it with me, which would be ideal for picnicking or making an office lunch a little more luxurious.

I used two one-cup (250 mL) mason jars to make the cheesecakes and had a little bit of batter left over. In hindsight, I can tell you I filled the jars a bit too full.

At some point, I may want to sit down and reexamine the subject of portion control. At the time, though, it seemed like a good idea. After all, the recipe said it makes two to four cheesecakes, so two seemed more than reasonable.

Please take my suggestion and make at least three, for a few reasons: 1: These jars are pretty giant and the cheesecake is, naturally, a bit rich and may be better in a slightly smaller dose. 2: Three or four cheesecakes means you can share more easily with more people. That or you can spread them out over several sittings.

3: You won’t be watching anxiously through the microwave door as the cheesecake mixture souffles up and over the jars’ edges, threatening to spill all over the rotating tray.

As it was, all that fretting was for nothing. They didn’t spill, but I think it would have been better without the panic.

Out of the microwave, they settled nicely into a slightly concave top.

I filled that with whipped cream — purely for esthetic reasons, of course. But later I thought some fresh fruit would have been nice.

I liked the slightly tart taste of limes countering the richness of cheesecake, but suspect this recipe can be easily adjusted to suit other flavours, such as lemon (by switching the zest and juice to that fruit) or a straight-up vanilla cheesecake by omitting the citrus and adding a teaspoon or so of vanilla extract. That would be particularly delicious topped with summer berries or a fruit compote.

After all, it only takes about seven minutes to try a new variation. The tricky part will be waiting the hour to see how it tastes.

Limes

Microwave Lime Cheesecake II

Microwave Lime Cheesecake

Adapted from TheKitchn.com

  • 3 tbsp (50 mL) butter, melted
  • 1/2 cup (125 mL) graham cracker crumbs
  • 1 tbsp (15 mL) sugar
  • 8 oz (250 g) cream cheese, softened
  • 1/3 cup (75 mL) sugar
  • zest of one lime
  • 2 tbsp (25 mL) fresh lime juice
  • 1 egg

Combine the graham cracker crumbs with melted butter and 1 tbsp (15 mL) sugar. Divide between two to four 1-cup (250 mL) jars or ramekins and press into the bottom.

Mix the rest of the ingredients until smooth. Divide evenly into jars or ramekins with crumbed bottoms.

Place in microwave for 2 minutes. The top of the cheesecake should appear dry when cooked. If it doesn’t look quite done, microwave at 30-second intervals until the tops appear dry. (For my extremely full jars, I needed 2 minutes and 30 seconds.) If you don’t have a rotating microwave tray, cook for 1 minute then turn the jars or ramekins and microwave for another minute.

Chill in refrigerator for 1 hour. Garnish with whipped cream or fresh berries and serve.

This story first appeared in the Real Life section in the Calgary Herald. For more delicious recipes, visit CalgaryHerald.com/life.

Continue Reading

Feta-Watermelon Salad

Fruit and cheese is a natural combination. I like a nice wedge of brie with pear, have enjoyed dried apricots and a little Gouda and, of course, apple and cheddar are a classic pairing for a reason.

Over the years I’ve seen the combination of feta and watermelon crop up in cookbooks, on blogs and in menus. For a long time I just could not wrap my head around the idea of matching the sharp, salty tang of feta with a sweet and luscious watermelon.

Feta-Watermelon Salad II

It seemed an incongruous match. A slightly chalky cheese with a juicy fruit? I could not be tempted. But I finally broke down and ordered a salad with feta and watermelon at a local restaurant a few months ago. Curiosity got the best of me, I guess. And then I mentally kicked myself for waiting so long.

Where I had expected incompatibility, I found harmony. A harmony that almost tempted me to lick my plate. Decorum reigned, but the salad has remained at the back of my mind for the last few months.

I was never a big watermelon eater. Sure, we’d eat wedges of it during summer as kids, coating our faces in the fruit’s juices as we sat on the back porch. It was a cool and refreshing treat and a nice way to pause between runs through the sprinkler on the lawn. I never did get the hang of spitting seeds, though.

Watermelon II

As I grew older, watermelon dropped off my radar. I never bought it for myself, ate it only when it was part of some fruit salad. Until this dinner out, when I realized this giant fruit could be just as sophisticated as the combination of brie and pear, while still holding that faint taste of childhood summers.

A baby watermelon I found at the farmer’s market sealed the deal. It was time to make this salad my own.

There are myriad variations of feta-watermelon salad on the Internet, and even one or two in my rather large cookbook collection. But each one had some ingredient that held no appeal for me or they appeared to be missing something I believed was crucial. In the end, I simply took from each what I thought was right: watermelon for the sweet; feta for the salt; cucumber for crunch; lime juice for tang; red onion for some sharpness; olive oil for that fruity, grassy flavour; and, of course, mint.

The mint certainly kicked it over the edge for me. That small addition transformed the simple salt-sweet combination into something spectacular.

I used a Nigella Lawson trick of marinating the sliced onions in acid — in this case lime juice — which she uses in several recipes, including her own version of feta-watermelon salad. The lime juice takes some of the bite away from the red onions while not robbing their flavour, and also creates a lovely pink colour for the dressing.

I don’t want to get too romantic about this salad, but it did taste a lot like I was eating a summer afternoon. Refreshing like a cold drink, but with the punch of feta and soothing mint. I probably could have eaten the entire bowl.

Which would have been for the best, because this salad really doesn’t keep. Only make as much as you’re going to need, because the watermelon does break down relatively quickly. Not that it didn’t still taste as good — it just lost some of its visual appeal.

Lastly, don’t be afraid to make adjustments as you see fit. Want more feta? Go for it. Think the watermelon cubes should be bigger? Smaller? Not cubed at all? Be my guest. This is a salad, after all, so tailor it to your own tastes. As long as the core ingredients remain the same, it will be tasty.

Mint

Watermelon I

Onions

Feta-Watermelon Salad I

Feta-Watermelon Salad with Mint

  • ½ cup (125 mL) lime juice, from 3 to 4 limes
  • ½ red onion (or one small one), peeled and sliced thinly into half-moons
  • 8 cups (2L) watermelon, cut into ½ inch (2 cm) cubes, one tiny watermelon or ¼ of a large one
  • ½ English cucumber or 3 baby cucumbers, seeded and sliced
  • 1 cup (250 mL) feta, cut into small cubes
  • 2 tbsp (25 mL) extra virgin olive oil
  • ½ cup (125 mL) mint, chiffonade

Juice the limes into a bowl. Slice the red onion and add to the lime juice to marinate while you prepare the rest of the salad.

Cut watermelon into slices, remove rind and chop into chunks. Dump them in a large salad bowl and top with cucumber slices and feta cubes. Add olive oil to red onion-lime juice mixture, stir and then pour over salad.

Roll mint leaves into a cigar and slice thinly into strands. Sprinkle over salad, toss and serve.

This story first appeared in the Real Life section in the Calgary Herald. For more delicious recipes, visit CalgaryHerald.com/life.

Continue Reading

Basil Vinaigrette

If you’ve been reading this for awhile, you may remember when I mentioned that I once bought a cookbook simply for a salad dressing recipe. Subsequently, I’ve learned to love Rebar’s lime sugar cookies and have tried numerous other recipes in the book. But it’s the basil vinaigrette that keeps me coming back to this book every single time.

Salad close-up

I first tried the basil dressing when I had a salad at Rebar one afternoon. It was a fantastic meal. (I have this theory about salads, that they are always best when someone else makes them. In this case, it’s not all that surprising when you look at what they include in their giant salads: grated beets, grated carrots, lettuce, tomatoes, sunflower seeds, cheese . . . . The list goes on.) And I’ve barely tried anything else when I’ve gone there again because the salad is so good.

And they don’t blink when I ask for a little extra dressing on the side.

People, this is good stuff.

And no doubt, there is A LOT of basil in here. Once blended with vinegars, dijon and a few other ingredients, then emulsified with olive oil, this comes out very thick, very green and very fantastic.

Basil

As soon as basil starts to show up at the farmer’s market each summer, I buy a couple of huge bunches, make a batch or two of pesto and then this dressing, which I devour on salads all week.

(Um, may I suggest checking your basil before blending?)
Extra passenger

The measurement for basil (1 1/2 ounces) doesn’t sound like a lot, but it’s a few cups, so make sure to buy enough. Otherwise, cut the recipe in half if you don’t have enough.

All in the blender

Basil Vinaigrette

Basil Vinaigrette II

Dressing on lettuce

Simple salad with Basil Vinaigrette

Basil Vinaigrette

from the Rebar Modern Food Cookbook

  • 2 garlic cloves
  • 1 1/2 tablespoons Dijon mustard
  • 2 tablespoons honey
  • 1/4 cup red wine vinegar
  • 1 tablespoon balsamic vinegar
  • 1 1/2 ounces fresh basil leaves
  • 1/2 teaspoon salt
  • 1 1/2 teaspoons cracked pepper
  • 1 cup olive oil

Combine all of the ingredients, except the olive oil, in a food processor (I use a blender and that works just as well, I’ve found.) and blend. Slowly add olive oil in a slow, thin stream until thick and creamy.

Season to taste and serve. Can be refrigerated up to three days.

Continue Reading

Shaved Asparagus Pizza

I have a confession: I am incapable of kneading. I don’t know if it’s a character defect, a lack of practice or sheer laziness, but I cannot seem to take a mix of flour and water and yeast and make it into a smooth mass that balloons into a beautiful ball of dough. I end up with something shaggy and ragged and, well, downright ugly.

When it comes to pizza crusts, I have tried to persevere. There have been a few successes (and one colossal failure where I essentially made a giant, pizza-sized cracker), but I was typically undone by my less-than-stellar kneading skills.

And then, a revelation: no-knead pizza dough.

It was a circuitous route that brought me to a place where I realized I too could easily make homemade pizza dough.

It started with shaved asparagus pizza.

Shaved aspargus pizza IV

I stumbled onto the idea on Smitten Kitchen — a popular food blog written by the charming Deb Perelman — and was immediately enchanted. Warm chewy crust, melted cheese and thin shavings of asparagus that would roast on top? Yes, please.

But, as Perelman pointed out, she was not the only one to think this would be a fantastic combination. Indeed, Jim Lahey, who revolutionized bread baking with his no-knead concept, serves a high-end version at his restaurant.

Surely, Lahey must have a pizza dough recipe.

Yes, yes he does. And it doesn’t involve kneading.

Sold!

This time, the dough is intentionally shaggy and ugly. And, after a few stirs and some squishing together of the ingredients (I can’t even bring myself to call it kneading), it only wants to be left alone for two hours.

When finally baked, it has a pleasing crispness with just an appropriate amount of chew. Topped with a tangle of shaved asparagus that had roasted and intensified in flavour, along with the richness and slight salt of the cheese, this is something I could eat over and over.

Shaved aspargus pizza II

My first taste of asparagus came in Grade 10 when my boyfriend made me dinner one night and steamed some to go with steaks. I don’t remember much about that meal other than feeling overwhelmingly shy and excited to have a boy I liked cook for me.

Since then, I’ve grown to love the green-stalked vegetable and I’ll take it just about any way it can be prepared. Roasting, though, is my favourite because I like how it slightly caramelizes the tops and intensifies the flavour.

This pizza takes advantage of that, particularly because you shave the asparagus. None of the stalks shave perfectly, so you end up with varying thicknesses of asparagus strips, each of which cook slightly differently. Some will caramelize, while others will still retain a slight bite to them.

The beauty of pizza is that it is infinitely adaptable and this recipe is no exception.

While I used buffalo mozzarella cut into rounds and a sprinkle of Parmesan, I was tempted to throw on some bits of goat cheese as well and will probably try that next time. A squeeze of lemon would have been nice at the very end. Like it spicy? Toss on some red pepper flakes.

Lahey’s version uses some rather fancy cheese, quail eggs and shaved black truffles.

But even with slightly less-glamorous ingredients, this dish is delicious.

P.S. This crust was so good that I made another batch about four days later. Yes, I have a pizza problem.

Buffalo Mozzarella

Asparagus bunch

Shaved Asparagus

Asparagus shavings

Shaved aspargus pizza I

Shaved aspargus pizza III

Shaved Asparagus Pizza
Crust, from Jim Lahey’s My Bread

  • 3 ¾ cups (925 mL) bread flour
  • 2 ½ teaspoons (12 mL) instant yeast
  • ¾ teaspoon (3 mL) table salt
  • ¾ teaspoon (3 mL) plus a pinch sugar
  • 1 1/3 cups (325 mL) room temperature water (about 72F or 23C)
  • 1 to 2 teaspoons (5 to 10 mL) olive oil for pans

In a medium bowl, stir together the flour, yeast, salt and sugar. Add the water and, using a wooden spoon or your hand, mix until blended, at least 30 seconds. Cover the bowl and let sit at room temperature until the dough has more than doubled in volume, about two hours.
Using a bowl scraper or rubber spatula, remove the dough from the bowl onto a floured work surface. Gently form into a rough ball. Then divide the dough into two halves (to make his two 13×18 – 33×45 cm – pizzas or, do as I did, and divide into three parts for round pizzas) spacing them 4 inches (10 cm) apart, and cover with a moistened kitchen towel for 30 minutes.

Pizza, from Smitten Kitchen:

  • ½ pound (250 g) asparagus
  • ¼ cup (50 mL) grated Parmesan
  • ½ pound )250 g) mozzarella, cut into rounds, shredded or cubed
  • 2 teaspoons (10 mL) olive oil
  • ½ (2 mL) teaspoon coarse salt
  • black pepper to taste

Preheat oven to 500F (260C).
Using the rough end as a handle, hold the asparagus against a cutting board and use a vegetable peeler to make long strips. (I got anywhere between two to five shavings from each stalk depending on how thick they were or how easily the peeler went through the asparagus. They were also of varying thicknesses, which is fine.) After shaving, you should just be left holding the rough end, which can be discarded. Repeat with all of the asparagus.
In a bowl, toss together asparagus, olive oil, salt and pepper.

Roll out or stretch dough to create 12” (30 cm) round. (Lahey calls for it to be stretched by hand, but I used a rolling pin and did only a bit of hand stretching after getting the dough on the pan.) Brush olive oil on pan and transfer dough.
Sprinkle on Parmesan, then add mozzarella. Top with asparagus strands.
Bake for 10 to 15 minutes until crust is golden, cheese is melted and asparagus is roasted.

This story first appeared in the Real Life section in the Calgary Herald. For more delicious recipes, visit CalgaryHerald.com/life.

Continue Reading

Roasted Tomato Tart

(I am so proud of this post because it marks my first food article in the Herald’s revamped Sunday edition. My photo of my little roasted tomato tart was on the cover of the ‘mix’ section. For those that haven’t seen the new Sunday edition, that means the photo was the entire front of the ‘mix’ section. Yay! And a warning, this post is photo heavy! What can I say? I had a hard time paring it down.)

And now, back to the article.

I have an unabashed love of tomatoes. Meaty slices of them wedged between two pieces of buttered toast with a sprinkle of salt and pepper is my idea of comfort food. Roma tomatoes drizzled with a little balsamic vinegar and good olive oil make a simple side dish. And I love that burst of seeds and flavour that comes when biting into a plain cherry tomato.

Tomatoes II

I once bought a perfume called Tomato because it smelled like the aroma given off after brushing up against the green stalks of a tomato plant — that verdant scent of heat and summer. A few spritzes on my wrist could transport me back to being a kid and visiting my grandparents on one of the Gulf Islands where I sometimes helped in the garden.

Enclosed in chicken wire to protect it from ravenous deer, the garden produced sweet tiny carrots I ate straight from the ground after a quick rinse from the hose, grape vines that tangled their way along trellises, and rows of tomato plants.

I would use a plastic watering can to fill the coffee tins with water, from which my grandfather had removed the bottoms, nestled into the earth next to the plants — a trick that allowed the water to get right at the plant’s roots. And I would brush up against the stalks, filling the air with that distinct smell.

If any were ripe, I’d pull them sun-warmed from the dark green plants and eat them unadorned.

There is no taste like a vine-ripened tomato.

Tomatoes

But sometimes I like to roast them to intensify their essence and bring out more of their natural sweetness.

Baking halved Roma tomatoes in the oven with a few unpeeled garlic cloves is an excellent base for a good tomato soup.

Cherry tomatoes, when roasted, shrink and wrinkle to softish pouches of concentrated tomato flavour. I’ve made simple pasta sauces like this, topped only with shaved Parmesan and a sprinkle of basil or parsley if I have them lying around.

Roasted Tomato Tart-round

I thought recently — after seeing a clamshell package of multicoloured cherry tomatoes at the farmers market — that they would make a good savoury tart, particularly if paired with a hearty crust.

When I began imagining a roasted cherry tomato tart, I thought there was potential in adding a few handfuls of Parmesan cheese to the dough to bring out a nice nutty, rich taste when baked.

A little research led me to realize I wasn’t the first person to think of this, but I didn’t love any of the recipes I came across. I am by no means a pastry expert, but was willing to give myself a chance to experiment.

Using ideas from several different recipes, I decided to create a hybrid pastry that used cream instead of water and a cup of Parmesan cheese, finely grated and blitzed with the other ingredients in the food processor.

The dough was easy to work with and resulted in a golden crust that played nicely against the sweet, soft tomatoes.

(This would likely work just as well, though, with a regular pastry.)

Because cherry tomatoes are so juicy, there was a lot of liquid bubbling away as the tart was baking. (Truth be told, I was a bit nervous about just how much I could see as I peered through the oven door.) Some of it did cook off in the process, but there was definitely a thin layer of tomato liquor when I pulled the tart out. Some may call it soggy; I prefer to think of it as tomato-infused pastry. Either way, the base of the tart pastry was crisp and I liked the taste of it.

A sprinkle of basil gave it a nice fresh taste when added as the tart cooled slightly. (And yes, you’ll want to let it sit for a few minutes because cutting into the tomatoes will likely cause some to burst. Ouch.)

Chilled parmesan pastry

Pastry in tart dish

Tomatoes III

Tart pre-oven

Roasted Tomato Tart II

Tomato Tart and slice

Sliced Tomato Tart

Roasted Tomato Tart Sliced

Roasted Tomato Tart

  • 1½ cups (375 mL) flour
  • 7 tbsp (115 mL) butter, cold and cut into small cubes
  • ½ cup (125 mL) cream
  • 1 cup (250 mL) finely grated Parmesan
  • pinch salt
  • 1-1¼ lb. (500 to 625 grams) cherry or grape-sized tomatoes
  • 1 tbsp (15 mL) olive oil
  • 1 tsp (5 mL) salt
  • ½ tsp (2 mL) fresh ground pepper
  • 2 tbsp (25 mL) fresh basil, chiffonade (rolled like a cigar and cut into strips)

Add the flour and pinch of salt to the bowl of a food processor, then sprinkle the butter cubes on top. Pulse two or three times until the butter starts to break down, then add the Parmesan. Pulse until the mixture is crumbly and the butter is in pieces no larger than a pea.

Add the cream slowly while pulsing until the dough starts to come together. (It will bunch up and the food processor noise will change.)

Empty the contents onto a lightly floured surface and knead it a few times to pull the dough together.

Wrap in plastic and refrigerate for at least 30 minutes or as long as overnight.

Preheat oven to 325 F (160 C).

Toss the tomatoes in a bowl with the olive oil, 1 tsp salt and pepper. Set aside.

On a lightly floured surface, roll out the dough until it is about 1/3 inch to 1/4 inch (8 millimetres to 6 mm) thick. Press into tart tin (9 inch/23 cm round tin or a 14-inch/35 cm rectangular tin), stretching it as little as possible, and cut off excess. Arrange tomatoes in the tart tin.

Bake for an hour until tomatoes are soft and pastry is golden brown. Remove and let cool on a rack for 10 minutes. Roll basil leaves like a cigar and then slice them to make herb strips. Sprinkle over tart.

Serve while still warm.

Cook’s note: The amount of tomatoes will vary depending on how tall or fat they are and how well they fit together in the tart tin.

This story first appeared in the Real Life section in the Calgary Herald. For more delicious recipes, visit CalgaryHerald.com/life.

Continue Reading

Strawberry Shortcakes

I suppose my scone anxiety started about 10 years ago when I was doing a stint teaching English in Japan.

My next-door neighbour invited me to a cooking class being hosted by one of the American wives who lived on a nearby U. S. naval base. Every so often they would run these courses and local housewives in my small town would sign up, looking for a chance to learn some foreign cooking and perhaps practise English.

I’m sure I paid attention. I’m also sure we put in all the ingredients. I’m confident we didn’t overmix.

But pulling our tray from the oven, it was painfully obvious something, somewhere had gone wrong.

The navy wife clucked her tongue and kindly suggested we forgot to add the baking powder.

To say they were hockey pucks would have been polite.

To add to that anxiety was the confusion I suffered when attempting to make scones again: how best to mix the butter with the flour to ensure even incorporation while the butter remains cold.

Pastry blender? Fingertips? Food processor?

It was all a bit much for this would-be perfectionist to handle.

I understood the logic behind it. If the butter stays cold and is perfectly mixed in with the rest of the ingredients, it will melt in the heat of the oven, creating light layers in the scone. But I just didn’t know which method was best.

Still, one can only be afraid of scones for so long.

And it’s strawberry season.

And if those two things aren’t enough to make this girl face down her anxiety with a round of strawberry shortcakes, I’m not sure what would be. After all, the thought of a light, golden scone-like shortcake, topped with slightly sweetened strawberries and a healthy dollop of whipped cream is enough to make me do things much worse than attempt a recipe while bracing for failure.

Within reason, of course.

As hoped for, my anxiety completely melted away when the recipe came together quickly and the shortcakes out of the oven were the requisite golden colour, pulling apart neatly to display all their lovely inner layers.

Strawberry Shortcake II

It may have been thanks to chef Nigella Lawson’s approach to the butter conundrum, which is to grate frozen butter into the dry ingredients. It seems so ridiculously smart, now that I think about it. After all, if the goal is even distribution, what better tool to use than something that will conveniently portion the butter out into tiny pieces? Not to mention the fact that because the butter is frozen, it’s difficult for it to warm up too much before the mixture goes into the oven anyway.

It may also have been that I made absolutely sure to add the leavening.

And it may have been that sometimes anxieties just need to be confronted.

After all, the rewards to be reaped here will carry on and on.

And, in the immediate moment, there are shortcakes to enjoy.

Strawberry Shortcake I

Strawberry Shortcakes

Adapted slightly from chef Nigella Lawson’s How to Be a Domestic Goddess.

For the shortcakes:

  • 1½ cups (325 ml) flour
  • ½ tsp (2 ml) salt
  • 1 tbsp (15 ml) baking powder
  • 5 tbsp (75 ml) sugar, divided
  • 1/2 cup (125 ml) unsalted butter, frozen
  • 1 large egg
  • ½ cup (125 ml) half-and-half cream
  • 2 tbsp (25 ml) whipping cream
  • 2 tbsp (15 ml) sugar, divided
  • 1 cup (250 ml) whipping cream

for the filling:

  • 1 pound (500 g) strawberries, hulled and sliced
  • mix the sliced strawberries with 1 tbsp (15 ml) sugar and set aside in the fridge.

Preheat the oven to 425°f (220°c).

Mix together the flour, salt, baking powder and 3 tbsp (50 ml) of the sugar in a bowl. Grate the frozen butter into the dry ingredients and use your fingertips to lightly toss all together. Whisk the egg into the half-and-half cream and pour into the flour mixture a little at a time, using a fork to mix. (Nigella notes you may not need all the cream; I needed another tablespoon or so.)

Turn the dough out onto a lightly floured surface, then roll gently to about ¾-inch (2 centimetres) thick. Dip a cutter in flour and cut out as many shortcakes as possible. Work the scraps back together, re-roll and cut more. (Nigella suggests using a 3-inch/6½-cm round cutter to make 8; I used a much smaller square one and subsequently got 15 shortcakes.) Place on a baking sheet, brush the tops with the 2 tbsp (25 ml)whipping cream and sprinkle with the remaining sugar.

Bake for 10 to 15 minutes (because mine were significantly smaller than suggested, they only took 8 minutes) until golden. Remove to wire rack to cool.

Whip the whipping cream with the remaining 1 tbsp (15 ml) sugar-and a splash of vanilla extract if desired.

Split the shortcakes through the middle, top with a spoonful of strawberries and dollop of whipped cream and then put the top back on.

These are best served slightly warm.

This story first appeared in the Real Life section in the Calgary Herald. For more delicious recipes, visit CalgaryHerald.com/life.

Continue Reading

Pesto

The smell of basil is the smell of summer.

basil

And not just because it is readily available in the months when the sun is out more often than not and the days are long.
It’s also because I will forever associate the smell of basil with my grandfather and summer afternoons in his studio when we would make pesto.

Pesto

He had a greenhouse that somehow managed to produce a never-ending supply of this fragrant herb. (Along with peppers and tomatoes that tasted like tomatoes. I loved eating them when their skins were still warm from being inside the hothouse; their taste was unparalleled.) So pesto was not just a treat that could be made with basil, it was a way of harvesting and putting to use mass quantities of the stuff.

The remaining ingredients, he always had on hand. Heads of papery garlic always sat in a bowl on the work table that separated the kitchen from the rest of the studio. Parsley was harvested from a large pot on the front deck. As a man who wished he was Italian, olive oil and parmesan were always part of the pantry.

He would store the pesto in baby jars in the freezer, sending a few home with me at the end of my visits to the island.

I started making my own pesto a couple of years ago, though in infinitely smaller batches since I have no garden nor greenhouse and must depend on the bags of basil from the farmer’s market. But I, like him, freeze what I don’t think I’ll quickly consume. Then, in the depths of winter, when the sun goes down before I get home from work and the wind can chill me to the bones, I can pull it out. I add it to soups or pasta sauces or cook it with a little cream and pour over pasta with a fresh few grates of Parmesan. In these small ways, I bring back the summer, and the smells and sounds of being with my grandfather.

Olive Oil

Parmesan

Pesto pre-blending

Pesto II

There are a million variations on pesto recipes. This is one I like, which I adapted from two recipes.

Pesto

  • 2 cups packed basil
  • 1/2 cup parsley
  • 3 cloves garlic
  • 1/2 cup pine nuts, toasted and cooled
  • 1/2 cup grated Parmesan
  • 1/2 teaspoon salt
  • pinch or two pepper (I just do a few grinds)
  • 1/2 cup olive oil

Place all ingredients except oil in a food processor. Blitz two or three times to get it going, then turn on and let run while drizzling oil in. Stop when all the oil is incorporated but before it gets too thin. I like mine to still have a slightly chunky feel to it.

Continue Reading