Cheddar Corn Chowder

It’s cold. Ergo, I want soup.

Cheddar Corn Chowder - close crop

For one thing, it’s warm and soothing. And for a second, it doesn’t need to take much time to put together, which means I’m back under a blanket eating it without much fuss.

Soup for me often means throwing in random vegetables from the crisper, potatoes, onions and garlic, a Parmesan heel (the leftover rind, which I save in a tightly sealed bag in the freezer) if I have it, fresh herbs if there are any to be found and a few handfuls of a small pasta or rice. It’s about creativity and frugality. Emphasis equally on both.

Other times, I want a bowl of soup that requires no real thought on my part, but delivers with soothing flavour.

I want comfort in a bowl.

Without much hassle.

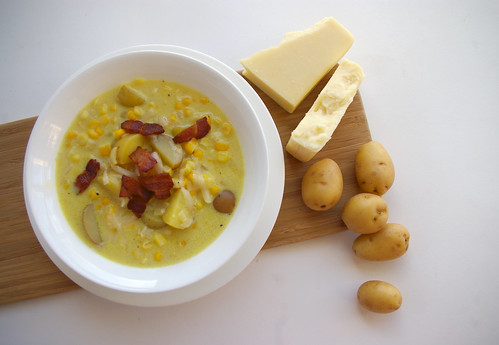
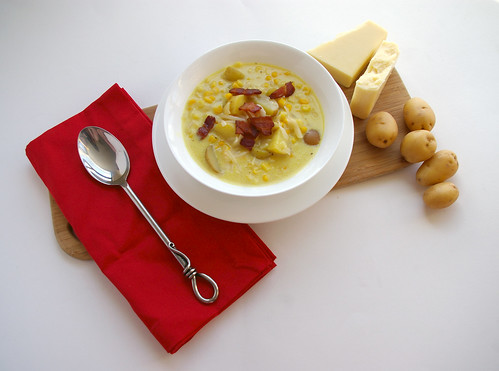
The Barefoot Contessa’s Cheddar Corn Chowder delivers.

Cheddar Corn Chowder - blue napkin

“It tastes like Thanksgiving,” a friend once said when she tried some.

It’s an apt description. The corn and potatoes, combined in the unexpectedly rich, chicken-y broth is a nod to the family holiday.

The turmeric adds a nice golden colour, while the addition of flour cooked in a decadent combination of bacon fat, olive oil and butter, thickens the soup to an almost gravy-like consistency. The sweetness of the corn works nicely in the savoury broth with the soft potatoes, and a few handfuls of white Cheddar.

Cheddar Corn Chowder - ingredients

And yet for a mid-week meal, it’s a good choice. The chowder is relatively quick to make — especially since you can easily substitute frozen corn for fresh, as I have done here, and the potatoes require no peeling. Paired with a salad, it can be a full, well-rounded meal.

Frankly, on its own, it’s quite filling.

And fairly fast.

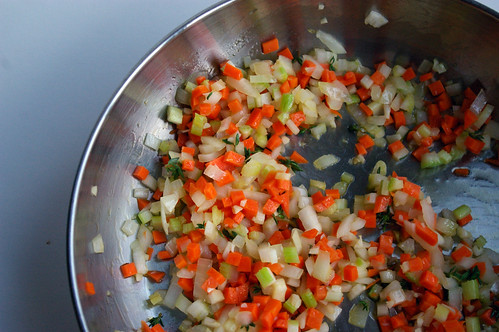
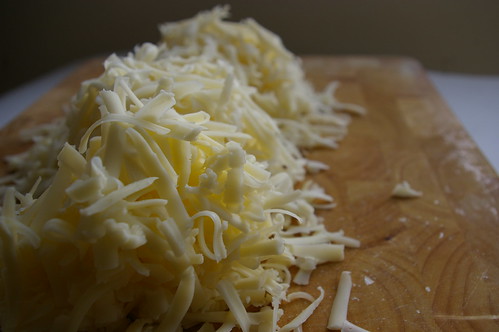
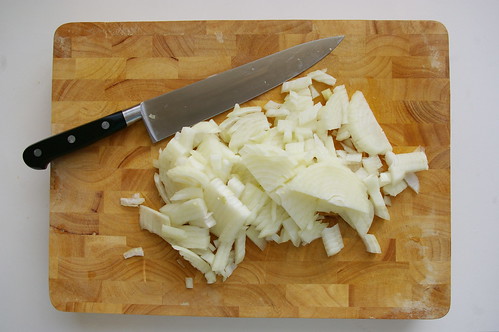
From start to finish, this took less than 45 minutes. That could be partly because I prepped as I went along. Tossing the bacon into the pot, I started chopping onions. Onions starting to saute, and I moved on to dicing the potatoes. (I use baby potatoes, which need little more attention than cutting into quarters, so even less work this way.) Once the potatoes were cooking in the soup, I got on with grating the cheddar. And so on.

(That even includes the inevitable 30-second break I have to take after chopping onions to deal with my intensely watering eyes. Aside: I seem to have lost any immunity to raw onions. Sad but true.)

There are enough gaps between adding ingredients and letting them cook that there’s even a bit of time to tidy up before the soup is served.

That means when it’s ready, there’s less guilt about pouring a bowl and getting back under the blanket for some soup sipping.

And with temperatures slipping back down to the negative double digits this week, that’s exactly what I’m looking for.

Cheddar Corn Chowder - red napkin

Cheddar Corn Chowder

I cut this recipe from The Barefoot Contessa Cookbook (Clarkson Potter, 1999) in half because the original serves 10 to 12 people. Even halved it makes a lot of soup, which is great for leftovers.

Need more? Doubling it is easy. In the summer and fall, substitute frozen corn with fresh (from about 5 ears) by cutting off the kernels and cooking them for 3 minutes in boiling salted water.

  • 1/4 lb (125 g) bacon, chopped
  • 2 tbsp (25 mL) olive oil
  • 3 cups (750 mL) chopped yellow onions (about 2 large)
  • 2 tbsp (25 mL) unsalted butter
  • 1/4 cup (50 mL) allpurpose flour
  • 1 tsp (5 mL) salt
  • 1/2 tsp (2 mL) freshly ground black pepper
  • 1/4 tsp (1 mL) ground turmeric
  • 6 cups (1.5 L) chicken stock
  • 3 cups (750 mL) medium-diced white boiling or baby potatoes, unpeeled
  • 5 cups (1.25 L) corn kernels
  • 1 cup (250 mL) half-and-half
  • 1/4 lb (125 g) sharp white cheddar cheese, grated

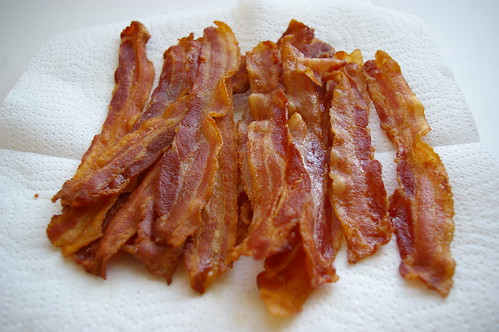
In a large stockpot on medium-high heat, cook the bacon and olive oil until the bacon is crisp, about 5 minutes. Remove the bacon with a slotted spoon and reserve.

Reduce the heat to medium, add the onions and butter to the fat, and cook for 10 minutes, until the onions are translucent.

Stir in the flour, salt, pepper, and turmeric and cook for 3 minutes. Add the chicken stock and potatoes, bring to a boil and simmer uncovered for 15 minutes, until the potatoes are tender.

Add the corn to the soup, then add the half-and-half and cheddar. Cook for 5 more minutes, until the cheese is melted. Season to taste with salt and pepper.

Serve hot with a garnish of bacon.

Serves 5 to 6.

This originally ran in the Calgary Herald. For more recipes, check out the Herald’s online food section.

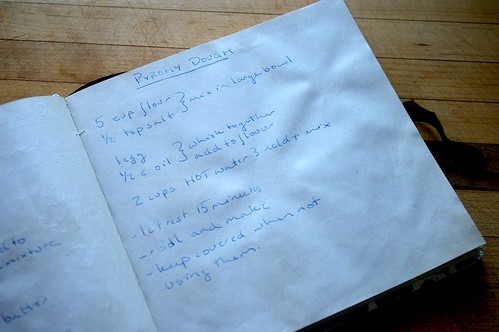
Bonus: I took a shot of the set up I used to make this photo work. Since it was earlier in the day than usual (I typically shoot in the afternoon), I needed to get the dish up even closer to the window. So, that’s why there’s a stool on the table. That’s a laptop sleeve propping up the edge of the white cardboard. Classy, right? Sometimes I have to also hold up the edge of the cardboard to ensure it’s a plain white background. This gets particularly tricky when dealing with things like soup. It’s really time to invest in a tripod.

This is how I shoot photos

Continue Reading

Warm Lentil Salad

I can barely close my staples cupboard.

Between the lentils, couscous, pasta, and at least five types of rice, the shelves are jammed with an overabundance of ingredients. I’ve squeezed half-eaten packages of rice noodles over near-empty bags of Arborio and sushi rice. I have two types of couscous (regular and Israeli) and two of quinoa (regular and black). And there are at least three bags of lentils: one I bought on impulse because I liked the look of the green disks, mottled like tiny pebbles, a freezer bag of several cups my parents gave me during a visit because I expressed interest in eating more lentils and a third bag I inherited from a friend when she was moving away and was purging her cupboards of all foodstuffs.

The trouble is, I had no idea what to do with them.

Lentil Swirl

One of my New Year’s resolutions — which, I will admit, I’m not really fastidious about, though I like the idea of setting goals, even if I don’t always accomplish them. It’s like how I love to make lists and then check off tasks when I get them done – was to start attacking the staples cupboard in an effort to reduce the volume of ingredients in there.
Lentils, I decided, were to be the first challenge.

I must have read somewhere about warm lentil salads because that was the first thing that come to mind when I decided to tackle this. I have no recollection of when or where I would have stumbled across such a recipe. But I had such a firm idea in my mind of what I was looking for: cooked lentils studded with slightly sautéed carrot, celery and onion and then tossed in a French-style vinaigrette and served up still warm.

Warm Lentil Salad II

Most of the ones I found while searching called for goat cheese, bacon and sausage. I’m certainly not against the idea of adding any of those to a salad. (In fact, I would count those three things among my top favourite foods; certainly they are things that would improve a lot of salads.) But this was about using up what I already have in my kitchen. And the few ingredients in the recipe I finally found on Molly Wizenberg’s blog, Orangette, were all things I had on hand.

It comes together quickly, especially if you time it so you are chopping and then cooking the vegetables while the lentils quietly simmer away with a bay leaf. Drain them and toss into the pan of onions, carrots and celery, then slosh over the vinaigrette and stir. Sprinkle with parsley, some crunchy flaked sea salt and it’s ready.

After patiently photographing the dish in the last few moments of daylight, I took that first bite.

The earthy lentils combined with the slightly softened vegetables and the mustard-spiked dressing, along with the fresh green taste of parsley was perfect. The crunch of sea salt and the small sprinkle of vinegar for added tang put the dish over the top.

I polished off the entire bowl. And then scooped myself another one.

The simplicity of all the flavours came through, but together created a homey dish, perfect for a winter afternoon.
After eating this, I could see getting through the rest of the lentils won’t be a problem.

(Edited to add that I made this again less than a week later. That is how good it is. Go forth, make it. It’s easy and so delicious!)

Lentils

Mirepoix

Mirepoix with thyme

Warm Lentil Salad I

Warm Lentil Salad III

French-Style Warm Lentil Salad
This recipe comes frrom Molly Wizenberg of Orangette, which she had adapted from Epicurious.com. She says it is even better the second day, though I would add the caveat, “if you have any left.”

  • 1 cup (250 mL) French green (also known as “Puy”) lentils, picked over and rinsed
  • 3 cups (750 mL) water
  • 1 Turkish bay leaf
  • ½ teaspoon (2 mL) salt, divided
  • 1 small onion, finely chopped
  • 1 medium carrot, finely chopped
  • 1 celery stalk, finely chopped
  • 2 medium garlic cloves, minced
  • 1 teaspoon (5 mL) finely chopped fresh thyme
  • 5 tablespoons (65 mL) olive oil, divided
  • 2 tablespoons plus ½ tsp (27 mL) red wine vinegar
  • ½ tablespoon (7 mL) Dijon mustard
  • Crunchy sea salt, for serving
  • 2 tablespoons (25 mL) finely chopped Italian parsley, for serving

In a medium saucepan, bring the lentils, water, and bay leaf to a boil over medium-high heat. Reduce the heat and simmer, covered, until almost tender, about 15 minutes. Stir in ¼ teaspoon (1 mL) salt, and then simmer, covered, for another 3 to 5 minutes, until tender but not falling apart.

While the lentils simmer, warm 1 tablespoon (15 mL) of the oil in a 12-inch skillet over medium-low heat. Add the onion, carrots, celery, garlic, thyme, and 1/8 teaspoon (0.5 mL) salt, and cook, stirring occasionally, until the vegetables are just softened, about 7 to 9 minutes.

Meanwhile, make the vinaigrette. In a small bowl, whisk together 2 tablespoons (25 mL) vinegar, mustard, and remaining 1/8 teaspoon (0.5 mL) salt. Add the remaining 4 tablespoons (50 mL) olive oil, and whisk to emulsify.

When the lentils are ready, drain them in a colander or sieve, and discard the bay leaf. Dump them into the skillet with the vegetables, and add the vinaigrette. Cook over low heat, stirring gently, until heated through. Stir in the remaining ½ tsp (2 mL) vinegar, and serve warm, with crunchy salt and parsley for sprinkling.
Makes 4 side-dish servings

This originally ran in the Calgary Herald. For more recipes, check out the Herald’s online food section.

Continue Reading

Pyrohy or Perogies

It started with an innocent tweet asking for suggestions on what to do with some leftover mashed potatoes. (A phenomenon I don’t think I’ve ever encountered. I’d just eat them straight-up with a little butter, but I digress.) I threw out the idea of fish cakes and a few others also had ideas.

And somehow from there Cheryl started talking about pyrhohy and the next thing I knew I had managed to scam an invite over for a lesson on how to make them at home. (Call them what you want, but I’m going to go with pyrohy here because that’s what Cheryl calls them and since she was kind — and patient — enough to teach me how to make them, I’m going to defer to her expertise.)

Pyrohy recipe

Anyway, I’ve long loved pyrohy though my only experience was the frozen kind from the grocery store. My first experience with homemade pyrohy was when my friend Colette had a group of us over for a Ukrainian dinner, serving up homemade cheese-and-potato dumplings and cabbage rolls made by her mom in Saskatchewan. They were fantastic and we all ate a lot that night. (There was kielbasa too and I provided a lemon tart, so we were all pretty stuffed at the end.)

Then an even larger group of us went to a fall supper at St. Stephen Protomartyr Ukrainian Cultural Centre where we supported the Knights of Columbus in their fundraiser by enjoying more homemade pyrohy, cabbage rolls, little meatballs in a dill and mushroom sauce and fried chicken. And then there was dessert . . . .

All this to say, it’s been a pretty pyrohy-filled fall. And that’s not a complaint.

So, a few Sundays ago, I drove over to Cheryl’s, met her two adorable kids and then got set up in the kitchen, along with Andree who had also been invited over for the lesson. There, in Cheryl’s beautifully lit kitchen (oh the photos I could take if I had that set up!), we became an odd little assembly line of workers. Cheryl showed us what to do and we tried to replicate it, occasionally with some success. And then we went home with two baking sheets full of pyrhohy ready to freeze or eat immediately.

So I did.

And they were delicious. (Due, I’m sure, in no small part to the onion I diced and gently fried in a generous dollop of butter.)

And, um, there are no photos of what they look like cooked because it was dark by then and the next time I ate them it was also dark and, well, now they’re all gone. Guess I’m going to have to make some more.

Pictures are after the recipe because they are a bit of a play-by-play of how to make pyrohy, so that made more sense.

Thank you again to Cheryl for the lesson!

Cheryl’s Pyrohy Dough

  • 5 cups flour
  • 1/2 teaspoon salt
  • 1 egg
  • 1/2 cup oil
  • 2 cups hot water

Mix together the flour and salt in a large boil. Whisk together the egg and oil, then add to the flour, mixing to combine. Add the hot water and mix again to form shaggy dough. Let rest for 15 minutes before using.

While letting the dough rest, begin forming the filling into small balls. This will make it much easier when it comes to filling the pyrohy.

To make the pyrohy, take a portion of dough and roll it into a log (like you did as a kid while using playdough), then cut into portions and roll those into balls. Using a rolling pin, lightly roll out the dough balls into ovals.

Place the filling in the centre of the dough oval and pull it over so the two halves meet each other. Gently pinch the dough sides together, trying to ensure no air is trapped inside. You can use your finger, curved slightly, to shape the pyrohy into their distinctive half-moons.

(I’m going to be honest here, I don’t think I’m explaining it well, but the pictures should help. Or you can check out Cheryl’s own post on making pyrohy here.)

We made straight-up mashed potato, mashed potato with bacon (put the bacon inside the mashed potato to keep it from perforating the pyrohy dough and causing a giant mess when you boil them) and sauerkraut. But, really, what you put inside is limited only (and forgive me for being this cheesy) by your imagination. Ricotta and a bit of fruit? Yes, that would be good. Mushrooms mixed in with potato? Of course. And so on.

Pyrohy dough

Pyrohy dough II

Bacon-potato filling

Shaping the filling

Filling

Preparing the dough

All the pyrohy bits and pieces

Shaping the dough

Ready to eat

Continue Reading

Mac-Raff n’ Cheese

This is one of my favourite all-time childhood meals.

Mac-Raff n' Cheese I

I loved coming home to find a pot of Mac-Raff n’ Cheese bubbling away in the oven. My stepdad, Sean, would make it in our giant Corning Vision Ware pot (Do you guys remember those? The glass pots that came in a couple of colours? Ours was brown.), so if I peered through the oven door I could see the tomato sauce simmering up to mingle with the cheese-coated pasta.

For a long time I thought it was a creation of Sean’s, him being the head chef in our blended family. And what a chef he was! We were well-fed kids because that man knows his way around a kitchen. Lamb and mint sauce, chicken and rice with cream gravy, roast beef with all the fixings. There’s a reason I love to go home, even today. But when I was home a few months ago, my mum revealed that she was actually the mastermind behind the recipe.

She’s a Macdonald; he’s a Rafferty. So we were the Mac-Raff household. Hence the name of this dish.

It is a smart meal from a parent’s perspective. Quick, filling and can be assembled during the day and left at the ready to bake closer to dinner time when everyone is home and getting hungry. As an adult, I’ve also found it to be fantastic as a freezer meal. Since I generally make enough for a family of six (apparently, I am incapable of cooking for one or two like a normal singleton. But it’s OK because I love leftovers.) I have got into the habit of splitting the mac n’ cheese into two casserole dishes and jamming one into my freezer for later.

Mac-Raff n' Cheese III

I made it a couple of months ago when the days were still crisp and cold. Then it warmed up and I wondered if people’s appetites for hearty, homemade macaroni and cheese had waned, so I kind of put it on the back burner (nyuk nyuk). And then we had another, delayed, blast of winter. Oh! I thought, a second chance! And then, uh, well, let’s just say I lost track of time.

But I think this is a good recipe to have on hand. Although there is no official recipe. I, like my parents, kind of make it up as I go along each time depending on what I have lying around. But, fundamentally, it is macaroni and cheese with tomato sauce on the bottom that is all baked together in a casserole dish with a layer of cheese on top.

And it is far greater than the sum of its parts. Tomato sauce = good. Pasta doused in cheese sauce = good. That layer where the two mix = perfection.

I like to take a couple of big spoonfuls and top with some cracked black pepper, then eat it with a spoon.

But the real beauty of this is that it is infinitely adaptable. Don’t like the cheeses suggested? Use what you’ve got or what you like. Don’t have fresh herbs? Use a pinch of dried basil. Use your family’s own secret tomato sauce recipe for that matter. This is about using what you’ve got and experimenting with what you think it will taste good.

Tomato Sauce I

Tomato Sauce II

Grated Cheese

Pasta and Cheese

Oven ready

Hot from the oven

Mac-Raff n' Cheese II

Mac-Raff n’ Cheese

Tomato Sauce base:

  • 1 tablespoon olive oil
  • 1 onion, diced
  • 3 cloves garlic, minced
  • 1 28 oz. can whole tomatoes
  • 1 14 oz. can crushed tomatoes
  • 1 tablespoon balsamic vinegar
  • pinch sugar
  • 1/4 cup basil (or combination of mostly basil and some parsley), roughly chopped.
  • salt and pepper to taste

Heat oil in a pot over medium heat. When hot, add onion and saute until transluscent. Add garlic and stir for about a minute until fragrant. Using the can lid, drain the tomato liquid from the can of whole tomatoes into the pot. Let the liquid reduce by half and then add in the tomatoes. I dice them one by one in my palm using a basic dinner knife as I like small chunks of tomato. Another trick is to use kitchen scissors and just cut them up in the can. Add to the pot. Then add the crushed tomatoes. Stir in sugar and balsamic and let simmer until it has reduced and thickened. You don’t want it too thick because it will reduce further in the oven. Add salt and pepper to taste. Stir in herbs.

Macaroni and cheese:

  • 500 grams pasta (penne, macaroni or whatever tubular pasta you have sitting around)
  • 1/4 cup butter
  • 1/4 cup flour
  • 5 cups grated cheese, divided (I like a combination of asiago, cheddar, provolone and a bit of Parmesan; but I’m not afraid to use what’s already in the fridge.)
  • 3 cups milk
  • salt and pepper to taste

Cook pasta according to package directions. As the pasta boils, start on the cheese sauce. Melt butter over medium-low heat in a pot. When frothy and bubbling, add flour and mix with a whisk until well blended. Continue cooking for a couple of  minutes to cook out the raw flour taste. Slowly add milk, whisking constantly to prevent lumps. After it has thickened slightly, add 4 cups of the grated cheese. (I usually switch to a wooden or plastic spoon at this point.) Stir until melted, then add salt and pepper to taste. (If it is too thick, splash in a bit more milk.) Remove from heat.

Drain cooked pasta and return to pot. Top with cheese sauce and mix together.

Assembly:

Preheat oven to 425F.

Put tomato sauce in base of casserole dish. Top with macaroni and cheese and then sprinkle over remaining one cup of cheese. Bake covered for 45 minutes to an hour (depending on the size of your casserole dish). Remove lid and bake another 10 to 20 minutes until cheese is bubbling on top.

This is fantastic with a nice green salad.

Note: To make ahead, assemble the entire dish but stop just before baking it. Wrapped in plastic wrap and aluminum foil, this can be stored in the freezer. To cook later, let thaw and then bake as directed.

Continue Reading

Pasta Carbonara

I have had great need of comfort food lately.

And for me that often means cheese and cream and pasta. Emphasis on cream. Sure, throw bacon in there too. So, no, this is not going to be low-fat or healthy or in any way, shape or form good for you, unless you have a severe bacon deficiency. (And wouldn’t that be wonderful?)

This is a totally bastardized version of Pasta Carbonara. Yes, I sometimes make the real stuff. No, this isn’t it. Yes, it’s still good.

Pasta Carbonara

I’ve loved pasta carbonara since I was a kid when my grandfather would make it for me.

I like the contrast of the salty bacon and the slightly sweet onions and the smooth creaminess bundled with the slight chew of a wide, flat pasta. (Why do I always delay so long in writing blog posts. I’m killing myself right now, having eaten the last of this for lunch.)

You may notice that I put a pound of bacon in the ingredient list. I cook up a pound but can guarantee nothing near that actually makes it into the dish. A lot of bacon snacking goes on. I consider it part of the cooking process.

Oh, and I cook it in the oven. This may seem like a weird extra step, but it means I’m not standing around watching it cook in the pan (read: I can go mess around on the computer) and it makes relatively quick work when doing an entire package of the stuff.

Since I make enough for a family of six, I typically have a lot of leftovers. Let me offer you one tip when it comes to reheating: add a bit of milk or cream to the bowl/tupperware container. It will help steam and revitalize the noodles and sauce instead of frying it.

So, now that I’m drooling, I’m not going to keep waxing poetic on how good this is. Trust me. Make it. And don’t feel guilty about it. Sometimes life needs a bit of cream and bacon and pasta.

Diced onion

Bacon

Cream and Onions

In the pan

Pasta Carbonara

  • 500 gram package of pasta (linguine, spaghetti, fettucine)
  • 1 pound bacon
  • 1 tablespoon olive oil
  • 1 yellow onion, diced
  • 1 cup whipping cream
  • 1/4 cup Parmesan cheese (plus more for sprinkling)
  • salt
  • pepper

Feel free to cook the bacon as you prefer. Though, seriously, give this method a try.

Preheat oven to 400. Place bacon on cookie sheet/on rack over cookie sheet/on broiler pan (heck, I’ve even used a casserole dish; it just takes extra draining after). Cook bacon for 15 to 20 minutes or until crisp. (Err on the side of crisp because it will soften in the cream sauce later. Limp bacon will get limper. *Shudder*) Set on paper towels to drain, then set aside to cool. When cool enough to handle, cut into smaller pieces. I usually do them a centimetre or two wide.

Heat olive oil in a pan over medium heat, add onion and a pinch of salt. Saute onion until transluscent, but not brown. Add whipping cream and cook until it has reduced by about a third. It should be super thick and rich. (I usually have a little extra cream or half-and-half around just in case it reduces too much.)

While the cream is reducing, cook pasta according to the packages directions. Drain.

Mix together the cream sauce and the pasta, adding in the Parmesan cheese and tossing until mixed. Add bacon and toss again. Season to taste. (Wait until the end to season because the bacon and cheese are salty and you don’t want to oversalt it.) Serve with fresh cracked pepper and more Parmesan, if desired.

Continue Reading