Szechuan Green Beans

I get into food ruts sometimes.

It’s like I get into a culinary funk and lose all my imagination, rotating through the same few dishes until something breaks the cycle.

Other times, I get into food obsessions.

During those periods, I make the same thing over and over – not because I’ve seemingly run out of culinary creativity, but because I just want to keep eating the same great dish.

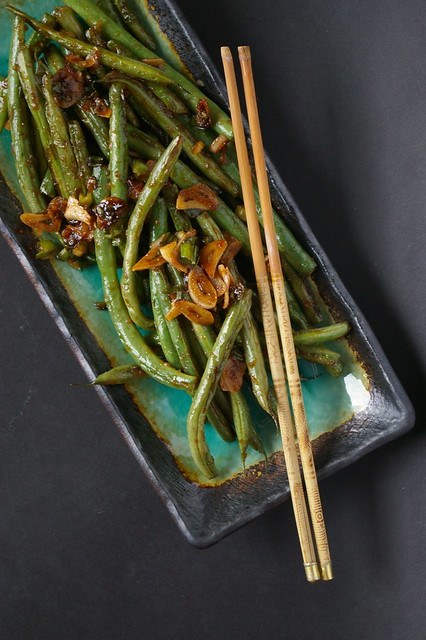
One of those obsessions is Szechuan Green Beans – a recipe I got from Julie Van Rosendaal.

IMGP3435

I had swung by her house one afternoon a few years ago where she had just been nibbling on some of these green beans sauteed with garlic, ginger and a squeeze of chili paste. She pushed the plate toward me; I took a bean and never looked back.

That first bite of slightly softened bean with the hit of spicy heat, the pungent garlic and green onions, now sauce soaked, hit all the right notes. So, I reached for another. And then another. When all the beans were gone, I found myself picking up the thin slices of garlic and stray bits of onions until the plate was picked completely clean.

I made them for the first time two days later. And the next night after that.

Since then, every few weeks I find myself grabbing fistfuls of green beans at the market, dreaming of eating the spicy, hot, slightly wrinkled beans over some rice with chopsticks.

This addiction runs so deep that I now typically double the recipe just to ensure I will have plenty to take to work the next day for lunch. This most recent batch was only a single – I didn’t have enough garlic at the time to make more – and when the beans were gone, I felt suitably bereft.

IMGP3458

I ate them all with rice and a side of pickled ginger – another bizarre food obsession that has manifested in the last year or so.

And, as there are still beans in the fridge, I’m pretty sure I know what will be for dinner tomorrow night.

And here is a more accurate photo of what it looks like when I’m eating it. Since, really, I’m not fancy enough for that kind of plating when I’m eating on my couch.

But picture a whole bunch of pickled ginger with it.


Szechuan Green Beans

This is virtually the same recipe as posted on Van Rosendaal’s blog, though I recommend going to the higher end of the garlic and I upped the green onions, as well. Instead of Sriracha, I’ve also used Sambal Olek to good effect.

  • 1 tbsp (15 mL) canola oil
  • 1 tsp (5 mL) sesame oil, optional
  • 1/2 lb (250 g) green beans, stem ends trimmed
  • 2 tsp (10 mL) grated fresh ginger
  • 3-5 garlic cloves, thinly sliced
  • 3 green onions, chopped
  • 1 tbsp (15 mL) soy sauce
  • 1 tsp (5 mL) sugar
  • 1 small spoonful of Sambel Olek (or a squirt of Sriracha)
  • Toasted sesame seeds, optional

Heat a heavy pan over medium-high heat and add the canola and sesame oils. Add the beans and cook, stirring occasionally until they start to turn golden. Add the ginger, garlic, green onions, soy sauce, sugar and Sriracha and cook a few minutes more, stirring often, until the garlic is golden, the beans are deeper golden and the sticky sauce has coated them all.

Sprinkle with toasted sesame seeds, if desired.

Serves 4.

A version of this article originally appeared in the Calgary Herald.

Continue Reading

Braised Sweet Peppers and a Memorial to My Grandfather

Chocolate Heart.

That’s my grandfather’s nickname for me.

He bestowed it on me the first day I drew breath, after opening the first window on an advent calendar and finding a little heart-shaped chocolate behind the perforated cardboard. He didn’t use it often, though always on my birthday, scrawling it in his deeply slanted handwriting on cards, exclaiming it lovingly when I called to thank him.

It’s a special nickname, a personal story between the two of us; other family members rarely use it.

We are not a family for rituals, but hearing him call me Chocolate Heart each year was one I looked forward to. As was the phone call I made to him each Remembrance Day when I would thank him for coming home from the war. It started back in 1996 when I was working a co-op term for the Peace River Block Daily News in Dawson Creek. There, Remembrance Day took on an importance I hadn’t seen in the cities I lived in. Each year, the newspaper put together a special section dedicated to sharing stories of the veterans who called the northern B.C. town home. That winter, we wrote the stories of war brides who had married Canadian soldiers and returned with them after the war to Canada, settling in the then-small community with no sidewalks and dirt roads. Touched by their stories and recognizing how important the act of remembering those who did not make their way home was for those who lived there, I went to the Remembrance Day ceremonies. And when I got back home that afternoon, I called Papa.

If he had not come home, I would not be here.

This day last year was the last time I heard his voice. This year, there is no phone call.

Two weeks after we chatted, he passed away unexpectedly in his little cabin on the parcel of land overlooking the waters of Active Pass and the stand of soaring Fir trees he refused to chop down, despite them blocking much of the view. It was two days before my birthday and among all the things I mourned about losing him was the fact I wouldn’t hear him call me Chocolate Heart one more time.

This is the man who nurtured in me a passion for good food and wine, who introduced me to prosciutto and Riesling, who shared his love for cooking with a little girl who loved to be in the kitchen with him. Somewhere there’s a photo of the two of us leaning over a pasta rack, fresh noodles dangling from the sticks as we grin behind them, proud of our efforts and patiently waiting until we could eat them.

JASMacdonald. Untitled, year unknown.

An artist and former art instructor at UBC, he showed me the beauty of art and how to appreciate it, even though his skills and talents didn’t travel through the mess of genes to me. He taught me how to catch fish by jigging over the side of a row boat bobbing in the waves from the BC Ferries as they slid through the pass between Galiano Island and Mayne. In his studio’s makeshift kitchen, at a counter made of a length of plywood on sawhorses, he showed me how to make pesto from the basil he grew in his greenhouse. We’d eat it on bread with cheese, looking out through the Fir trees to the blue water, listening to jazz.

He dreaded Remembrance Day, refused to go the legion for any ceremony, choosing instead to stay at home and drink tumblers of wine while watching the birds flit around the feeders he kept filled and past them down the steep grassy slope to the ocean. It was a reminder of friends he lost during the war and those he had served with who had died in the intervening years. But he liked the phone call. And so did I.

Sometimes I could persuade him to share stories of his time overseas. He didn’t linger on the atrocities of war, of those fellow soldiers he lost. Instead, with his trademark chuckle, he’d weave tales about his misadventures and mishaps as a navigator. Like how he convinced his superior officers that he didn’t know how to swim — a key skill when one is threatened with the chance of being shot down over water — and was ordered to learn, which meant he spent afternoons in a heated pool learning the basics of front crawl (“Which is the easiest to learn?” he’d asked before demanding he only learn that one stroke.) while the other soldiers ran drills outside.

From the time I was young, I heard the stories of how he was shot down while on a bombing mission to Stuttgart. Hearing the tales before I was old enough to fully understand the dangers he was in made his funny anecdotes more amusing than scary. Half the crew was killed when the plane went down. He had parachuted to safety and spent three days wandering the French countryside, hiding in barns and haystacks, eating raw eggs and mulled wine before he was connected to the French underground and smuggled into Switzerland. The northeastern corner of France was occupied at the time and it was only by chance he was not discovered. He never focused on that part of it, instead spinning stories about how his cover was that he was ‘Jacques’ a deaf-dumb gardener because he had no aptitude for language and if he spoke, he would immediately be identified as a Canadian. “Which was dumb,” he would later say, “because if anyone made a loud noise near me, I’d turn around.”

He broke the rules of internment in Switzerland, reaching out to his wife back in Vancouver with their baby daughter to say he was alright, even as she was receiving telegrams to report he was missing in action. And when boredom in Bern reached a fever pitch, he and a few other soldiers smuggled themselves back into France and down to the coast to try to get back to England.

The upside of all those boring days was he wrote everything down; I have one of those journals, his words written out in his signature slanted handwriting, as well as a typed version of his story. So those stories won’t be lost, at least. It’s the stories I didn’t get to hear that make me wish for one more day at his side with a tumbler of wine and the sound of his voice.

He leaves a legacy, though. It is in the food I make and the skills I learned at his side. It’s in my love of Italian food and a good Gewurztraminer.

I miss him dearly.

In the days just after he passed, I wanted to make something that would connect us in some way. I can’t make Fettuccine con Piselli e Prosciutto without thinking of him. (That post is also about him.) Nor Pasta Carbonara. But I remembered all the times we also made Sweet Braised Peppers from his favourite cookbook by Umberto Menghi and I knew that was the perfect way to honour his memory. It’s one of the first things I remember making with him. It’s also the first time I learned you can’t touch your eyes after touching a hot pepper — a lesson that had my grandfather making me lay on the couch with a cold, wet facecloth over my eyes. Why he was using hot peppers, which the recipe doesn’t call for, remains a mystery to me.

So, in my grief, I chopped peppers and made a tomato sauce and ate it all with crusty, buttered bread that I used to swipe the last of the sauce from my bowl. And I know he would have been nodding his head in enjoyment and telling me I should just eat a little more.

Peperonata (Braised Sweet Peppers)

From The Umberto Menghi Cookbook.

  • 1 tablespoon olive oil
  • 1 medium red pepper, quartered
  • 1 medium green pepper, quartered
  • 1 small onion, diced large
  • Salt (to taste)
  • Freshly ground pepper (to taste)
  • 1 clove garlic, finely chopped
  • 1/3 cup tomato sauce
  • 1/4 cup Parmesan cheese, coarsely grated

Preheat oven to 400F.

Saute peppers and onion sin oil in a skillet on medium heat for 4 to 5 minutes.

Season with salt and pepper.

Put peppers and onion in a casserole dish. Sprinkle garlic on top of peppers and onion. Pour tomato sauce over peppers, onion and garlic. Sprinkle Parmesan cheese on top of peppers, on, garlic and tomato sauce. Put casserole dish, uncovered, in oven and bake at 400F for 15 minutes.

Serves 2.

Continue Reading

Kale Salad with Hazelnuts and Apple

No one would ever describe me as trendy.

I rarely look good in fashionable clothes and can’t figure out how to wear any new style of makeup.

Even when it comes to food, I’m often behind the times.

So, it’s no surprise I’m falling for kale just as it’s falling out of popular favour.

Kale became a culinary darling a few years ago, starting with an obsession for kale chips that spread like wildfire on food blogs. The simple recipe of tossing ripped leaves with a bit of olive oil, salt and pepper, then baking them to a crisp, spawned thousands of blog posts. Hailed as the ultimate snack, food blogs were filled with increasingly creative versions.

There was something about them popping up everywhere that made me specifically not want to try kale chips and, as a consequence of not really knowing what else to do with the cruciferous vegetable, not bothering to try kale at all.

And then I was served a kale salad at a potluck.

The greens were dressed with a vinaigrette spiked with grainy mustard and sprinkled with paper-thin radishes. I asked for seconds.

Turns out, my disinterest in following a trend had meant I had been missing out.

Since then, I’ve started making my own versions of that salad — adding apple for some sweetness and hazelnuts for crunch — taking advantage of the fact it pays to work ahead with kale. Dressing it in advance, unlike other salads, actually improves the salad, as the vinaigrette helps soften the otherwise tough leaves. The dark green vegetable stands up to the dressing so well, it makes for a great work lunch because there’s no need to keep the salad and the dressing separate.

A nutritional powerhouse, full of beta carotene and calcium, as well as vitamins K and C, kale should transcend trends.

But, of course, like anything that becomes a widespread hit, there is bound to a point in time when people begin tiring of it and want to move on to the next hot ingredient.

As 2014 marches on, some in the food community are starting to declare kale has reached a saturation point on restaurant menus and in recipes. It’s time for that trend to move along, they say.

I’m not against the idea of another ingredient getting some time in the spotlight.

But, luckily, since I never really pay attention to trends, that means kale will be on my menu for a long time to come.

Kale Salad with Hazelnuts and Apple

Like all salads, this one is infinitely adaptable. Swap out different nuts, replace the apple with dried cranberries or cherries or add thin slices of radish for a peppery punch.

Dressing:

  •  Zest of 1 lemon
  • 1 tbsp (15 mL) lemon juice
  • 1 tbsp (15 mL) apple cider vinegar
  • 1 tsp (5 mL) grainy mustard
  • 2 tsp (10 mL) honey
  • 1/4 tsp (1 mL) salt
  • 1/4 tsp (1 mL) freshly ground pepper
  • 1/4 cup (60 mL) olive oil

Salad:

  • 2 bunches kale, cored and roughly chopped
  • 1 crisp apple, julienned
  • 1/4 cup (60 mL) hazelnuts, toasted and roughly chopped
  • 2 green onions, thinly sliced

In a jar or bowl, shake or mix together the first seven dressing ingredients — from the lemon zest to the pepper — to dissolve the salt and honey. Add the olive oil and shake or mix again until the dressing has emulsified.

Add the chopped kale to a large bowl, pour over the dressing and toss well. Refrigerate for at least an hour to let the dressing soften the leaves. When ready to serve, add the apple, hazelnuts and green onions, tossing everything together.

Serves 4 to 6.

Continue Reading

Spring Green Risotto

Last Saturday, I had drinks on a patio. Sunglasses were a necessity, as was a tall glass of something cold, and good conversation with friends.

All along 17th Avenue, patios were cracked open for the first warm weekend day in March. Tables were jammed with people laughing, drinking and turning their faces skyward to bask in the warm sun.

It’s as sure a sign of the changing seasons as the fact we had to put our clocks forward that night. (Though one is very much preferable to the other.)

It’s nearly spring.

But we’re not quite there yet.

After all, there are still patches of snow and, it being Calgary, we can be assured of one last blast of winter before spring truly arrives.

As I wait for those first green buds to appear, I find myself drawn to eating something that can at least remind me of spring. This Spring Green Risotto from the Barefoot Contessa is a good fit.

Spring Green Risotto I

The bright green of asparagus and peas, the bright flavour of lemon zest and juice are the tastes and sights of spring. The mascarpone (or, in my case, cream cheese as mascarpone was not to be found) brings a rich creaminess that’s a good last comfort-food hurrah as winter fades away.

Risotto is a bit fussier than other dishes because of the continual stirring, but I think it’s worth the effort. In my experience, you don’t have to be chained to the pot, constantly moving the grains of rice about. You just need to be nearby for frequent stirring.

(I’m sure someone is mentally scolding me right now for that statement, but if the thought of cooking a risotto has put you off because you believe it will be a major arm workout from stirring for 30 minutes non-stop, this is me suggesting you reconsider. No, you can’t walk away; yes, you can do light kitchen tidying at the same time. Or that’s what I did.)

The patience and frequent stirring is worth it. Especially with this recipe.

Spring Green Risotto III

Those little green peas popped with flavour, while the lemon juice made it bright and the cream cheese (see the recipe notes) added a smooth, creamy flavour without too much richness.

It’s enough to tide me over until spring finally does break through. Or at least until the next day warm enough for patio drinks.

Leeks and Arborio Rice

Spring Green Risotto II

Spring Green Risotto IV

Spring Green Risotto V

Spring Green Risotto

Adapted from Barefoot Contessa Back to Basics. I omitted the 1 cup (250 mL) of chopped fennel, since I don’t like the flavour. Add it in with the leeks if you’re more of a fan. If you can’t find mascarpone (which I couldn’t – and didn’t want to go searching for in another store), spreadable cream cheese is a decent substitute. It’s less authentic, but was creamy and tangy enough. Using light cream cheese will also cut some of the calories.

  • 1 1/2 tbsp (22 mL) olive oil
  • 1 1/2 tbsp (22 mL) unsalted butter
  • 3 cups (750 mL) chopped leeks, white and light green parts only (about 2 leeks)
  • 1 1/2 cups (375 mL) arborio rice
  • 2/3 cup (150 mL) dry white wine
  • 4-5 cups (1 to 1.25 L) simmering chicken stock
  • 1 lb (500 g) asparagus, cut diagonally in 1 1/2-inch (4 cm) lengths
  • 10 oz (300 g) frozen peas, defrosted
  • 1 tbsp (15 mL) freshly grated lemon zest (about 2 lemons)
  • kosher salt and freshly ground black pepper
  • 2 tbsp (25 mL) freshly squeezed lemon juice
  • 1/3 cup (75 mL) mascarpone cheese
  • 1/2 cup (125 mL) freshly grated Parmesan cheese, plus extra for serving
  • 3 tbsp (50 mL) minced fresh chives, plus extra for serving

Heat the olive oil and butter in a medium saucepan over medium heat. Add the leeks and saute for 5 to 7 minutes, until tender.

Add the rice and stir for a minute to coat with the leeks, oil and butter. Add the white wine and simmer over low heat, stirring often, until most of the wine is absorbed. Add the chicken stock, a soup ladleful or two at a time, stirring often.

Most of the stock should be absorbed before adding another ladleful. This should take between 25 and 30 minutes.

Meanwhile, blanch the asparagus in boiling salted water for a few minutes, until just tender. Drain and cool in ice water.

When the risotto has been cooking for about 20 minutes, drain the asparagus and add it to the risotto with the peas, lemon zest, 2 teaspoons (10 mL) salt and 1 teaspoon (5 mL) of pepper. Continue cooking and adding stock, stirring almost constantly, until the rice is tender but still firm.

In a small bowl, whisk together the lemon juice and mascarpone.

When the risotto is done, remove from the heat and stir in the mascarpone mixture, plus the Parmesan and chives. Taste and adjust seasonings as necessary.

Sprinkle with chives and more Parmesan to serve.

Serves 4 for dinner, 6 as an appetizer.

This article first appeared in the Calgary Herald. For recipe ideas and stories about food, check out the Herald’s food page.

Continue Reading

Warm Lentil Salad

I can barely close my staples cupboard.

Between the lentils, couscous, pasta, and at least five types of rice, the shelves are jammed with an overabundance of ingredients. I’ve squeezed half-eaten packages of rice noodles over near-empty bags of Arborio and sushi rice. I have two types of couscous (regular and Israeli) and two of quinoa (regular and black). And there are at least three bags of lentils: one I bought on impulse because I liked the look of the green disks, mottled like tiny pebbles, a freezer bag of several cups my parents gave me during a visit because I expressed interest in eating more lentils and a third bag I inherited from a friend when she was moving away and was purging her cupboards of all foodstuffs.

The trouble is, I had no idea what to do with them.

Lentil Swirl

One of my New Year’s resolutions — which, I will admit, I’m not really fastidious about, though I like the idea of setting goals, even if I don’t always accomplish them. It’s like how I love to make lists and then check off tasks when I get them done – was to start attacking the staples cupboard in an effort to reduce the volume of ingredients in there.
Lentils, I decided, were to be the first challenge.

I must have read somewhere about warm lentil salads because that was the first thing that come to mind when I decided to tackle this. I have no recollection of when or where I would have stumbled across such a recipe. But I had such a firm idea in my mind of what I was looking for: cooked lentils studded with slightly sautéed carrot, celery and onion and then tossed in a French-style vinaigrette and served up still warm.

Warm Lentil Salad II

Most of the ones I found while searching called for goat cheese, bacon and sausage. I’m certainly not against the idea of adding any of those to a salad. (In fact, I would count those three things among my top favourite foods; certainly they are things that would improve a lot of salads.) But this was about using up what I already have in my kitchen. And the few ingredients in the recipe I finally found on Molly Wizenberg’s blog, Orangette, were all things I had on hand.

It comes together quickly, especially if you time it so you are chopping and then cooking the vegetables while the lentils quietly simmer away with a bay leaf. Drain them and toss into the pan of onions, carrots and celery, then slosh over the vinaigrette and stir. Sprinkle with parsley, some crunchy flaked sea salt and it’s ready.

After patiently photographing the dish in the last few moments of daylight, I took that first bite.

The earthy lentils combined with the slightly softened vegetables and the mustard-spiked dressing, along with the fresh green taste of parsley was perfect. The crunch of sea salt and the small sprinkle of vinegar for added tang put the dish over the top.

I polished off the entire bowl. And then scooped myself another one.

The simplicity of all the flavours came through, but together created a homey dish, perfect for a winter afternoon.
After eating this, I could see getting through the rest of the lentils won’t be a problem.

(Edited to add that I made this again less than a week later. That is how good it is. Go forth, make it. It’s easy and so delicious!)

Lentils

Mirepoix

Mirepoix with thyme

Warm Lentil Salad I

Warm Lentil Salad III

French-Style Warm Lentil Salad
This recipe comes frrom Molly Wizenberg of Orangette, which she had adapted from Epicurious.com. She says it is even better the second day, though I would add the caveat, “if you have any left.”

  • 1 cup (250 mL) French green (also known as “Puy”) lentils, picked over and rinsed
  • 3 cups (750 mL) water
  • 1 Turkish bay leaf
  • ½ teaspoon (2 mL) salt, divided
  • 1 small onion, finely chopped
  • 1 medium carrot, finely chopped
  • 1 celery stalk, finely chopped
  • 2 medium garlic cloves, minced
  • 1 teaspoon (5 mL) finely chopped fresh thyme
  • 5 tablespoons (65 mL) olive oil, divided
  • 2 tablespoons plus ½ tsp (27 mL) red wine vinegar
  • ½ tablespoon (7 mL) Dijon mustard
  • Crunchy sea salt, for serving
  • 2 tablespoons (25 mL) finely chopped Italian parsley, for serving

In a medium saucepan, bring the lentils, water, and bay leaf to a boil over medium-high heat. Reduce the heat and simmer, covered, until almost tender, about 15 minutes. Stir in ¼ teaspoon (1 mL) salt, and then simmer, covered, for another 3 to 5 minutes, until tender but not falling apart.

While the lentils simmer, warm 1 tablespoon (15 mL) of the oil in a 12-inch skillet over medium-low heat. Add the onion, carrots, celery, garlic, thyme, and 1/8 teaspoon (0.5 mL) salt, and cook, stirring occasionally, until the vegetables are just softened, about 7 to 9 minutes.

Meanwhile, make the vinaigrette. In a small bowl, whisk together 2 tablespoons (25 mL) vinegar, mustard, and remaining 1/8 teaspoon (0.5 mL) salt. Add the remaining 4 tablespoons (50 mL) olive oil, and whisk to emulsify.

When the lentils are ready, drain them in a colander or sieve, and discard the bay leaf. Dump them into the skillet with the vegetables, and add the vinaigrette. Cook over low heat, stirring gently, until heated through. Stir in the remaining ½ tsp (2 mL) vinegar, and serve warm, with crunchy salt and parsley for sprinkling.
Makes 4 side-dish servings

This originally ran in the Calgary Herald. For more recipes, check out the Herald’s online food section.

Continue Reading

Quinoa Salad with Curry-Lime Vinaigrette

When Twitter first came on the scene, I wasn’t really sure what to do with it. I had Facebook and email and a blog already, so did I really need another way to connect with people? But I signed up anyway. And, as it has grown, I’ve come to see all sorts of benefits that I could not have previously imagined would come from this micro-blogging/communication/networking phenomenon. I’ve made new friends, found news stories and been given a few new recipe ideas.

This Quinoa Salad with Curry-Lime Vinaigrette is one of those recipes. A friend tweeted she had been thinking a lot about biryani-style quinoa dishes. I was curious and asked for links, which she happily sent along. I liked the idea of them, but neither of the recipes really grabbed me as a whole. Instead, I was more interested in picking and choosing the bits and pieces from each that were intriguing.

And I was more than motivated to try out something similar, having impulse bought a three-pound bag of quinoa from Costco. Seriously. Some people impulse buy gum; that makes a lot more sense.

Cooked quinoa

I’ve liked quinoa for some time, ever since trying it with veggies and a peanut sauce at the Coup. But the idea of cooking it was a bit intimidating. Various reports of it being bitter or improperly cooked were enough to make me shy away from it. And then I saw on the back of this bag that you could cook it in a rice cooker. Can I make a confession here? I don’t really know how to cook rice on the stove because a former boyfriend bought me a cooker when I came back from Japan (where I had fallen in love with the one in my little townhouse). Now that’s all I use. So, knowing I could make perfect quinoa in the rice cooker was enough for me to put the giant bag of the stuff in my equally giant Costco cart.

And then I got it home and didn’t really know what to do with it.

And here we are.

So, I made this salad with quinoa and carrots and zucchini, currants and pine nuts and sort of make-it-up-as-you-go-along dressing based on what I thought would be good with hints from the other two recipes I read. Tossed it all together and it was fantastic. So I ate some more. And then I tweeted it and people started asking for a recipe. So, I made it again last week and actually wrote down what went in this time.

I was at the farmer’s market and bought some oddly coloured carrots (because I also impulse buy strange vegetables) and used them in the salad because I thought they’d be pretty. They were. But the first time I made this I used straight up normal carrots and it was just as fantastic.

Funky white carrot

Purple Carrot

Oh, and here’s the best tip I’ve read in a while for julienning vegetables perfectly. First cut it in diagonal slices, then stack those and cut into sticks. So much easier and they always look fantastic.

Julienned Zucchini

This is great right away, even better if you can let it sit for a bit so everything has a chance to hang out.

Lastly, I’d say that the beauty of a salad is it is infinitely adaptable. Don’t like pine nuts? Use sliced almonds instead. Currants are great, but I bet diced apricots or a handful of dried cranberries would also be delicious. And so on.

Curry-lime vinaigrette

Quinoa salad with curry-lime vinaigrette

Quinoa Salad with Curry-Lime Vinaigrette

  • 2 cups cooked quinoa
  • 2 carrots
  • 1 small zucchini
  • 3 green onions
  • 1/2 cup currants
  • 1/4 cup pine nuts, toasted
  • 1 cup chickpeas, rinsed and drained
  • zest and juice of one lime
  • 1/2 teaspoon salt
  • 1/2 teaspoon curry powder
  • 1/4 teaspoon dried ginger
  • 1/4 teaspoon cinnamon
  • 1 tablespoon honey
  • 1/4 cup oil (I used olive because it’s what I had. Any veg oil will be great)

Cook quinoa according to package directions or using the “white rice” setting on a rice cooker. Set aside and let cool then place in large salad bowl.

Julienne carrots and zucchini, then slice green onions. Add to quinoa. Stir in chickpeas, toasted pine nuts and currants.

To make dressing, zest lime into a bowl, then add lime juice and honey. Whisk to dissolve honey, then add salt and spices. While whisking, slowly add oil to emulsify. Pour over salad and toss.

Continue Reading

Shaved Asparagus Pizza

I have a confession: I am incapable of kneading. I don’t know if it’s a character defect, a lack of practice or sheer laziness, but I cannot seem to take a mix of flour and water and yeast and make it into a smooth mass that balloons into a beautiful ball of dough. I end up with something shaggy and ragged and, well, downright ugly.

When it comes to pizza crusts, I have tried to persevere. There have been a few successes (and one colossal failure where I essentially made a giant, pizza-sized cracker), but I was typically undone by my less-than-stellar kneading skills.

And then, a revelation: no-knead pizza dough.

It was a circuitous route that brought me to a place where I realized I too could easily make homemade pizza dough.

It started with shaved asparagus pizza.

Shaved aspargus pizza IV

I stumbled onto the idea on Smitten Kitchen — a popular food blog written by the charming Deb Perelman — and was immediately enchanted. Warm chewy crust, melted cheese and thin shavings of asparagus that would roast on top? Yes, please.

But, as Perelman pointed out, she was not the only one to think this would be a fantastic combination. Indeed, Jim Lahey, who revolutionized bread baking with his no-knead concept, serves a high-end version at his restaurant.

Surely, Lahey must have a pizza dough recipe.

Yes, yes he does. And it doesn’t involve kneading.

Sold!

This time, the dough is intentionally shaggy and ugly. And, after a few stirs and some squishing together of the ingredients (I can’t even bring myself to call it kneading), it only wants to be left alone for two hours.

When finally baked, it has a pleasing crispness with just an appropriate amount of chew. Topped with a tangle of shaved asparagus that had roasted and intensified in flavour, along with the richness and slight salt of the cheese, this is something I could eat over and over.

Shaved aspargus pizza II

My first taste of asparagus came in Grade 10 when my boyfriend made me dinner one night and steamed some to go with steaks. I don’t remember much about that meal other than feeling overwhelmingly shy and excited to have a boy I liked cook for me.

Since then, I’ve grown to love the green-stalked vegetable and I’ll take it just about any way it can be prepared. Roasting, though, is my favourite because I like how it slightly caramelizes the tops and intensifies the flavour.

This pizza takes advantage of that, particularly because you shave the asparagus. None of the stalks shave perfectly, so you end up with varying thicknesses of asparagus strips, each of which cook slightly differently. Some will caramelize, while others will still retain a slight bite to them.

The beauty of pizza is that it is infinitely adaptable and this recipe is no exception.

While I used buffalo mozzarella cut into rounds and a sprinkle of Parmesan, I was tempted to throw on some bits of goat cheese as well and will probably try that next time. A squeeze of lemon would have been nice at the very end. Like it spicy? Toss on some red pepper flakes.

Lahey’s version uses some rather fancy cheese, quail eggs and shaved black truffles.

But even with slightly less-glamorous ingredients, this dish is delicious.

P.S. This crust was so good that I made another batch about four days later. Yes, I have a pizza problem.

Buffalo Mozzarella

Asparagus bunch

Shaved Asparagus

Asparagus shavings

Shaved aspargus pizza I

Shaved aspargus pizza III

Shaved Asparagus Pizza
Crust, from Jim Lahey’s My Bread

  • 3 ¾ cups (925 mL) bread flour
  • 2 ½ teaspoons (12 mL) instant yeast
  • ¾ teaspoon (3 mL) table salt
  • ¾ teaspoon (3 mL) plus a pinch sugar
  • 1 1/3 cups (325 mL) room temperature water (about 72F or 23C)
  • 1 to 2 teaspoons (5 to 10 mL) olive oil for pans

In a medium bowl, stir together the flour, yeast, salt and sugar. Add the water and, using a wooden spoon or your hand, mix until blended, at least 30 seconds. Cover the bowl and let sit at room temperature until the dough has more than doubled in volume, about two hours.
Using a bowl scraper or rubber spatula, remove the dough from the bowl onto a floured work surface. Gently form into a rough ball. Then divide the dough into two halves (to make his two 13×18 – 33×45 cm – pizzas or, do as I did, and divide into three parts for round pizzas) spacing them 4 inches (10 cm) apart, and cover with a moistened kitchen towel for 30 minutes.

Pizza, from Smitten Kitchen:

  • ½ pound (250 g) asparagus
  • ¼ cup (50 mL) grated Parmesan
  • ½ pound )250 g) mozzarella, cut into rounds, shredded or cubed
  • 2 teaspoons (10 mL) olive oil
  • ½ (2 mL) teaspoon coarse salt
  • black pepper to taste

Preheat oven to 500F (260C).
Using the rough end as a handle, hold the asparagus against a cutting board and use a vegetable peeler to make long strips. (I got anywhere between two to five shavings from each stalk depending on how thick they were or how easily the peeler went through the asparagus. They were also of varying thicknesses, which is fine.) After shaving, you should just be left holding the rough end, which can be discarded. Repeat with all of the asparagus.
In a bowl, toss together asparagus, olive oil, salt and pepper.

Roll out or stretch dough to create 12” (30 cm) round. (Lahey calls for it to be stretched by hand, but I used a rolling pin and did only a bit of hand stretching after getting the dough on the pan.) Brush olive oil on pan and transfer dough.
Sprinkle on Parmesan, then add mozzarella. Top with asparagus strands.
Bake for 10 to 15 minutes until crust is golden, cheese is melted and asparagus is roasted.

This story first appeared in the Real Life section in the Calgary Herald. For more delicious recipes, visit CalgaryHerald.com/life.

Continue Reading

Roasted Tomato Tart

(I am so proud of this post because it marks my first food article in the Herald’s revamped Sunday edition. My photo of my little roasted tomato tart was on the cover of the ‘mix’ section. For those that haven’t seen the new Sunday edition, that means the photo was the entire front of the ‘mix’ section. Yay! And a warning, this post is photo heavy! What can I say? I had a hard time paring it down.)

And now, back to the article.

I have an unabashed love of tomatoes. Meaty slices of them wedged between two pieces of buttered toast with a sprinkle of salt and pepper is my idea of comfort food. Roma tomatoes drizzled with a little balsamic vinegar and good olive oil make a simple side dish. And I love that burst of seeds and flavour that comes when biting into a plain cherry tomato.

Tomatoes II

I once bought a perfume called Tomato because it smelled like the aroma given off after brushing up against the green stalks of a tomato plant — that verdant scent of heat and summer. A few spritzes on my wrist could transport me back to being a kid and visiting my grandparents on one of the Gulf Islands where I sometimes helped in the garden.

Enclosed in chicken wire to protect it from ravenous deer, the garden produced sweet tiny carrots I ate straight from the ground after a quick rinse from the hose, grape vines that tangled their way along trellises, and rows of tomato plants.

I would use a plastic watering can to fill the coffee tins with water, from which my grandfather had removed the bottoms, nestled into the earth next to the plants — a trick that allowed the water to get right at the plant’s roots. And I would brush up against the stalks, filling the air with that distinct smell.

If any were ripe, I’d pull them sun-warmed from the dark green plants and eat them unadorned.

There is no taste like a vine-ripened tomato.

Tomatoes

But sometimes I like to roast them to intensify their essence and bring out more of their natural sweetness.

Baking halved Roma tomatoes in the oven with a few unpeeled garlic cloves is an excellent base for a good tomato soup.

Cherry tomatoes, when roasted, shrink and wrinkle to softish pouches of concentrated tomato flavour. I’ve made simple pasta sauces like this, topped only with shaved Parmesan and a sprinkle of basil or parsley if I have them lying around.

Roasted Tomato Tart-round

I thought recently — after seeing a clamshell package of multicoloured cherry tomatoes at the farmers market — that they would make a good savoury tart, particularly if paired with a hearty crust.

When I began imagining a roasted cherry tomato tart, I thought there was potential in adding a few handfuls of Parmesan cheese to the dough to bring out a nice nutty, rich taste when baked.

A little research led me to realize I wasn’t the first person to think of this, but I didn’t love any of the recipes I came across. I am by no means a pastry expert, but was willing to give myself a chance to experiment.

Using ideas from several different recipes, I decided to create a hybrid pastry that used cream instead of water and a cup of Parmesan cheese, finely grated and blitzed with the other ingredients in the food processor.

The dough was easy to work with and resulted in a golden crust that played nicely against the sweet, soft tomatoes.

(This would likely work just as well, though, with a regular pastry.)

Because cherry tomatoes are so juicy, there was a lot of liquid bubbling away as the tart was baking. (Truth be told, I was a bit nervous about just how much I could see as I peered through the oven door.) Some of it did cook off in the process, but there was definitely a thin layer of tomato liquor when I pulled the tart out. Some may call it soggy; I prefer to think of it as tomato-infused pastry. Either way, the base of the tart pastry was crisp and I liked the taste of it.

A sprinkle of basil gave it a nice fresh taste when added as the tart cooled slightly. (And yes, you’ll want to let it sit for a few minutes because cutting into the tomatoes will likely cause some to burst. Ouch.)

Chilled parmesan pastry

Pastry in tart dish

Tomatoes III

Tart pre-oven

Roasted Tomato Tart II

Tomato Tart and slice

Sliced Tomato Tart

Roasted Tomato Tart Sliced

Roasted Tomato Tart

  • 1½ cups (375 mL) flour
  • 7 tbsp (115 mL) butter, cold and cut into small cubes
  • ½ cup (125 mL) cream
  • 1 cup (250 mL) finely grated Parmesan
  • pinch salt
  • 1-1¼ lb. (500 to 625 grams) cherry or grape-sized tomatoes
  • 1 tbsp (15 mL) olive oil
  • 1 tsp (5 mL) salt
  • ½ tsp (2 mL) fresh ground pepper
  • 2 tbsp (25 mL) fresh basil, chiffonade (rolled like a cigar and cut into strips)

Add the flour and pinch of salt to the bowl of a food processor, then sprinkle the butter cubes on top. Pulse two or three times until the butter starts to break down, then add the Parmesan. Pulse until the mixture is crumbly and the butter is in pieces no larger than a pea.

Add the cream slowly while pulsing until the dough starts to come together. (It will bunch up and the food processor noise will change.)

Empty the contents onto a lightly floured surface and knead it a few times to pull the dough together.

Wrap in plastic and refrigerate for at least 30 minutes or as long as overnight.

Preheat oven to 325 F (160 C).

Toss the tomatoes in a bowl with the olive oil, 1 tsp salt and pepper. Set aside.

On a lightly floured surface, roll out the dough until it is about 1/3 inch to 1/4 inch (8 millimetres to 6 mm) thick. Press into tart tin (9 inch/23 cm round tin or a 14-inch/35 cm rectangular tin), stretching it as little as possible, and cut off excess. Arrange tomatoes in the tart tin.

Bake for an hour until tomatoes are soft and pastry is golden brown. Remove and let cool on a rack for 10 minutes. Roll basil leaves like a cigar and then slice them to make herb strips. Sprinkle over tart.

Serve while still warm.

Cook’s note: The amount of tomatoes will vary depending on how tall or fat they are and how well they fit together in the tart tin.

This story first appeared in the Real Life section in the Calgary Herald. For more delicious recipes, visit CalgaryHerald.com/life.

Continue Reading

Sautéed Chard over Polenta with Fried Eggs

I came into a plethora of eggs over the weekend.

Farm fresh eggs

I was at work on Sunday when a colleague came up to me.

Him: You like X, right?

Me: Oh yes, that’s how I get through the day sometimes. (In my best, most sarcastic and slightly confused voice.)

Him: Uh, OK. Well, I have some and I wondered if you wanted to buy some.

Pause.

Me: Wait, did you say eggs?

Him: What did you think I said?

Me: Um…..

Anyway, he had a few dozen from this totally organic, self-sustaining farm outside of Calgary called Thompson Small Farm. I’ve been searching for really good eggs since I moved here from Vancouver. I’ve found the ones here, even from area farms, to be pretty anemic looking and I’ve craved those with those golden-orange yolks that are so beautiful. So, the thought of finding those was enough to tempt me to buy two dozen. Plus, well, he said one of them was blue-green and that was just a bonus.

So, for the next two days I dreamed up things to make with these pretty eggs in their multicoloured shells. And I realized I wanted to do something that would really showcase the egg itself. Somewhere in my food-related Internet travels, I came across a post where someone had topped polenta with cooked greens and a poached egg. Since I have come to love chard mostly owing to this, I thought it would be cool to do a riff on that idea.

Polenta and chard with egg

For the most part, I made this up as I went along, taking inspiration from the chickpeas and chard entry. But I did a lot of research on poaching eggs (vinegar, no vinegar, swirl, boiling water, stainless steel etc. Who knew there were so many variations?), so that I would be fully prepared when it came time to make them. On the drive home, though, I realized I just wanted to do something fast and, in all honesty, I really didn’t want to dirty another dish. I figured frying the egg in the pan where I had just sautéed the chard would add even more flavour.

I have about three different grinds of cornmeal as I keep thinking I have the wrong one for polenta. In the end, I used the instant stuff. What? It was in my cupboard already and I’m desperately trying to clear space. Plus, that stuff is INSTANT and that makes for a very, very quick dinner. I followed the instructions and then just doctored it up with a bit of cream (er, yes, well, it was already in the fridge . . . .) and some butter and a nice pinch of flaked salt.

This was quick, easy and delicious. I loved the soft polenta, garlicky chard and the ever-so-slightly oozing egg yolk all combined into one. Maybe next time I will try poaching the eggs, but, in a pinch, this was just fine.

Chard

Egg

Blue eggshell

Chopped chard stems

Polenta and chard with egg II

I’d call these more guidelines than a recipe, so adjust as you see fit.

Sautéed Chard over Polenta with Fried Eggs

  • 1 bunch chard
  • 2 cloves garlic, minced
  • 1 tablespoon olive oil
  • 1/4 cup white wine (or water or chicken stock)
  • 2 eggs
  • butter
  • cooked polenta
  • salt and pepper to taste

Cook polenta according to directions, adding some butter/cream/salt/pepper/cheese or whatever else you desire.

Remove the stems from the chard, then dice finely. Chop leaves into thin strips and set aside. In a large frying pan, heat up olive oil over medium heat. Add stems and a pinch of salt. Saute until they start to soften, about five minutes. Add the garlic and cook for about a minute, until it gets fragrant. Add wine (or water or chicken stock) and then the strips of chard leaves. Stir, then top with a lid and cook for about five minutes until the leaves are wilted. Scrape out pan and add a small knob of butter to melt. When bubbling add eggs and fry to desired doneness.

Dollop polenta onto plate, top with chard and fried egg.

Continue Reading

White Bean Tartlets with Oven Roasted Tomatoes

This post is dedicated to my friend Elsbeth who is going to kick my butt for waiting two weeks to post. I could possibly be the most procrastinating-est blogger ever. It’s a curse.

So, Elsbeth, this one is for you.

Solo Tartlet

I had a little party on Friday two weeks ago to celebrate a blog milestone. The original plan was to have a few friends over for appies and wine to celebrate crossing the 100,000-views mark, but that didn’t work out because I ended up getting to that point faster than originally thought and the timing was off. (No, it was not procrastination related, for once.) Then I thought it would be cute to instead have people over for passing by 123,456 views.

So, that’s what it ended up being.

I sometimes get a bit of party anxiety, though. Will people have fun? Will there be enough food?

And, as usual, my fretting was all for naught. Besides having cheese, crackers, some salami and prosciutto, I also made two appetizers: prawns sauteed with chili, garlic and ginger served in wonton crisp cups and these White Bean Tartlets with Oven Roasted Tomatoes. And thankfully (with the addition of sending one care package home for a friend who couldn’t make it), all of the food was eaten! Frankly, that was the best part. Made me feel like everyone enjoyed the goodies. Plus, you know, less clean up.

(So, I’m making up for the lack of text here with bonus photos. Couldn’t narrow them down….)

Trio of tartlets III

I got the inspiration from one of my 8 million cookbooks, but adjusted the recipe quite a bit and figure that, at that point, it’s safe to call it my own. It was pleasantly garlicky and rich-tasting even though there was almost no fat involved. And, c’mon, they’re just so damn cute.

Thyme

Tomatoes and Thyme

Roasted Tomatoes with Thyme

White Beans pre-puree

Trio of Tartlets

Trio of tartlets II

White Bean Tartlets with Oven Roasted Tomatoes

  • 30 grape tomatoes
  • 30 tart shells or pastry to make 30 tarts
  • 3 tablespoons olive oil, divided
  • 4-5 sprigs of thyme
  • 1 teaspoon thyme leaves, minced
  • 3 cloves garlic, minced
  • 19 oz (540 mL) can white kidney beans
  • 1/2 cup white wine (can substitute stock or even water)
  • Salt and pepper to taste

Bake tart shells as indicated or blind bake homemade pastry until shells are completely cooked.

Preheat oven to 350. Put tomatoes in oven safe dish and toss with 2 tablespoons of olive oil. Sprinkle with a pinch or two of salt and add the sprigs of thyme. Roast in the oven for about 30 minutes until their skins have started to split. Set aside.

In a pot over medium heat, heat 1 tablespoon olive oil and minced garlic. Once the oil is hot and the garlic has started to soften, add the drained and rinsed beans and continue cooking until warmed through and the beans are starting to fall apart, stirring often. Add wine (or stock or water) and thyme leaves and cook until most of the liquid is gone. Remove from the heat. Dump the beans, garlic and thyme into a food processor and whiz until it forms a nice paste. If it appears to be a bit too dry, add some more wine/stock/water. Spoon into cooked pastry shells and top each one with a roasted tomato. At this point I also spooned any drippings from the roasted tomato pan onto the tartlets.

Continue Reading

Roasted Chickpeas with Chard

I can’t say I’ve ever gone out of my way to buy/cook/eat chard. But there was something about Julie’s entry during her year-long, post-a-day, blog-a-thon involving roasted chickpeas and chard that, for some unknown reason, really appealed to me. I filed it away, figuratively, for a future date and carried on with things.

Chard II

So, when a friend at work was extolling the virtues of her chard crop, I was immediately reminded of my plan to try out this dish. And, very fortuitously, she was happy to provide me with a large bunch of chard to use in my attempt.

Bundled Chard

Oh chard! Why have I foresaken thee for so many years? You are quick to prepare and delicious! And I’m pretty sure you’re good for me too!

Chard I

I’m just sad now that the chard season (at least in my friend’s garden) is over for another year. Most of the generous bunch she gave me went into the dish with the roasted chickpeas. But I held back a few stalks that I sauteed quickly with garlic and topped with a fried egg for breakfast one day.

The original recipe just calls for the leaves from what I can tell. But I liked the rainbow stalks so much that I diced them finely and fried them for a few minutes before adding the leaves to the mixture.

I can only hope that next year my friend’s chard crop is even bigger and she is as giving as this time around with it….

This recipe has been adapted ever so slightly from the original, as seen here. Mostly because I didn’t have enough garlic to do it properly and, as mentioned before, because I used up the stalks too.

Chickpeas, garlic, shallots and bay leaves

Chard III

Chopped chard stalks

Roasted chickpeas with garlic and bay leaves

Roasted Chickpeas with Chard

Roasted Chickpeas with Chard

For the chickpeas
1 19 oz.  can chick peas, rinsed and drained
3 cloves garlic, peeled (original calls for entire head; will try this next time)
2 shallots, roughly chopped
2 bay leaves
1/3 cup olive oil

For the chard:
2 tablespoons olive oil
1 large bunch Swiss chard, center stems removed and chopped finely, and leaves coarsely torn
2 garlic cloves, crushed
1/2 cup vegetable, chicken or beef broth

Preheat oven to 400. In a baking dish, combine chickpeas, garlic, shallots, bay leaves and oil. Roast for about 45 minutes, shaking the pan at least once (twice is probably even better) until everything is golden. Remove from oven and set aside.

In a frying pan on the stove, add olive oil and heat until hot. Saute garlic for about 30 seconds until it is fragrant, add chard stems and saute for a minute or two until tender. Add chard and continue cooking until it has wilted — about five minutes. Pour over stock, cover and cook for another 10 minutes. Remove lid and drain excess liquid. Add chickpea mixture, season with salt and pepper and mix until heated through. Add a little more olive oil if desired.

Continue Reading

Butternut Squash in Coconut Milk

Are you ever shopping and see something you think you need only to find when you get home that you already have, say, five of those already? No? Well, you’re smarter than me then.

A couple of months ago I saw coconut milk on sale, so I picked up a few cans. I like my curries and Thai Seafood Chowder and this great peanut sauce (which I should do a blog entry on; note to self) and so coconut milk is a good staple for me to have around. Unfortunately, I got home to find that I already had about four cans of it in the cupboard. Huh. Now I had eight cans.

On the upside, it means that I have the goods on hand when I see recipes like this one and want to give it a shot.

I’ve been on a butternut squash kick lately. Having never really eating squash for most of my life, I’ve found myself embracing it. It began with an acorn squash I randomly bought a few months ago. (It was so cute, and then it dawned on me that I’d actually have to do something with it.) I simply roasted it and then had it with a roasted chicken breast. Simple perfection. And there are apparently a lot of things you can do with squash. So goes my continuing education.

Butternut Squash

I liked the idea of this recipe. Soft, comforting squash with the exoticism of Thai flavours. And it was good, but if I can make one recommendation, I would suggest using this as a side dish. I’m sure this is the original intent of the recipe, but I made it on a whim and helped myself to a big bowlful. It was a bit rich to just eat on its own.

(I also should have reduced the sauce a bit more. Next time.)

Pre-simmering

Butternut Squash in Coconut Milk

This recipe comes from Closet Cooking, but has, as usual, been slightly adapted.

Butternut Squash in Coconut Milk

  • 1 tablespoon vegetable oil
  • 1 teaspoon garlic, minced
  • 1 teaspoon ginger, grated
  • 2 cups butternut squash, peeled and cut into 1″ cubes)
  • 1/2 cup coconut milk
  • 1 tablespoon sugar
  • 1 tablespoon fish sauce
  • 1/2 teaspoon chili sauce (such as sambal olek)

Heat oil in a pan. Add garlic and ginger and saute for about a minute until fragrant. Add chili sauce and saute for another 30 seconds, then add coconut milk, sugar, lime juice, fish sauce and squash. Cover and simmer until squash is tender, about 30 minutes. Remove squash and let coconut milk mixture continue to cook until it is reduced. Pour over cooked squash.

Continue Reading

Risotto with Roasted Butternut Squash

Last week I worked a couple of night shifts.

I used to have a position where I worked nights for a month at a time, every three months. That was too much for me. Over the course of the weeks, I’d start to feel more and more ghost-like, spending my days alone and my nights with only a handful of colleagues; the final hour I was pretty much alone and I would slink out into the dark night, drive home and stay awake until three in the morning before finally crawling into bed.

But I don’t mind the odd night shift, actually. Sleeping in? A sunny day to one’s self? A few hours to bake and cook and photograph and eat? Sounds good to me. (Especially in these days of waning winter light, when full sun has been minimized to just a few short hours in the early afternoon.)

Plus, who doesn’t love the idea of waking up and having Risotto with Roasted Butternut Squash for breakfast?

Risotto with Roasted Butternut Squash

That morning, searching around for something to eat, I realized I had better use up some butternut squash that was otherwise going to have to be imminently pitched. Roasting it was the only reasonable answer. And, as I dumped the cubes into a roasting dish and drizzled it with olive oil and sprinkled on salt and pepper, I remembered a Barefoot Contessa recipe for a risotto with roasted squash.

In pulling out my recipe book, however, I realized I was missing some key ingredients, including shallots and pancetta. I’m sure these things make her version even better, but this bastardized version made me swoon when I sat down less than an hour later with a big bowlful and the contented feeling that comes from hot food and knowing work is still hours away.

Luckily, I did have a small box of saffron — another of my myriad food impulse purchases that had not been cracked open. Saffron, those delicate threads, so scarlet, so fragile. I remember growing up, seeing the same type of small, clear plastic box in my mum’s cupboards. But I have no recollection of her ever using it. The red threads impart a lovely orange-yellow colour to the risotto and also their own flavour, which I can’t really attempt to explain. Still, while I made this with saffron, if you don’t have it, I wouldn’t panic.

This made enough to feed two adults generously, likely four as a side dish. Or, one of me over the course of several meals.

Roasted butternut squash

Saffron

Getting the risotto started

Final steps

Risotto with Roasted Butternut Squash

  • 1 small butternut squash (1 pound)
  • 2 tablespoons olive oil, divided
  • salt and pepper
  • 1/2 onion, diced
  • 3/4 cup arborio rice
  • pinch saffron (optional)
  • 1/2 cup white wine
  • 3 cups chicken stock
  • 2 tablespoons butter
  • 1/2 cup freshly grated parmesan

Preheat oven to 400. Peel the butternut squash, halve it and remove seeds. Cut into 3/4″ cubes. Place squash in roasting dish or on sheet pan, toss with olive oil, 1 teaspoon salt and 1/2 teaspoon pepper. Roast until tender and golden in spots, about 25 minutes. Toss once to ensure even roasting.Meanwhile, heat the chicken stock in a small covered saucepan. Leave it on low heat to simmer.

In saucepan, heat 1 tablespoon olive oil, add diced onion and saute until translucent. Put chicken stock in microwave safe bowl or measuring cup and heat. (Time will vary on the microwave; start with two minutes. This can also be done by warming the stock on the stove, but I find the microwave system saves me another pot to wash. If the stock cools too much, just microwave it again.)

Add rice to onion and oil mixture and stir until the grains are coated. Add the wine and let it reduce slightly. Add one cup of stock, along with the saffron, if using. Simmer, stirring occasionally, until the stock is absorbed — about five to 10 minutes. When the stock is almost gone, add the next cup. Repeat with the last cup of stock. When the liquid is all absorbed, remove pot from heat, stir in butter and cheese. Toss in roasted squash. Add salt and fresh pepper to taste.

Continue Reading

Fresh Corn Salad

A group of friends and I were talking about things we like to make for dinner a couple of weeks ago, when one mentioned her relatively recently acquired love of all things barbecue. And that, inevitably, led to a discussion about side dishes.

There has been a lot of recipes lately for grilled corn, which sounds delicious (especially when there is also talk about chili-lime butter to spread on after), but I am a sad city dweller with no patio/balcony/deck and, subsequently, no hibachi/grill/barbecue. But that doesn’t mean that I miss out when corn is in season.

Corn on the cob

Every summer I make a few rounds of Fresh Corn Salad, when corn on the cob is ripe and basil is plentiful at the Farmer’s Market. There are only seven ingredients in this salad, and that includes the dressing.

This is really easy to throw together and well worth the effort. (Okay, maybe the actual cutting-the-corn-off-the-cob is a bit messy.) (I recently saw this gadget that strips the kernels from the cob and while I love all things gadgety, even I feel that’s a bit much.)

I did initially have a tough time finding cider vinegar, but then found some at my local Safeway (along with another much-loved Barefoot Contessa ingredient: champagne vinegar. Um, actually, I just looked and mine is “champagne style.” What can I say? I’m a champagne girl on a “champagne-style” budget.) They come in pretty small bottles, but I don’t use cider vinegar all that often, so it works out.

basil and red onion

Corn off the cob

Fresh Corn Salad

This recipe is from The Barefoot Contessa Cookbook.

Fresh Corn Salad

  • 5 ears corn, shucked
  • 1/2 cup small-diced red onion (1 small onion)
  • 3 tbsp. cider vinegar
  • 3 tbsp. good olive oil
  • 1/2 tsp. kosher salt
  • 1/2 tsp. freshly ground black pepper
  • 1/2 cup chiffonade fresh basil leaves

In a large pot of boiling salted water, cook the corn for 3 minutes until the starchiness is just gone. Drain and immerse it in ice water to stop the cooking and set the colour. When the corn is cool, cut the kernels off the cob, cutting close to the cob.

Toss the kernels in a large bowl with the red onions, vinegar, olive oil, salt and pepper. Just before serving, toss in the fresh basil. Taste for seasonings and serve cold or at room temperature.

Continue Reading