Vanilla Panna Cotta with Strawberries

Last January, I made several resolutions that I hoped to fulfil through the course of the year. A flood in my apartment, which led to several walls being torn out and weeks and weeks of workmen Humpty Dumpty-ing my home back together again killed any drive I had to enact the “entertain at least once a month” resolution. Or any of the myriad food-related resolutions I had, since my kitchen was barely navigable from all the belongings normally hidden away in the storage room.

And so, in the end, I fulfilled none.

This year, I’ve kept my resolutions equally simple:

  • Write more actual letters to people
  • Read more classics
  • Travel somewhere new
  • Drink more water
  • Make panna cotta
  • Join a new class
  • Increase my intake of fruit and vegetables

And so far, I’m off to an unexpectedly good start.

I’m partway through Jane Austen’s Northanger Abbey and have Wuthering Heights by Emily Bronte on standby; I’ll be travelling to Morocco this fall; and I made panna cotta.

Panna cotta with strawberries II

This was a holdover from last year’s resolutions and I’m surprised it has taken me this long to finally cross it off my list. (Although, I do think part of my hesitation stemmed from knowing this is a very dangerous recipe to master.)

Panna cotta – literally “cooked cream” in Italian – is nothing more than sweetened cream (or a combination of cream, milk, buttermilk or yogurt) infused with any one of myriad flavours.

It’s infinitely adaptable; I’ve had everything from simple vanilla versions to ones flavoured with orange blossom water, topped with fruits or coulis or left unadorned to let the light flavour come through.

It’s silky, soothingly smooth and can be the perfect end to most meals.

And it is ridiculously easy. The hardest part of making this recipe was wading through the hundreds of versions that popped up after a straightforward Google search.

But, for the first time attempting it at home, I wanted something uncomplicated.

Nothing more than cream, vanilla, sugar and gelatin, topped with a few macerated strawberries for colour and flavour.

This version from food blogger and author David Lebovitz fit the bill.

Even making the panna cotta felt soothing: from scraping out the fragrant flecks of vanilla from their pods and stirring them into the cream that was gently heating on the stove, to pouring the liquid into ramekins and putting them to bed in the fridge for the night.

Only attempting to unmould them proved tricky. (If no one is worried about spectacular presentation – and who would be after taking one bite of this dessert? – I probably wouldn’t worry about bothering next time and would simply serve them in clear glasses or pretty coloured ramekins instead.)

But any frustrations stemming from their unwillingness to slide out on the first attempt evaporated with the first bite of panna cotta.

Sweet, light, brightened by diced strawberry and speckled with vanilla, it was everything I had hoped for.

If the rest of my resolutions turn out to be this easy, I just might get through all of them this year.

Unmolded panna cotta

Strawberry

Vanilla Beans

Panna cotta with strawberries I

Panna cotta with strawberries III

Vanilla Panna Cotta with Strawberries

This version is slightly adapted from David Lebovitz – namely the addition of macerated strawberries – who in turn adapted it from Judy Witts’s Secrets From My Tuscan Kitchen. You can find gelatin, which is typically sold in boxes of packets, in the baking section of most grocery stores.

  • 4 cups (1 L) whipping cream (or half-and-half)
  • 1/2 cup (125 mL) sugar
  • 1 vanilla bean, split lengthwise (or 2 tsp/10 mL vanilla extract)
  • 2 packets powdered gelatin (about 4 ½ tsp/22 mL)
  • 6 tbsp (100 mL) cold water
  • 2 cups (500 mL) strawberries, diced
  • 1-2 tbsp (15 to 25 mL) sugar (depending on the sweetness of the strawberries)

Heat the cream and sugar in a pot on the stove or in the microwave until the sugar is dissolved. Remove from the heat. Scrape the seeds from the vanilla bean and add them and the pod to the cream. Cover and let infuse for 30 minutes. Remove the pod and rewarm the mixture before continuing.

Lightly oil eight custard cups with a neutral-tasting oil, such as vegetable or safflower.

In a medium-sized bowl, sprinkle the gelatin over the cold water and let stand 5 to 10 minutes.

Pour the warm panna cotta mixture over the gelatin and stir until the gelatin is completely dissolved.

Divide between the prepared cups, then chill until firm (at least two hours). Just before serving, mix together diced strawberries and sugar and let sit while unmolding the panna cotta.

To serve, run a sharp knife around the edge of each panna cotta and dip the ramekin in a dish of hot water to loosen. Unmould onto a serving plate and top with strawberry mixture.

Serves 8.

This first appeared in the Calgary Herald. For more recipe ideas and food stories, check out the Herald’s food page.

Continue Reading

Cream Biscuits with Sausage Gravy

If I believed in past lives, I’d swear I was a southern belle in one of mine. Give me a pitcher of sweet tea, porch swings, some fried chicken or chicken-fried steak and especially give me some Biscuits with Sausage Gravy.

Biscuits and Sausage Gravy II

I’ve been bookmarking recipes for biscuits and gravy on Delicious for a while now. In fact, when going through to clear out some old links (I mean, do I need 800 bookmarked recipes? No, I don’t think so.), I found a few I had forgotten about. I left one of them because it was different enough that I think I’d like to give it a go later.

Because this certainly won’t be the last time I cook up some biscuits and gravy.

Oh yeah.

So, instead of the usual biscuits, which involve cutting in butter to make them nice and flaky, this recipe only uses cream.

And they were a total revelation. Light and fluffy, cracking perfectly in half when pulled apart and with not an ounce of butter to be seen. Not that using butter in shortcakes or scones is difficult, since I discovered Nigella’s trick, but avoiding it all together certainly makes things go much faster.

The sausage gravy recipe was just as simple and straightforward. I think next time I may want something where I have a bit more control over the flavours. However, this was super tasty and it came together very quickly, which, if I was making this for a crowd would definitely put this recipe in the win column.

It’s easy to adjust the flavours just by changing up the type of sausage you use, which is also nice.

I’d call this a very good starter recipe, but I’m certainly not done exploring the world of biscuits and gravy.

Cream Biscuits

Cream Biscuits

Sausage Gravy

Biscuits and Sausage Gravy I

Cream Biscuits

  • 2 cups all-purpose flour, plus extra for the counter
  • 2 teaspoons granulated sugar
  • 2 teaspoons baking powder
  • 1/2 teaspoon table salt
  • 1 1/2 cups heavy cream

Preheat oven to 425. Line a baking sheet with parchment paper.

In a medium bowl, whisk together the dry ingredients. Stir in the cream (starting with about 1 1/4 cups and adding more if necessary) until a dough forms, about 30 seconds or so. Dump the dough out onto a lightly floured counter. Gather it together and squash it together (not quite kneading it) until smooth.

Shape it into a circle about into a circle about 3/4″ thick. Cut biscuits into rounds and place on parchment-lined backing sheet. Bake biscuits until golden brown, about 15 minutes.

Sausage Gravy

  • 12 ounces bulk pork sausage
  • 2 tablespoons all-purpose flour
  • 2 cups milk
  • Salt and freshly ground black pepper, to taste

Heat a medium pan over medium-high heat. Add the sausage and cook, stirring occasionally and breaking it up into little bits, until browned and cooked through, about 7 to 10 minutes. Remove from the pan and set aside.

Sprinkle the flour into the remaining fat in the pan and cook for about a minute. Whisk the flour mixture while slowly adding the milk. Bring to a boil, then reduce the heat and simmer for 2 minutes or so to let the gravy thicken. Add salt and pepper to taste, then stir in the sausage.

Serve the sausage gravy over the cream biscuits.

Serves 8 or fewer, depending on how hungry people are.

Continue Reading

Pickled Onions and Onion Jam

As a kid — like almost all kids, I imagine — I was resolutely against onions. No, not in any dishes, please and thank you. And I was totally convinced that I could tell when they were in something. Until my mum did a little experiment. With my eyes closed, she gave me a piece of cooked celery and a piece of sauteed onion to taste. If I could tell them apart, I won. And if I couldn’t, then I wasn’t allowed to complain about onions ever again.

I failed.

Even though it was a 50-50 shot.

Red Onion

Now, I find the whole thing amusing. These days, almost all of my favourite dishes start with sauteeing some diced onions in butter or olive oil or both. (Like this one or this one or this one. Huh. Think I have a pasta addiction? Yeah.)

Of course, they don’t have to just be the start of a dish.

A few months ago, over at my day job, I wrote a piece about saving the standard sandwich. I made some jazzed up mayo with lemon juice and a whole bunch of herbs and then I made onion jam. That was my first time making it and it was a revelation. Sweet and savoury, rich and that slight hit of vinegar. Dear god help me, I was eating it with a fork. Seriously. And I had just made some no-knead bread and I had a chunk of brie and for the next three days, that became my go-to snack. (That and the herb mayo on toast with thin slices of tomato. Drool.)

Onion Jam II

A few weeks ago, I made a little Mexican feast (guacamole — recipe coming — and slow-cooked pork and tortillas) and at the last second, I thought nothing could improve this delicious trifecta than a little zing from pickled onions. I did a quick surf around the web, found a recipe and whipped them up. It made those little tacos sing. Seriously.

And then, a few days ago, I bought two red onions for reasons that are entirely unclear to me. And so, with two red onions and two recipes that would transform those little purple globes into something amazing, (And that’s with me liking red onions to begin with.) I got cracking.

I made Pickled Onions and Onion Jam.

I didn’t have brie this time around, so I’ve been eating the onion jam with Monterey Jack. Less fancy, still tasty. And I don’t have homemade tortillas, slow-roasted pork and guacamole, but I do have toasted bagels and ripe avocados that I’ve just mashed on top before lacing on top a few forkfuls of pickled onions. So simple, so good.

Brine

Adding the red onion

Pickled Onions

One quick note on the pickled onions: I made them the first time without the fennel and the second time with. Since I don’t love fennel, I will probably leave it out from now on. But if you do actually like fennel, then go for it. Other recipes I found also called for allspice berries (don’t have any; trying really hard to stop buying ingredients for just one recipe) and dried chiles (don’t have any and didn’t really want that kick of heat.) So, in short, this is totally adaptable. This is how I did it this time around.

Pickled Onions

Adapted from several sources.

  • 3/4 cup white vinegar
  • 3 tablespoons sugar
  • 1/4 teaspoon salt
  • 1 bay leaf
  • 5 whole cloves
  • 5 peppercorns
  • 1/4 teaspoon fennel seeds
  • 1/4 teaspoon coriander
  • 1/4 teaspoon mustard seeds
  • 1 large red onion, peeled, and thinly sliced into rings

In a small, non-reactive saucepan, heat the vinegar, sugar, salt and spices until the mixture comes to a boil.  Add the onion slices and lower heat, simmering gently for about a minute.  Remove from heat and let cool. Transfer the onions and the liquid into a container and refrigerate.

Sauteed onions

Onion Jam

Onion Jam

  • 2 tablespoons (30 mL) olive oil
  • 2 tablespoons (30 mL) butter
  • 2 red onions, halved and sliced into 1/4-inch (1/2-cm) moons
  • 1 clove garlic, crushed (optional)
  • 1 teaspoon (5 mL) fresh thyme
  • ¼ cup (60 mL) balsamic vinegar
  • 1 tablespoon (15 mL) sugar
  • pinch salt

In a saute pan, heat olive oil and butter over medium heat until melted.

Add onions and a pinch of salt (which helps to draw out the onions’ moisture) and garlic (if using); saute until onions are cooked and caramelized, about 15 minutes. Add sugar and thyme, stirring to dissolve the sugar.

Add vinegar. Simmer until it is thick and has a jam-like consistency, about 5 minutes. Remove garlic clove.

Continue Reading

Teriyaki Trout and Quick Japanese Pickles

When I’m nostalgic for Japan, there is one recipe I pull out.

Though, oddly, I didn’t find it in Japan nor use it when I was there.

Instead, this recipe for Teriyaki Trout was one I inherited from my family, who has been cooking it for years.

Teriyaki trout with quick pickles IV

Although only really a nod to a traditional teriyaki, it is my fallback recipe when I’m longing for the Land of the Rising Sun. There, I often made an authentic teriyaki salmon that I would serve with steamed rice and a selection of tsukemono (pickles).

But this tastes just as good and the ingredients are readily available, unlike the two types of soy and mirin that usually went into my marinade when I was overseas. (These can, of course, be found at Asian grocery stores, but this recipe is built on ingredients most people have readily available in their cupboards: soy, sugar and sherry.)

This is not the thick gloppy sauce you find on supermarket shelves. This is a thin marinade that infuses the fish with that salty-sweet teriyaki flavour.

A few cloves of smashed garlic perfume the marinade without overpowering the flavours. (And, bonus, they are easy to fish out when it’s time for the trout to go in the oven.)

In the beginning, my parents made this with salmon, as the original recipe calls for, but when the price of that got too dear, they started using steelhead trout. Now that’s what I grab as well.

Teriyaki trout with quick pickles II

My version is a photocopy of the original, with no notation of where it came from. Even the amount of fish called for is absent from the recipe.

But I’ve found the marinade is enough for about two pounds of fish. I prefer to do whole sides rather than individual fillets or steaks, though please use what you want.

Since it’s usually only me dining, I often make the full batch of marinade and divide it between two pieces of fish, throwing one into the freezer for dinner at a later date. I’ll pull it out in the morning and let it sit in the fridge. As it thaws, it continues to infuse the teriyaki flavour into the fish and by the time I get home from work, it’s ready to cook, which, some nights, is exactly the kind of meal I like to have around.

When I’m a little homesick for the rice paddies and stunted hills of the small town in Japan where I lived, I make this dish, serving it with rice and some steamed green vegetables. Sometimes, when I’m really feeling nostalgic, I also make quick pickles -thin slices of de-seeded cucumbers left to sit in a bath of rice vinegar, sugar and salt.

The tangy flavour is a nice balance to the rich fish.

Cucumbers

Sliced Cucumbers

Teriyaki trout with quick pickles

Teriyaki Trout

  • 2 pounds (1 kg) steelhead trout, side or steaks
  • 1 cup (250 mL) soy sauce
  • 1/4 cup (50 mL) sherry (drinking, not cooking)
  • 2 tablespoons (25 mL) sugar
  • 3 cloves garlic, crushed
  • 2 tablespoons (25 mL) grated ginger or ginger paste

Combine the soy, sherry, sugar, garlic and ginger in a bag or flat dish. Add the trout. Let marinate for at least 30 minutes or up to overnight.

Preheat oven to 450°F (230°C). Place fish in a casserole dish (if using steaks, grease the dish slightly so they can be easily removed) and bake until fish is cooked and flakes easily, about 12 to 20 minutes depending on the thickness of the fish.

Quick Japanese Pickles

The amount of salt and sugar can be easily adjusted for taste. I use Maldon flaked sea salt, which has a milder flavour. Sea salt can be easily substituted, but start with just 1 tsp (5 mL) and add more only if needed. The rice vinegar should be unseasoned.

  • 1 English cucumber (or 3-4 small cucumbers)
  • 1/2 cup (125 mL) rice vinegar
  • 1 tablespoon (15 mL) sugar
  • 1½ teaspoons (7 mL) flaked sea salt
  • 2 tablespoons (25 mL) water

Slice cucumbers in half and use a small spoon to scrape out seeds. Slice on a diagonal into ½-cm half-moons. Stir together vinegar, sugar, salt and water and mix until salt and sugar have dissolved. Add cucumber slices, tossing them with brine. Let rest in the fridge for at least an hour, tossing occasionally.

This originally ran in the Calgary Herald. For more recipes and food stories, head to the Calgary Herald’s Food page.

Continue Reading

Guinness Brownies

I first heard about Guinness Brownies through another blog, but forgot to bookmark it and couldn’t remember where I had seen it. I had sent the link to a friend who’s a fan of beer-based baking, but then thought it would be nice to just make them for her instead. A quick Google search brought up myriad other blog posts, including the one I had seen originally, as well as some other variations. After cruising through a bunch, I realized most of them were riffs on one standard recipe — one I liked much more than the recipe I had first come across.

Guinness Brownies II

Now, normally, I like to leave recipes alone for the first attempt, figuring I need to give it a chance to wow me before I make changes. But most of the versions I found called for white chocolate, which I loathe. And I knew it would cook out and be undetectable in the final brownie, but I still wasn’t keen on buying white chocolate just for this recipe. One other blogger had subbed in milk chocolate chips, which seemed like a good idea to me. I think the object here is chocolate-y sweetness and milk chocolate can certainly achieve that, with the bonus of being an ingredient I can use in other things.

Random rant: why do they sell baking chocolate squares in packages of 6 ounces? Most of the recipes I’ve come across call for 8 ounces, which means buying two packages and then letting the remaining four ounces sitting around in the cupboard (where, yes, I am likely to forget I have them and then go buy more. I really need a more organized baking cupboard).

Cracking a beer at 11 a.m. felt a bit funny, though it’s not my first time. (Those Guinness Cupcakes are also an excellent recipe, if you’re looking for something else to do with the dark Irish beer.) And I was a bit nervous about cooking it down. I’m not a huge beer fan and was afraid reducing it and intensifying the flavour would make it stand out far too much in the final brownies. Plus, it did seem a bit weird to cook beer.

But what do I know?

Not much apparently because these were fantastic. They were rich and dense, flavourful but not overly beer-y. A definite keeper.

Guinness

Guinness Brownie Batter

All Baked Up

Guinness Brownies I

Guinness Brownies III

Guinness Brownies

This is a hybrid recipe from a couple of sources, but I have to give Bitchin’ Camero a shout out because that is a seriously awesome blog name and Blondie’s Cakes for the smart idea of reducing the Guinness for additional flavour.

  • 1 cup all-purpose flour
  • 3/4 cup unsweetened cocoa powder
  • 1/4 teaspoon salt
  • 6 tablespoons unsalted room temperature butter, cut into cubes
  • 8 ounces dark bittersweet chocolate, chopped (I used 6 ounces of bittersweet and 2 of 70 per cent dark chocolate)
  • 3/4 cup milk chocolate chips
  • 4 large eggs, at room temperature
  • 1 cup granulated sugar
  • 2 bottles Guinness beer, reduced to 1 1/4 cups
  • 3/4 teaspoon vanilla
  • 1 cup semi-sweet chocolate chips
  • icing sugar for dusting (optional)

Preheat the oven to 375 degrees F. Line a 9 x 13-inch baking pan with parchment paper.

In a medium bowl, whisk together flour, cocoa powder, and salt until evenly combined. Set aside.

In a double boiler set over low heat, melt butter, bittersweet chocolate and milk chocolate chips. Remove from heat.

In a large mixing bowl, beat together eggs and sugar on high speed until light and fluffy. Pour in melted chocolate mixture and beat until combined.

Add flour-cocoa mixture and beat until just combined. Whisk in cooled Guinness and vanilla. (It will take a few minutes for the beer to incorporate. I used more of a folding technique with the whisk for the first minute or two to keep everything from slopping everywhere.)

Pour into prepared pan. Scatter over semi-sweet chips.

Bake 25 to 30 minutes, until a toothpick inserted in the centre comes out clean. Note: mine only took 24 minutes; start checking at the 20-minute mark.

Let brownies cool. Dust with icing sugar if using and serve.

Continue Reading

Butter, onion, tomato sauce

My general approach to tomato sauce is simple: I wing it.

After years of watching my parents throw basic ingredients into a pot and letting it simmer for an hour or two to create a hearty and rich tomato sauce, and even more years of making it from scratch on my own – owing to a perhaps unnatural love of pasta – I don’t give too much thought to cooking up a decent red sauce.

I’m a big believer in the long-simmered sauce with a multitude of ingredients that all come together over a slow heat, melding and marrying into something that is so much greater as a whole than the sum of its parts.

But I can also turn around a very basic sauce in 15 minutes.

At the very least, my spaghetti sauce usually has garlic and diced onions, sauted in olive oil with a generous pinch of salt, canned plum tomatoes I roughly (and gently, using a butter knife) chop in my hand over the pot, fresh basil if I can get my hands on it, a little sprinkle of sugar if the whole mix is too acidic, and a Parmesan heel, which I stash in my freezer for just such occasions.

So, it takes an unusual tomato sauce recipe to catch my eye.

Like this one. It has three ingredients. (OK, four, if you count salt, which, in general, I don’t, since almost all recipes call for salt.)

Canned tomatoes. A yellow onion. Butter.

That’s it.

Butter, onion, tomato II

Marcella Hazan’s recipe for tomato sauce with butter and onion has made appearances over the years on various food blogs I follow.

Each time I saw it, I thought I really should remember to give that a try.

And then I’d forget about it until someone else posted their love of this simple yet rich dish.

This seemed like a great weeknight dinner recipe since there is minimal fuss. No chopping or dicing, sweating or sauteing.

You dump it all into the pot, let it come to a simmer, reduce the heat, and go about things. In this case, a little laundry, some tidying and things that allowed for a quick wander past the pot to give the tomatoes a stir and squish against the side with a wooden spoon.

At the end of 45 minutes, all it needed was a small pinch of salt and to be dolloped over a nest of noodles.

Some have suggested sprinkling on Parmesan, but I opted not to. The sauce is rich and tasty without adornment, which is sort of the beauty of it.

The butter adds an almost unidentifiable creaminess and mellows out the acidity of the tomatoes.

And, luckily, such an easy recipe is simple enough that in the future I can pretty much wing it.

Butter, onion, tomato

Cooked sauce

Spaghetti and Sauce I

Spaghetti and sauce II

Marcella Hazan’s Tomato Sauce

This was adapted from Hazan’s The Essentials of Classic Italian Cooking by way of several food blogs. Since there are only three ingredients, I do recommend using San Marzano or San Marzano-style canned tomatoes, which are packed in tomato puree instead of water and have, therefore, a greater tomato flavour. You can find Marzano-style tomatoes in most grocery stores these days.

  • 1 28-oz (796-mL) can of whole tomatoes
  • 5 tbsp (75 mL) butter
  • 1 medium yellow onion, peeled and halved
  • 1 lb (500 g) spaghetti
  • salt to taste, if needed

Put the tomatoes, butter and onion in a pot over medium heat. Once the butter is melted, stir to combine, then reduce the heat to low or medium low – depending on how hot your element is; you’re looking for a slow but steady simmer – and cook for about 45 minutes. Stir occasionally, squishing the tomatoes against the side of the pot.

Cook pasta according to package instructions.

Remove sauce from heat, discard the onion and taste. Add salt if needed. Serve over cooked pasta.

This article first appeared in the Calgary Herald. For more recipes and meal ideas, head to the Calgary Herald’s food page.

Continue Reading

Bourbon Pecan Pie Brownies

The first time I had pecan pie was when I was 16 and visiting a friend in England for a month during summer holidays. There were visits to Stonehenge and London, trips on the train to Bath, but a lot of the time was spent hanging out in Bristol with her boyfriend and his friend, with whom I struck up a short summer romance.

It was not to last, but part of our brief courtship included an invitation to dinner at his family’s house. Details have likely been repressed due to all that teenage awkwardness, but one thing is clear in my mind: his mom made pecan pie.

It was delicious.

Since then I’ve been drawn to variations on the pecan pie. (Not, to be clear, in any way related to yearning for the boy who ended things in a long-distance call just a few weeks after I returned to Canada, but because I like the idea of this pie, the rich pecans and sweet goo filling.)

(And, as an aside, you can read a bit more about my short-lived summer romance in another pecan pie-related post here.)

But I can rarely get excited about making pastry.

And then I came across a recipe for Bourbon Pecan Pie Brownies.

Stacked and side view

Where a crust would be, instead a fudgy, chewy brownie and a pecan pie topping kicked up with some bourbon.

Seemed to me like two very fine things coming together to make an even finer thing.

I found it on a blog, but the recipe originated (and had been adapted from) an NBC Sunday Night Football Cookbook, the idea of which totally charms me.

I used to use the same brownie recipe every time I felt like a chocolate fix, until I found a recipe for Rocky Road Brownies, which used no leavening. The resulting brownies were dense and fudgy and a revelation.

They are, unsurprisingly, rich — two sweet desserts combined into one. And the bourbon retains some of heady kick, so be warned.

The original recipe says it makes 16 bars; I’d suggest cutting smaller.

After all, you can always eat two.

Cocoa, butter and sugar

Scraped Clean

Chopped pecans

Top layer batter

Top layer on

Solo brownie

Stack of brownies

Bourbon Pecan Pie Brownies

The original recipe calls for the two layers to bake in the oven for 30 to 35 minutes to set the pecan pie layer. Don’t be afraid to go longer; mine were in for 45 minutes before the centre had set.

For the brownies:

  • 1/2 cup (125 mL) flour
  • 1/4 tsp (1 mL) salt
  • 3/4 cup (175 mL) cocoa powder
  • 1 ¼ cup (300 mL) sugar
  • 1/2 cup (125 mL) butter
  • 1 tsp (5 mL) vanilla extract
  • 2 eggs

Preheat oven to 325F (160C). In a small bowl, beat together eggs and vanilla, then set aside. In a double boiler set over boiling water, combine butter, cocoa, sugar and salt. Mix as the butter melts until everything is combined. Remove from heat and whisk in egg and vanilla mixture.

Add flour and stir until combined. Pour into 8 by 8-inch (20 by 20 cm) baking dish. Bake for 20 to 25 minutes. Let cool completely.

For the pecan pie layer:

  • 1/2 cup (125 mL) packed brown sugar
  • 1/2 cup (125 mL) corn syrup
  • 2 eggs
  • 1 tbsp (15 mL) vanilla extract
  • 1/4 tsp (1 mL) cinnamon
  • 1/4 cup (50 mL) butter, melted
  • 2 tbsp (25 mL) bourbon
  • 2 cups (500 mL) chopped pecans

Beat together corn syrup and sugar until smooth. Add eggs, vanilla and cinnamon, and beat. Add butter and bourbon and beat again until thoroughly combined. Stir in pecans and pour the mixture over the brownie layer. Bake for 30 to 35 minutes.

Let cool completely, then refrigerate for at least two hours before serving.

This article first appeared in the Calgary Herald. For more food-related articles and recipes, check out the Herald’s food page.

Continue Reading

Dark Chocolate Chunk Cookies

What’s the sign of a good recipe?

When you make it twice in one week. (And kind of wish you had the ingredients to make it again as you’re blogging about it.)

My friends, this is that kind of recipe.

And it’s for chocolate chunk cookies.

Milk and dark chocolate chunk cookies

I didn’t think there was anything revolutionary about chocolate chip cookie recipes. (Barring, of course, the New York Times one that pretty much everyone has tried, except me. One day, I will try this. It’s the same day I have a fridge large enough to store a bowl of cookie dough for a minimum of 24 hours. One day.) I was mistaken.

These are chewy delights of soft cookie with melty bits of dark chocolate. They are cookie perfection.

Dark chocolate chunk cookies I

I just really wanted to make some cookies one night last week, but had not put any thought into what kind. I innocently tweeted out I had a hankering to bake and my friend Robyn suggested I make these cookies from Anna Olson. I was intrigued by the addition corn starch, which Olson says gives the cookies a chewy centre.

And, perhaps more importantly, I knew I had all the required ingredients, including an assortment of dark chocolate bars that I wasn’t quite sure what to do with. One of the ones I ended up using was a more traditional thin, flattish bar, while the other was about a 1/2-inch thick.

I used my awesome cookie scoop to portion out the dough, which made these nice rounded, perfectly portioned balls of dough. What surprised me when they baked, though, is that there really wasn’t very much spread. They remain nicely thick and I’m sure that contributes to the chew.

I ate a couple that night, then took some in for work where people devoured them.

So, when it came to attending my first tailgate on Saturday (I know, I know, but I’m from Vancouver; we’re not really tailgate people), I knew exactly what I wanted to bring. And not just because I really wanted to eat some myself. But, yeah, that was part of it.

This time, I used two flat, thin bars of 70 per cent dark chocolate. I broke them into smaller pieces with my meat tenderizer. Let me tell you, that was oddly satisfying. And the end result was really nice. The pieces melted into strata of cookie and oozing chocolate. It was heavenly.

And for that, this is my new go-to cookie recipe.

Smashed chocolate

Dark chocolate chunk cookie dough

Scooped dough

Dark chocolate chunk cookies I

Milk and dark chocolate chunk cookies

Dark chocolate chunk cookies

Milk and dark chocolate chunk cookies

Dark Chocolate Chunk Cookies

This is, essentially, exactly as Anna Olson dictates, but I’ve made a few changes to the instructions and called for dark chocolate instead of bittersweet.

  • 3/4 cup unsalted butter, softened
  • 1 cup brown sugar
  • 1/4 cup granulated sugar
  • 1 egg
  • 2 teaspoons vanilla extract
  • 2 cups all-purpose flour
  • 2 teaspoons cornstarch
  • 1 teaspoon baking soda
  • 1/2 teaspoon salt
  • 8 ounces dark chocolate, cut or broken into chunks

Preheat oven to 350F.

Cream butter and both sugars until smooth. Add egg and vanilla and blend in.

In a separate bowl, whisk together flour, cornstarch, baking soda and salt. Add to butter mixture and mix until just blended. Fold in chunks of chocolate.

Line baking sheet with parchment paper. Drop cookie dough by spoonful onto the lined sheet and bake until just golden brown around the edges, between 8 and 10 minutes.

Continue Reading

Portland a.k.a I went to Oregon to eat a burger

Warning: This is a photo-heavy post.

So, the story goes that I went all the way to Portland, Oregon for a burger.

Honestly, it’s not all that far from the truth.

And here’s where our story starts . . . .

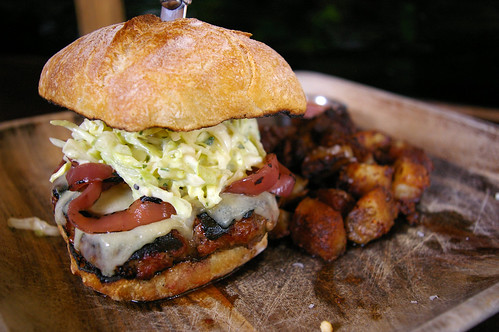
Once upon a time, I came across a post on one of my favourite websites, A Hamburger Today, that talked about a burger in Portland. The headline was: Gruner makes a burger worthy of obsession. The photo that went with it? Worth at least 1,000 words. In one: mouthwatering. (Go on, check it out. I’ll wait here.)

So, when my friend Suzi and I were talking about taking a trip together, I pitched Portland. I had been interested in the city for a while because other friends had visited and raved on about it, the food trucks, Powell’s Books and the Oregon coastline (which, granted, is about 90 minutes away, but stunning). And Suzi was game. Especially because I sent her a photo of the burger.

Let me get right to it: it was JUST as good as I hoped.

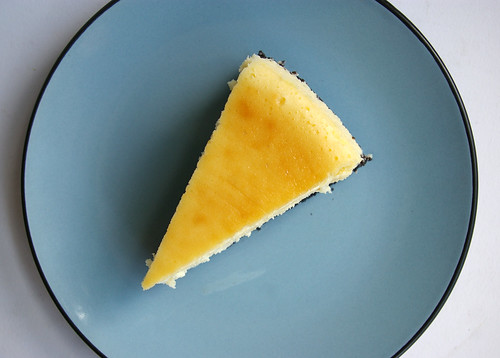
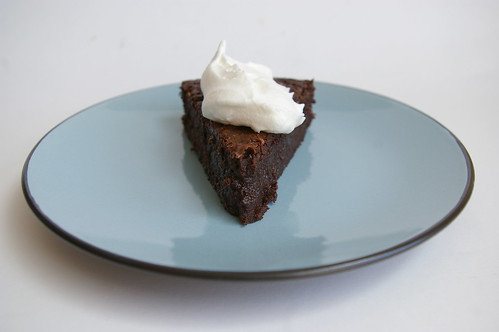
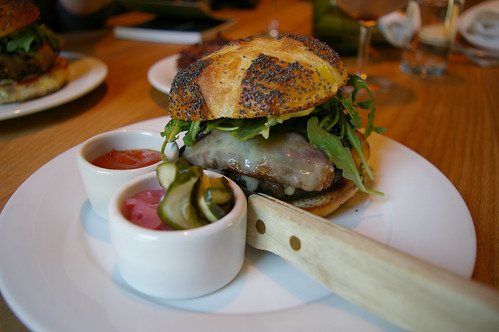
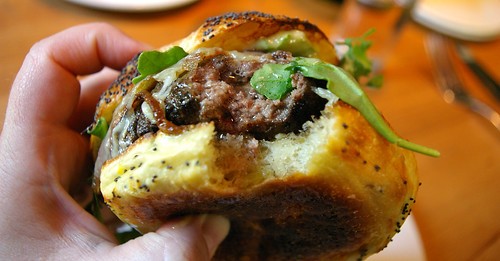
Behold, the beautiful Gruner burger:
The Gruner burger

But I’m getting ahead of myself. Even though I knew exactly what I wanted, I checked out the menu.
Gruner Menu
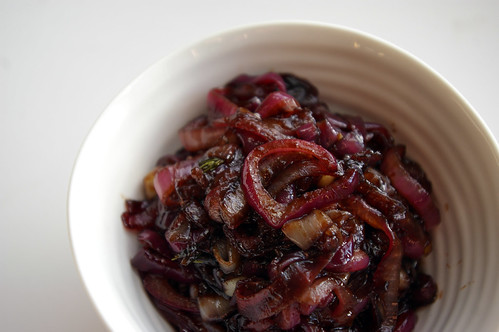
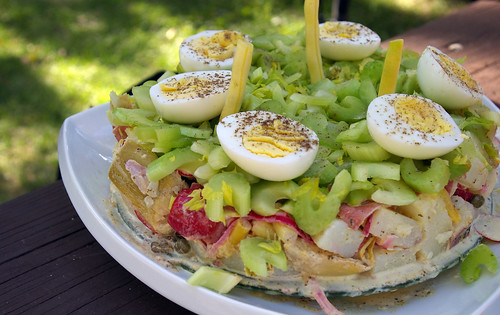
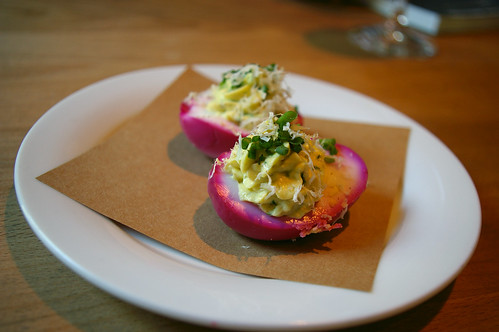
And they brought us some beet-stained devilled eggs.
Beet-pickled devilled eggs
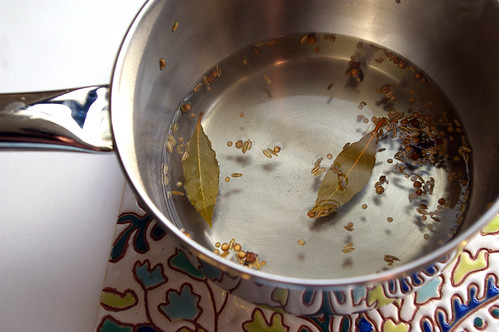
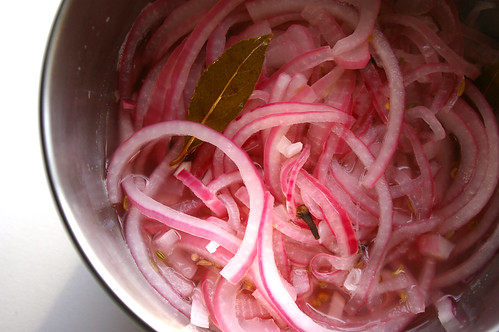
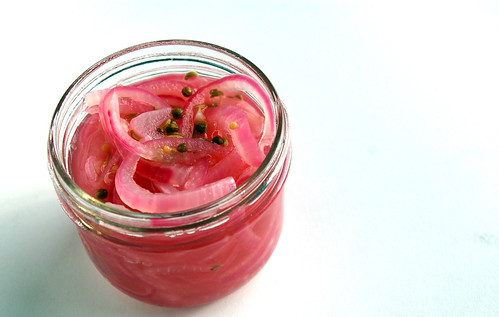
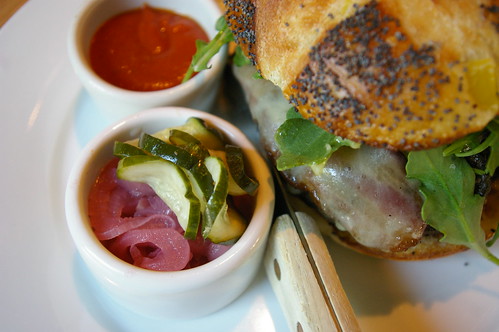
Although the burger was the main attraction, check out these yummy pickles. (Pickles, it would turn out, would be sort of a theme for the trip.)

The Gruner burger II

But the best part?

When I took that first bite and squished the burger down slightly and it erupted in a volcano of hot, delicious meat juices.

The photo doesn’t really do it justice, so just trust me on this.
The Gruner Burger III

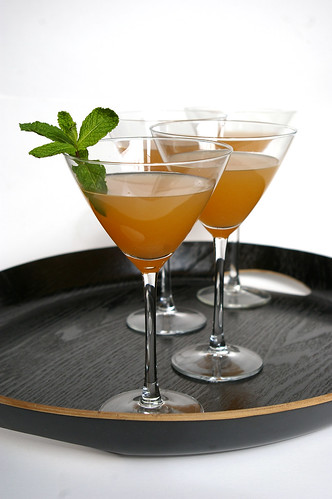
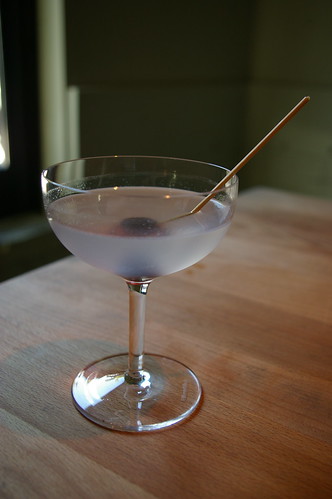
It went very well with my Arsenic and Old Lace drink (Monopolowa gin, Dolin Dry vermouth, Rothman & Winter crème de violette, Kübler absinthe) with a fantastic housemade maraschino cherry.
Arsenic & Old Lace

After that we pretty much had to roll ourselves out of Gruner. Luckily, we were just a couple of blocks away from Powell’s. Semi-conscious in a meat coma, we trawled the shelves and picked up a few books before walking back to the hotel. (The fabulous Jupiter Hotel, which was funky and clean and close to downtown — something that came in quite handy.)

The plan for Day 2 was to pick up our rental car (a Prius, of course!) and head to the coast. The Prius, I have to say, was a bit weird initially. I mean, it’s so damn quiet. But I loved that we drove to the coast and back and tootled around town the next day and still only used a 1/2 tank of gas.

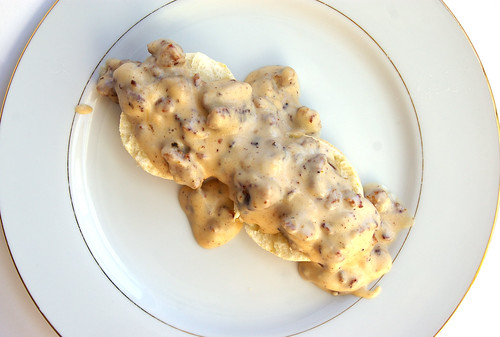
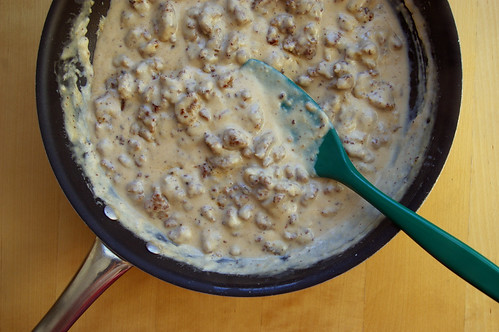
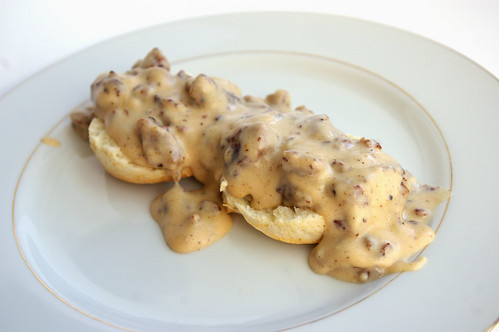
Before we set off, we stopped at Pine State Biscuits.

I swear I was a southern belle in a past life. If only because I am completely obsessed with biscuits and sausage gravy. (On my Delicious right now, I have at least three recipes bookmarked for biscuits and gravy. This winter, it will be made. Stay tuned.) Also, fried chicken. So, the thought of fried chicken AND biscuits AND sausage gravy (not even mentioning cheese and a few slices of bacon) made this a priority stop for me.

We didn’t eat again for seven hours. You can see why:
Pine State Biscuits breakfast

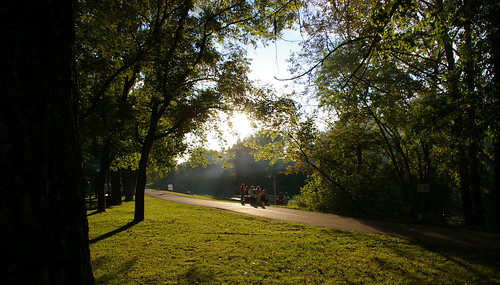
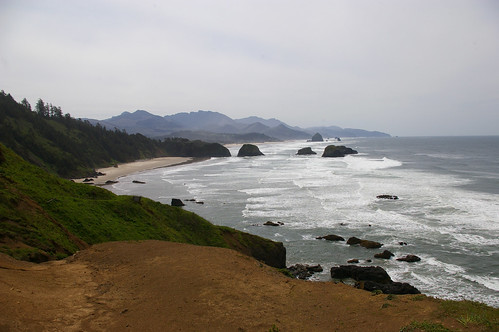
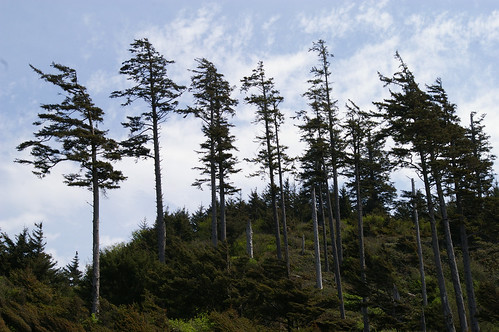
I miss the ocean. A lot. If I don’t get a fix of that briny air and sharp coolness of the Pacific every few months, I start to feel a bit off. I was really looking forward to seeing the waves, smelling the salt air and checking out the rugged coastline I had seen in pictures.

Like the burger, I was not disappointed.
Cannon Beach

Windswept

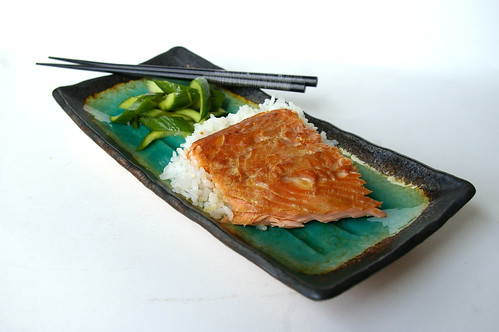
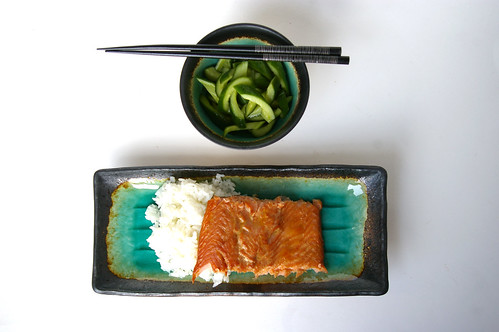
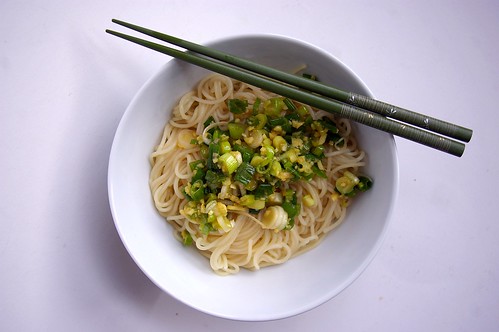
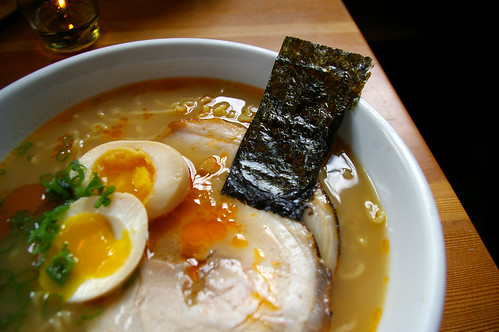
That night we had dinner at Biwa, a Japanese restaurant known for its ramen. Like beaches and burgers, ramen has a special place in my heart. I ate a lot of it when I lived in Japan. In nice restaurants and little holes-in-the-wall. When I went back a few years after living there, I spent a few days in Kyoto and one fond memory really sticks out. I was eating ramen at a restaurant not much more than two meters wide — just enough space for a long counter, some bar stools and an aisle-wide kitchen. The one server had to scoot around the cook to serve steaming bowls of noodles, slurped up by a handful of men sitting hunched over the counter. While they concentrated on their ramen, I was reading Memoirs of a Geisha and trying hard not to get any of the rich broth on the book’s pages as I was engrossed in the scene when Sayuri meets the chairman in front of the Minamiza kabuki theatre. After I paid my bill, I walked outside to find I was standing across from the theatre itself.

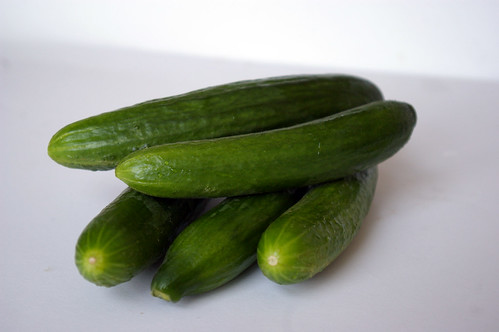
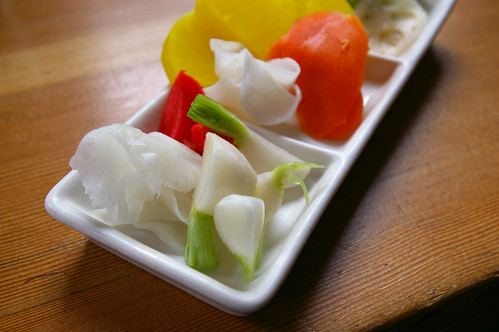
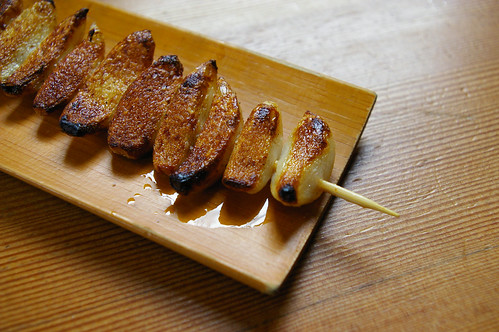
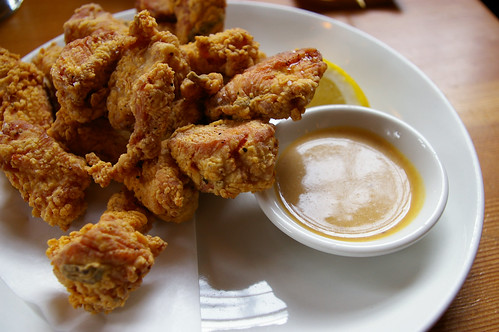
A bowl of ramen was definitely in order, but so was a dish of pickles (adorable) and barbecued garlic (beautiful and the sharp flavour was mellowed by heat) and chicken karaage (essentially, fried chicken — and one of my favourite bar snacks in Japan).

Mini pickled vegetables
Barbecued Garlic
Chicken karaage
Ramen

It was like being back in Japan, but I got to drink bourbon sours the entire time, so that was a bonus.

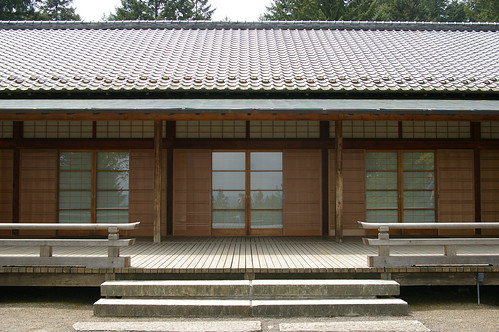
To follow the theme of the night before, we went to the Portland Japanese Gardens the next day (after a less-than noteworthy breakfast not worth discussing).

The Pavilion

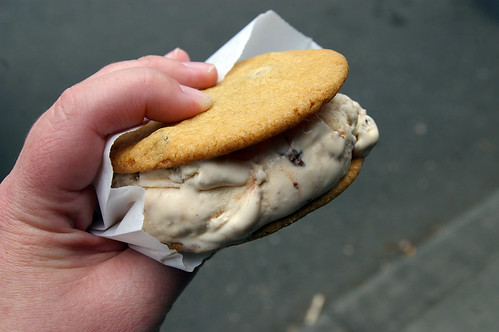
And then it was time for ice cream sandwiches from Ruby Jewel. I must give Suzi full credit for finding this gem. Soft housemade cookies sandwiched around soft and luscious ice cream. In this case, chocolate chip cookies with salted caramel ice cream. You get to pick the cookies and filling.
Ruby Jewel ice cream sandwich

By sheer coincidence, the weekend we were in Portland was just after the James Beard awards had been announced. One of the winners was Andy Ricker of Pok Pok, who claimed the title of Best Chef Northwest for 2011. Pok Pok had popped up a number of times when I was searching for good restaurants in Portland, so it was already on the list. When we caught wind of the award, we knew there was going to be a lot of interest and possibly a long wait. Luckily, Ricker is also behind Whiskey Soda Lounge, a more casual, bar-like drinks-and-snacks establishment just about kitty-corner from Pok Pok. You can put your name on the Pok Pok list, then head over to WSL for snacks and drinks. When your table comes up at Pok Pok, they come and find you, allowing you to settle the tab and wander across the street for round 2.

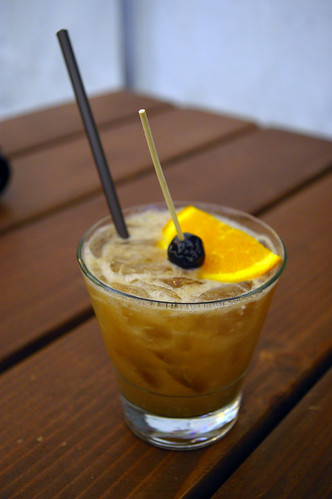
I started with a Tamarind Whiskey Sour (sours also being sort of a theme for the weekend), followed by another. And possibly another.
Tamarind Whiskey Sour

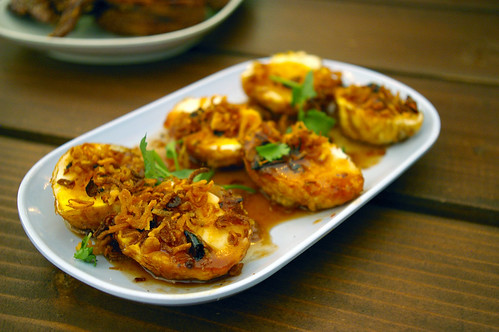
Then we dove in to some of Chef Chew’s Khai Luuk Khoei: deep-fried eggs with sweet-spicy tamarind sauce and fried shallots. Incredibly tasty, but one of them was so spicy, I drained my drink and ate all the vegetables on the table to try to quench the fire.

Chef Chew's Khai Luuk Khoei

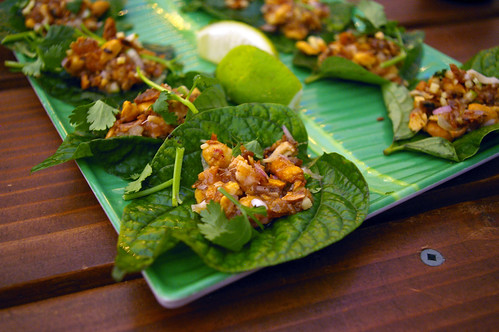
One of the things I really love about Thai food is that the cuisine is all about complex flavours that come together in a fresh and light way. Salty, spicy, sweet, sour. These Miang Kham embodied all of that. Chilies, ginger, peanuts, dried shrimp, lime, shallot and coconut with a ginger sauce, all wrapped up in a betel leaf.

These were amazingly fresh and light, yet had complex flavours. I’m pretty sure if I’d had enough room, I could have downed another round of these. (And, as I write this, my mouth has started watering again.)
Miang Kham

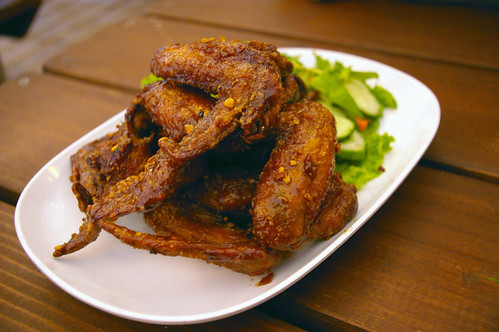
For Ike’s Vietnamese Fish Sauce Wings, the menu simply says, “Yes, these are the wings you have been looking for.” And it is right.

See above re: eating a second plate.
Ike's Vietnamese Fish Sauce Wings

By the time we had eaten all of that, our server came over to say our table was ready at Pok Pok. We were pretty full, but went over anyway for some pork sate and a green mango salad. After all, it’s not every day you get a chance to eat at a James Beard-award winning restaurant.

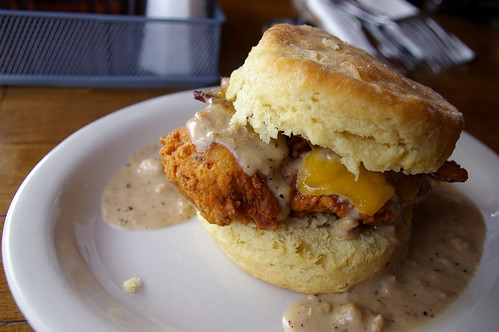
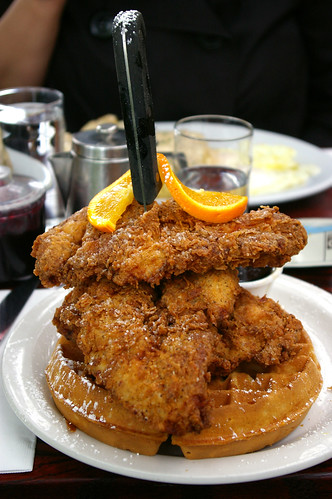
Our plan for breakfast on Sunday was to go to one place. In the cab, the driver mentioned the Screen Door and how popular it is. At that point he may have also mentioned chicken and waffles. (You may remember I’m a fan.) We actually had him turn the taxi around. This place had a long line, despite the drizzle. But that first glimpse of their version of chicken and waffles was enough confirmation the decision was the right one.

This was an insane amount of food. Three fried chicken breasts atop a fluffy, tall sweet potato waffle. I barely appeared to make a dent in it. For scale, that is indeed a large steak knife buried to the hilt.

Chicken and sweet potato waffles

So, perhaps it’s surprising I was hungry in time for dinner. Or not.
Just across the street from our hotel was Le Pigeon, a small and much loved restaurant whose chef, Gabriel Rucker, had also just received kudos from the James Beard Foundation; he was named the 2011 Rising Star Chef. Le Pigeon is also known for its burgers. They only make five a night (the other restaurant, Little Bird, does not limit the amount) and Suzi and I nabbed no. 3 and 4. First, though, there was a glass of gorgeous sparkling rose.
Rose at Le Pigeon
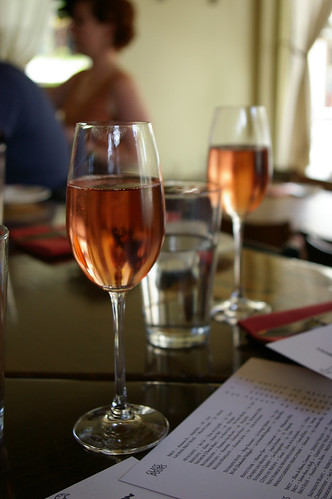
And a quick glance at the menu to determine what to start with.
Le Pigeon menu
Eventually I decide on an arugula salad with duck egg and apricot.
Le Pigeon - first course
Before diving into the burger.
Le Pigeon burger

It was very juicy, and very tall with some lovely coleslaw-like topping. The crispy potatoes were also a nice switch from the standard fries.

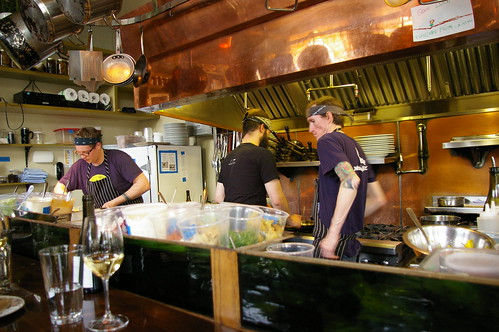
We had snagged spots at the bar (because we didn’t have reservations, we took what we could get. And we only managed to grab those by waiting by the front door as the restaurant opened for the night at 5 p.m. I mentioned it’s a popular place, didn’t I?) and had the chance to watch the kitchen in action.

Le Pigeon kitchen

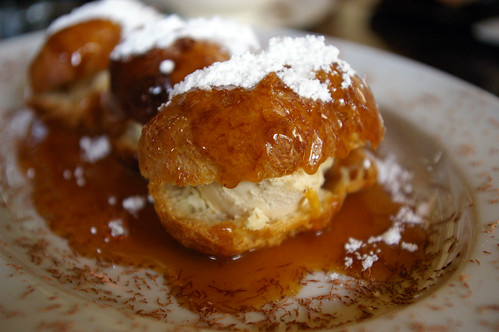
And for dessert — vegetarians, avert your eyes and skip ahead — I could not resist the foie gras profiteroles. When I ordered them, I assumed simply they were filled with foie gras mousse. But overhearing a conversation between one of the chefs and another patron, it became clear there was more to it than that. I asked the chef for clarification. It’s actually foie gras three ways: fat from the foie is used to make the choux pastry, foie is used as a mousse-like filling and then more fat is used in the caramel sauce.

Dear god.

Foie gras truffles

And then we were down to our final morning.

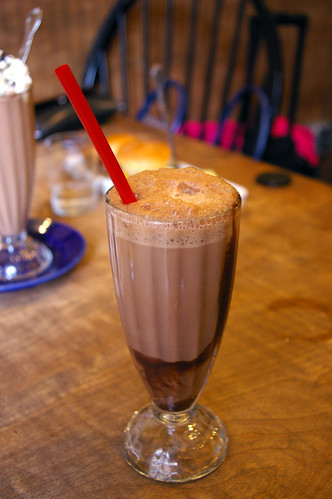
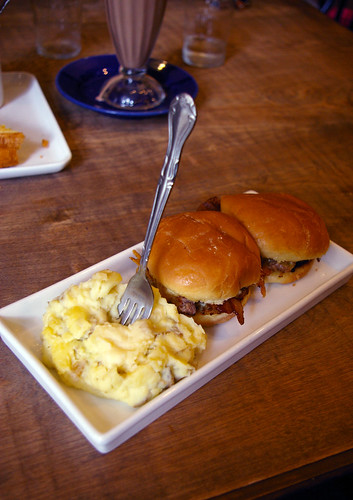
Packed suitcases in hand, we went to Blueplate. It’s a little diner-like establishment downtown that features old-school fountain drinks (like egg creams!) and comfort food like grilled cheese sandwiches and, ahem, burgers. (Yes, I have a problem. I know it.) I had heard about Blueplate on Diners, Drive-ins and Dives and had mentally added it to my should-try-if-ever-in-Portland list.

I love old-fashioned soda fountain drinks and the egg cream (containing no actual eggs nor cream, but milk, soda water and chocolate syrup) is one of my favourites. It went well with my wee burgers and mashed potatoes.

Egg cream at Blueplate

Blueplate burgers

Stuffed, we carried on to the airport where we went our separate ways.

It’s possible, I’m already planning a return trip.

Continue Reading

Vanilla Cupcakes with Bourbon Buttercream

It was my friend Dan Clapson’s birthday the other day.

As part of what turned out to be a long weekend’s worth of celebrating (for him, not me), on the Monday evening we had Monday Night Supper Club (head here for some play-by-plays of these weekly events) at Stanley Park. Dan laid out some ground rules for the potluck. OK, one rule: everything had to be shaped like a cake.

Since Dan seemed to be a very lucky birthday boy who got everything he hoped for over the weekend, who was I to deny this particular wish? So, leading up to the big day I was pondering ideas. And I was drawing blanks. I really just wanted to make cupcakes. What? I know my strengths.

Vanilla Cupcake with Bourbon Buttercream

And for some reason, I kept thinking about creating with some sort of bourbon-flavoured icing.

I thought it was pretty original, but a quick Google search showed recipes are out there. And that is a good thing because it gave me a great jumping off point.

It’s tasty stuff, I can’t lie. But it’s also incredibly boozy despite the fact there is very little booze in it. Three tablespoons, about 1 1/2 shots. And only half of that made it onto the cupcakes (it’s enough icing for 24 cupcakes, not 12; the remainder is sitting in my fridge and I’m still trying to figure out what to do with it. Make more cupcakes seems the most logical answer.), so, really, it was 3/4 of a shot for the entire batch. You’re certainly not going to get drunk on them, that’s for sure.

People got pretty creative with the picnic potluck, including Chelsea who brought a sushi cake, complete with sweet potato “candles.”

Sushi "Cake"

Adria Britton with the very popular pizza pull-apart bread bundt.

Pull-Apart Pizza Bundt

Jamie Penno brought a savoury bacon-and-cheese cake.
Savoury Bacon and Cheese Cake

And Dan brought a potato salad “cake,” which was an intriguing take if not completely successful. Points for creativity!
Potato Salad "Cake"

I felt a bit non-creative for bringing straight up cupcakes, but I’m pretty sure the bourbon icing made up for that.

Vanilla Cupcakes with Bourbon Buttercream I

Vanilla Cupcakes with Bourbon Buttercream II

Dan and his Birthday Cupcake

And it was a lovely night to be in the park. Perfect way to end a lazy long weekend.

Stanley Park

Vanilla Cupcakes
This is straight from Martha Stewart’s recipe for yellow cupcakes (though I rewrote the instructions a bit). They are yellow, but I prefer to focus on their flavour.

  • 1 1/2 cups all-purpose flour (spooned and leveled)
  • 1 1/2 teaspoons baking powder
  • 1/2 teaspoon salt
  • 1/2 cup milk
  • 1 teaspoon pure vanilla extract
  • 1/2 cup (1 stick) unsalted butter, room temperature
  • 3/4 cup sugar
  • 2 large eggs

Preheat oven to 350F.

Line a muffin tin with liners.

In a bowl, whisk together the dry ingredients: flour, baking powder and salt. Set aside.

In measuring cup or bowl, mix milk and vanilla.

In a large bowl, beat butter and sugar until light and fluffy. Add eggs one at a time, beating well each time. Turn mixer down to low, then add half of the dry ingredients, followed by the milk and vanilla and then the rest of the dry ingredients. Mix until just combined.

Divide evenly among muffin cups.

Place tin on rimmed cookie sheet and bake until a toothpick comes out clean. (Martha suggests 20 to 25 minutes; mine were done by 18, so don’t be afraid to check early.) Cool cupcakes in the tin for 5 minutes and then remove to a rack and cool completely before frosting.

Top with bourbon buttercream.

Bourbon Buttercream
And I adapted this one from My Recipes.

  • 1/2 cup butter
  • 1 pound icing sugar
  • 3 tablespoons bourbon
  • 3 tablespoons milk
  • 1 teaspoon vanilla

Beat butter until creamy. Add half of the icing sugar and beat, followed by the milk and bourbon and vanilla. Mix until blended. Add the remaining sugar and beat until thick and smooth.

Continue Reading

Chocolate Lime Cheesecake

The problem with getting behind in blogging is you start to forget why you made something in the first place.

OK, that might not be a problem others have. This may be particular to me.

Chocolate Lime Cheesecake Slice I

I think I came up with the idea of making a Chocolate Lime Cheesecake while flipping through cookbooks one night and remembering this had been on my to-do list for eons. I’m almost sure I had pulled Nigella Lawson’s Nigella Bites from my (overstuffed) shelf looking for one of her salad recipes when I re-stumbled across this one. And it occurred to me, since it was a long weekend and I was going to be working on the stat holiday, that I should bake this up and bring it in to the rest of the Calgary Herald crew working on the holiday Monday just like I used to when I was over in the city section. (Back then, I worked Sundays every week and I often baked and brought in goodies for what became known as Civilized Sundays, which would see us sitting around at 10 a.m. eating cake and listening to the police scanner. And reading our horoscopes.)

Then, and I do remember this correctly, I told the people who I knew would be also working that I was going to bake a cheesecake, which actually made me do it.

And, man, am I glad I did.

Nigella, my friends, she knows her stuff.

You know I love lime. It’s no surprise I also like chocolate. These two together are a very nice, very unexpected treat.

It may seem a bit fussy, but I followed all the instructions, including baking it in a water bath, which is a relatively common suggestion for baking cheesecake (a gentler way that theoretically keeps the top from cracking but always seemed like an unnecessary additional step). And I think it is indeed worth it. And the trick of snapping the aluminum foil into the springform pan (which sounds more confusing than it actually is) really does protect the crust and cake from any water.

Aluminum foil-wrapped pan

However, I must also add that I bought extra-wide aluminum foil thanks to the suggestion of my friend, Colette, who knew such a thing existed. Thanks Col! That way there was no panic about making sure the various pieces were secure enough. I would recommend this as a great way of alleviating any concern over seepage.

Seepage. What an odd thing to be mentioning on a food blog.

And, goodness, this is a very scattered post, isn’t it?

To summarize: this cheesecake is tasty. I enjoyed it. So did my friends. Make it. Don’t wait as long as I did to do so.

End.

Chocolate Lime Cheesecake I

Chocolate Lime Cheesecake II

Chocolate Lime Cheesecake Slice I

Chocolate Lime Cheesecake Slice I

Chocolate Lime Cheesecake

Straight from Nigella Lawson’s Nigella Bites.

  • 7 ounces chocolate wafer cookies
  • 1/3 cup unsalted butter, melted
  • 1 1/2 pound cream cheese (recommended: Philadelphia)
  • 1 cup sugar
  • 4 whole eggs
  • 2 egg yolks
  • 4 limes, juiced or 3/4 cup

Special equipment: springform pan

Preheat oven to 350 F.

Place a large overlapping piece of aluminum foil over the bottom of the springform pan, and then insert pan ring over it. Fold the foil extra foil up and around the pan and place the whole thing on a second piece of foil, also folding it and pressing it securely around the pan, having a water tight covering.

In a food processor, process cookies until they are crumb-like, add melted butter and continue to process. Pour crumb mixture into springform pan and press with your fingers to line the pan. Place the pan in the refrigerator to set while you prepare the cheesecake.

Place a kettle of water on for water bath. In a food processor beat the cream cheese until smooth, add the sugar, eggs, egg yolks, and lime juice.

Take crumbed pan from the refrigerator and place it in a roasting pan. Pour the cheesecake mixture into the crumb pan, and then carefully pour the hot kettle of water into the roasting pan so the water reaches 1/2 way up the pan so the water does not splash into cheese cake.

Place roasting pan in oven for 1 hour, checking after 50 minutes. It should feel set, but still wobbly in the center. Take the roasting pan out of the oven, carefully remove the springform pan from the roasting pan and place it on a rack. Peel off the outer layer of foil, and tear away the side bits of the first layer of foil and leave the pan to cool. Once the cake comes to room temperature, place it in the refrigerator for 20 minutes before serving. Transfer to the plate you’re going to serve it on, a plate without a lip, or a cake stand. Unclip the springform pan and remove the outer part. Carefully lift the cheesecake removing the metal bottom. The aluminum foil can stay on the cake. Serve chilled.

Continue Reading

Quinoa Tabouleh

Some people impulse buy gum.

I impulse buy five-pound bags of quinoa.

Oh sure, I thought it was a lovely idea in that moment, romanced by all the things I could do with this versatile, healthy, nutritious ingredient chock full of protein and fibre.

Especially after I saw on the back of the hefty bag that I can cook quinoa in my rice cooker. (Cooking rice and rice-related ingredients? Not my forte. I blame it on a year living in Japan where my apartment came equipped with a rice cooker.)

And then I got the family-sized bag home, jammed it into my cupboard and kind of forgot about it as it occupied valuable real estate in my kitchen. I finally unearthed it many weeks later, concocting a biryani-style salad with currants, chickpeas and a curry-lime dressing.

And then I forgot about it again.

Since then, there has been a bit more experimenting with quinoa.

But there is also something to be said about going back to basics — honest-to-goodness classic dishes that remain in the cooking repertoire for a reason.

Things like tabouli.

Or tabbouli. Or even tabouleh.

Or however you want to spell it.

Quinoa Tabouleh III

In theory, this is a salad I should like. Mint and parsley, lemon juice, tomato and cucumber. All those herbs with that zip of acidic lemon, the crunch of cucumber and umami taste of tomato? I like all those things. A lot.

What I don’t like is bulgur, the grain traditionally used in tabbouleh salads.

I made a huge bowl of it once using a recipe that called for bulgur and then had to eat it for two days to get through it, hating it the entire time.

I didn’t like the taste or the chew and forcing myself to finish the thing, which had taken a bit of time and effort to prepare, did not help the situation.

So, as I was sorting through my cupboards the other day and stumbled across the still half-full bag of impulse quinoa, I was struck by a thought: why not make tabbouleh with a grain-like ingredient I actually enjoy?

And I pulled out my rice cooker and did exactly that.

Quinoa Tabouleh II

(As a result of cooking it this way, I can offer you no suggestions or guidelines for cooking quinoa, other than tell you what I was also told: give it a bit of a rinse or a soak – say about 10 minutes or so — before cooking, which should alleviate any of the bitterness you might taste otherwise.)

With the exception of using quinoa and the addition of a red (or orange or yellow) paper for a bit of additional colour and crunch, this recipe holds quite true to traditional tabbouleh.

It’s the abundance of herbs, slight onion bite from the green onions and generous amount of lemon juice that gives it such a refreshing and light taste.

It’s the substitution of quinoa for bulgur that makes it no hardship to finish it off pretty quickly.

And, thankfully, I still have plenty more quinoa to make this again.

A trio of peppers

Mint

A Cup of Tomatoes

Quinoa Tabouleh I

Quinoa Tabbouleh

  • 4 cups (1 L) cooked quinoa
  • 1 red, orange or yellow pepper, diced
  • 1 cup (250 mL) cherry or grape tomatoes, halved or quartered
  • 2 to 4 green onions, sliced thinly
  • 2 mini cucumbers, halved, seeded and sliced
  • ¼ cup (50 mL) mint, chopped
  • ¼ cup (50 mL) parsley, chopped
  • 1/3 cup (75 mL) lemon juice (from about 2 lemons)
  • 1 tsp (5 mL) salt
  • freshly ground pepper
  • 1/3 cup (75 mL) extra virgin olive oil

Cook quinoa according to directions. Let cool and place in large bowl. Add red pepper, tomatoes, green onions, cucumbers, mint and parsley. In separate bowl, mix lemon juice, salt and pepper. Whisk to dissolve salt. While whisking, slowly drizzle in olive oil to emulsify. Pour about ¾ of the dressing over the salad and toss. Add the remaining dressing if the salad seems dry.

Serves 4.

This piece originally ran in the Calgary Herald. For more great recipes and stories, head to the Herald’s food page at CalgaryHerald.com/life.

Continue Reading

Peach-blueberry muffins

Oh hey!

Just popping in with some bran muffins.

Peach-blueberry muffins

I know I’m a bit of a baking freak, but I think I reached new lows (highs?) when I baked these up yesterday in the 30-degree heat. But I had a flat of peaches and they’re all pretty much perfectly ripe at this exact moment and I need to come up with ways to use them before I have to toss them. The original plan was a streusel peach cake, or a rustic tart, but by the time I got back from brunch with a friend and did some other chores, it seemed a bit late to be putting together a cake. And pastry? Well, that’s probably not going to be great when your kitchen is that blazing hot. (Plus, you know, pastry. We’re not the best of friends. One day, I hope. One day.)

Anyway, I’ve been making these peach bran muffins of Julie’s for awhile now. They’re what I think muffins should be. Healthy, full of good-for-you ingredients like bran and not too much sugar. Not those cake-in-disguise muffins, which I know are tasty, but really are just cupcakes with a different name.

I grew up eating Sunny Boy Muffins. Warm from the oven, cracked open with a little pat of butter. I can still taste them. (And this serves as a good reminder that I really need to track down some Sunny Boy; there is nothing like the taste of nostalgia.) So, I like a good, solid muffin. And these deliver.

I’ve made them several ways: with buttermilk, with plain yogurt thinned with some milk, with white sugar, with brown and with a mixture of the two. And here’s what I’ve decided: pretty much any way you go, these are good, hearty muffins. But, since I rarely have buttermilk on hand, I usually go with the yogurt-milk mix and I think I like the dual-sugar combination. Julie’s recipe calls for one peach, but I usually double that (or 1.5 that, if the peaches are really big) because I like the extra fruit. And this time around I added in some blueberries, which I just happened to have around. I’m sure other fruit would also be fantastic.

I like making muffins and cupcakes but an ongoing issue I have is that I appear to have some sort of miniature muffin tin. I mean, it looks all normal sized but whenever a recipe says it will make 12 muffins, I end up with anywhere between 16 and 20. At first, I thought it was just me and I was maybe not filling the tins enough. And then I realized it happens so consistently that I’m now pretty confident that it’s this tin. I can’t quite justify getting a new one, though.

All this to say, the recipe says it makes 12 muffins. I got 18 out of it, after dropping the cooking time almost in half. If your muffin tin runs on the small side and you have leftover batter after all the cups are filled, lower the cooking time to around the 13- or 14-minute mark. You can always bake them longer, but you don’t want to overbake them.

OK, go forth, make muffins. Enjoy.

All-bran cereal

Peach

Blueberries

Muffin batter

Peach-blueberry muffin

Fresh Peach Bran Muffins

from Dinner With Julie.

  • 2 cups All Bran cereal
  • 1 3/4 cups buttermilk or plain yogurt, thinned with milk
  • 1/2 cup sugar (white or brown)
  • 1/4 cup canola oil
  • 1 large egg
  • 1 1/2 cups all-purpose flour
  • 2 tsp. baking powder
  • 1 tsp. baking soda
  • pinch salt
  • 1 or 2 peaches, chopped (or additional fruit, as desired)

In a large bowl, stir together the cereal and buttermilk; let stand for 10 minutes, until soft. (Sometimes I drizzle in a bit more milk if this mixture seems really, overly solid. Never had any problems with a little additional liquid.) Preheat the oven to 375F.

Stir the sugar, oil and egg into the bran mixture. Add the flour, baking powder, baking soda and salt and stir until almost combined; add the peach and stir just until blended.

Divide the batter among 12 muffin cups that have been lined with paper liners or sprayed with nonstick spray. Bake for 25 minutes, until golden and springy to the touch. Makes a dozen muffins.

Continue Reading

Asparagus and Pea Salad with Mint

You ever notice how one recipe can beget another?

Last summer when I was making my shaved asparagus pizza, I found myself snacking on the strands of asparagus that had been tossed with olive oil, salt and pepper. (I’m completely unable to resist “testing” ingredients as I go along.)

It made me wonder why so few recipes I have stumbled across call for raw asparagus, which, when lightly dressed, is lovely.

Now that the stalks are appearing again on grocery shelves, it got me thinking. And then I stumbled across a salad recipe, which combined asparagus shavings with some other great loves of mine: Parmesan, prosciutto, mint and lemon.

Asparagus and Pea Salad with Mint

This salad is kind of like six degrees of separation.

Mint goes well with peas, which are lovely with asparagus, a natural match to prosciutto.

Well, really, what doesn’t prosciutto go well with?

And a lemon-based dressing adds some refreshing tartness, while a little bit of honey brings out the natural sweetness of the peas.

Now, I am the first one to up the amounts of salad goodies — more Parmesan, more prosciutto, please and thank you.

But in this case, I’m going to, unexpectedly, advise restraint. Messing with the fine balance between salt and sweet, meat and cheese, mint and vegetables can upset the equilibrium.

Too much cheese and the salt overpowers the delicate flavours of asparagus and mint.

Too much prosciutto overwhelms the texture of the salad.

When the proportions are right, this salad is perfection.

Right after finishing the photo shoot, I inhaled a bowlful.

I loved the spring green flavour of the thinly shaved asparagus, the sweet peas and bright mint with the slight tang of the mustard and lemon dressing.

The prosciutto didn’t hurt either.

All the greens contrasted with the pink of cured ham and cream of Parmesan is quite pretty and makes this a great dish for entertaining.

Serve it out on the deck with some crusty bread and a nice bottle of wine.

Asparagus and Pea Salad with Mint II

Asparagus and Pea Salad with Mint

This salad is from Epicurious by way of Serious Eats.

If fresh peas are in season, feel free to use them instead of frozen peas. Frozen peas are perfectly tasty, though. Just defrost in a sieve with some hot water. To get nice Parmesan shavings, let the cheese sit out on the counter for 10 or 15 minutes and then use a vegetable peeler.

  • 1½ cups (375 mL) peas
  • 1 lb (500 g) asparagus
  • 6 cups (1.5 L) salad greens
  • 2 tbsp (25 mL) chopped mint
  • 1/4 cup (50 mL) shaved Parmesan
  • 8 slices prosciutto, cut in strips
  • 2 tbsp (25 mL) lemon juice
  • 2 tsp (10 mL) Dijon mustard
  • 1 tsp (5 mL) honey
  • salt and pepper to taste
  • 1/2 cup (125 mL) olive oil

Whisk together lemon juice, Dijon mustard, honey and salt and pepper.

Drizzle in the oil slowly while still whisking to emulsify the dressing.

Test the dressing and adjust seasonings as necessary.

Place salad greens in a large bowl, add chopped mint and peas.

Using the woody end as a handle, hold the asparagus against a cutting board and use a vegetable peeler to make long strips. (These will vary in thickness, which is fine.)

After shaving, you will be left holding the rough end, which can be discarded.

Repeat with all the asparagus and then add the shavings to the salad.

Add sliced prosciutto. Toss with dressing (start with only a portion of the dressing and add more as necessary; the salad may not need all of it).

Top with shaved Parmesan.

Serves 4.

This first appeared in the Calgary Herald. For more recipes and instructional videos, check out the Herald’s Food page.

Continue Reading

Rhubarb Upside-down Cake

Before I get down to this (and, baby, this is well worth getting down to), a little apology and a tease of what’s going to be coming up on P&P. First, sorry for the delay in updating. Life, it has been hectic of late. That’s not a bad thing, except when it comes to keeping the blog a little more lively. But, my friends, I’ve got posts coming on my trip to Portland (hint: there are burgers. And they are t-a-s-t-y.), a scape pesto and some other goodies.

So, thanks for your patience. And now, let’s look at some cake, shall we?

Rhubarb Upside-Down Cake III

It’s rhubarb season again and one of my most favourite times of the year (right up there with that point when cherry blossoms finally burst forth in frothy clouds of pink).

In the last few weeks, people have regaled me with stories of how their rhubarb patches are growing like weeds and they have no idea what to do with all those stalks. (Including one friend who actually didn’t know it was rhubarb in her garden. If I lived anywhere near her, I would have been tempted to drive over and take them all.)

I give them all the same response: I’m more than happy to take it off their hands.

I have no shame when it comes to rhubarb.

Red Rhubarb Stalks

I love it, those rosy-pink or mottled green stalks with their sour punch that mellows with a little sugar and heat.

I like it in crumb cakes and muffins, crisps and cocktails. (And here are a couple more.)

And when I saw this Rhubarb Upside-Down Cake from Martha Stewart, I knew exactly what my next project would be once I got my hands on a pound or two of the fruit.

My only real experience with upside-down cakes is the images from the ’60s and ’70s of the pineapple version with each golden ring dotted by a bright red maraschino cherry.

This version is all rhubarb with the top awash in rosy pink.

The question with upside-down cakes is always, will this upend properly to a gorgeous display of fruit on a golden-crumbed cake? The backup question follows: if it doesn’t, can I at least make it look like it did?

Except for a few errant pieces of rhubarb that slid off the cake’s edges, it came out beautifully. (Perhaps don’t jam them into the edges of the pan quite as enthusiastically as I did, since these were the ones that escaped from the top of the cake.)

I will say that I followed Stewart’s instructions exactly and she suggests removing the cake after only 10 minutes of cooling; otherwise, she says, it will stick.

As I lifted off the cake pan, rosy pink juices glided down the cake edge and settled on the cake stand like a thin moat.

It was definitely juicier than the image of Stewart’s perfect cake, but when it comes to that sweetened rhubarb syrup that forms when the fruit is cooked with a bit of sugar, I’m OK with that. And I’ve never heard anyone complain of an overly moist cake.

This was light and fluffy, slightly perfumed with orange and topped with softened rhubarb, sugar-kissed and slightly tangy.

And the unusual addition of a crumb topping (which then becomes the crumb bottom) added an unexpected, but nice, texture.

I thought it was a weird touch and was tempted to skip it initially, figuring rhubarb and cake alone would be tasty, but it added another dimension to the cake, which I liked.

And, with this, rhubarb season is on for me.

I can only hope other friends feel overwhelmed by an excess of rhubarb and they don’t mind me suggesting they feel free to pass it along.

Rhubarb and Sugar

Rhubarb and Sugar II

Crumb Topping

Cooked Crumb Topping

Rhubarb Upside-Down Cake

Rhubarb Upside-Down Cake II

Rhubarb Upside-Down Cake Slice

Rhubarb Upside-Down Cake

This comes from Martha Stewart. She suggests when putting the rhubarb in the cake pan to put the pinkest edges facing down so the cake, when upended, will have the best colour.

For the topping:

  • 4 tbsp (60 mL) unsalted butter, melted
  • 1/2 cup (125 mL) all-purpose flour
  • 1/4 cup (50 mL) sugar
  • coarse salt

For the cake:

  • 3/4 cup (175 mL) unsalted butter, divided, at room temperature, plus more for buttering pan
  • 1 lb (500 g) rhubarb, trimmed and cut on a very sharp diagonal about ½-inch (1-cm) thick
  • 1¾ cups (425 mL) sugar, divided
  • 1½ cups (375 mL) all-purpose flour
  • 1½ tsp (7 mL) baking powder
  • coarse salt
  • 1/2 tsp (2 mL) finely grated orange zest
  • 1 tbsp (15 mL) fresh orange juice
  • 2 large eggs
  • 1 cup (250 mL) sour cream

Preheat oven to 350°F (180°C).

Make the topping: Stir together butter, flour, sugar and 1/4 tsp (1 mL) salt until moist and crumbly.

Make the cake: Butter a 9-inch (23-cm) round cake pan (2 inches/5 cm deep). Dot with 4 tbsp (60 mL) butter, cut into pieces. Toss rhubarb with 3/4 cup (175 mL) sugar; let stand for 2 minutes. Toss again, and spread in pan.

Whisk together flour, baking powder and 1½ tsp (7 mL) salt. Beat remaining butter and cup of sugar with a mixer on medium speed until pale and fluffy. Beat in zest and juice. Beat in eggs, 1 at a time, until incorporated, scraping down sides of bowl.

Beat in flour mixture in 3 additions, alternating with sour cream, until smooth. Spread evenly over rhubarb. Crumble topping evenly over batter.

Bake until a toothpick inserted into the centre comes out clean and top springs back when touched, about 1 hour. Let cool for 10 minutes. Run a knife around edge of cake, and invert onto a wire rack. Let cool completely.

Cook’s Note: Let the cake cool for 10 minutes before removing it from the pan. The rhubarb will be too hot to handle safely right after baking. But if the cake sits much longer, it may stick.

This first appeared in the Calgary Herald. For more recipes and instructional videos, check out the Herald’s Food page.

Continue Reading

Momofuku Ginger Scallion Noodles

Last year I was lucky enough to travel to New York for a week.
Central Park

Fire Escapes

Brooklyn Bridge

And my friend, whom I was visiting, was open to all the restaurant suggestions I had. And there were plenty of them. But at the top of the list was Momofuku.

One of the first meals we enjoyed was at Momofuku Noodle Bar. And, towards the end, we had another amazing meal at . . . Momofuku Noodle Bar. Because even though I had wanted to go to the Noodle Bar and Ko during the trip, somewhere along the way things got confused and when I thought we were at Ko, we were at the Noodle Bar. Whoops.

We could have later gone to Ko when we realized the error, but I didn’t feel I could visit Momofuku and not have the ramen, which is one of those dishes that instantly transports me back to Japan (when it’s done right) and yearn for Japan (when it’s not).

That first night at the Noodle Bar we ordered the pork buns (which I still daydream about sometimes; they were just unbelievable) and the Ginger Scallion Noodles. These, these were so good that I was almost tempted to order them the next time we went back. Chewy ramen noodles, doused in a mix of thinly sliced green onions with a pungent hit of ginger, a slight hint of salty soy. I don’t think we left a single slice of scallion in that bowl.

Ginger-Scallion Noodles

We ate a lot of amazing meals that week (and had some incredible experiences too: a Broadway show, an afternoon at the Met) but I found myself coming back to Calgary and thinking about the noodles. When I took the job as the Food Writer for the Calgary Herald, I was quietly ecstatic to discover I would have access to a fairly good library of cookbooks (for research purposes, of course), which included the Momofuku cookbook by David Chang and Peter Meehan. I may have pulled it off the shelf to flip through in my first week on the job (for research purposes, of course). And then I kind of put the idea of making the noodles on the backburner.

Until this week.

When, suddenly, all I wanted to do was make those noodles.

So I did.

The recipe is ridiculously simple and it’s really only mincing the ginger and slicing the onions that takes any amount of effort (and, in the end, not all that much).

But the cookbook also outlines how the restaurant serves up the dish that I had fallen in love with a year ago:

Cook six ounces of ramen noodles, drain and toss with 6 tablespoons of the ginger scallion sauce, then top with bamboo shoots (another recipe from the book), quick-pickled cucumbers (another recipe from the book), pan-roasted cauliflower (pretty much just like it sounds), more sliced scallions and a sheet of toasted nori.

Yup, that sounds delicious. But I just didn’t have the patience to do any of that.

Maybe next time.

(I wrote more about my trip over here, if you want to check out some of what I ate — hint: Crack pie! — and some hot shoes I bought.)

Scallions

Ginger

Ginger and Scallions

Ginger-Scallion Noodles II

Ginger Scallion Sauce

  • 2 1/2 cups thinly sliced scallions (greens and whites, from 1 to 2 large bunches)
  • 1/2 cup finely minced peeled fresh ginger
  • 1/4 cup grapeseed or other neutral oil
  • 1 1/2 teaspoons usukuchi (light soy sauce)
  • 3/4 teaspoon sherry vinegar
  • 3/4 teaspoon kosher salt (or more to taste)

Mix together the scallions, ginger, oil, soy , vinegar and salt in a bowl. Taste and check for salt, adding more if needed. Add several spoonfuls to cooked ramen noodles.

(You can find ramen noodles in most grocery stores these days, typically in the produce section by the fresh herbs and wonton wrappers.)

Continue Reading

Rocky Road Brownies

A couple of months ago I went on a ski trip with a number of friends to Golden. OK, for me it was an apres ski trip, where I excelled in drinking margaritas, attempting my first shot ski (I’ll let you google that; no wait, now it sounds dirty: it’s a ski with shot glasses attached so four people are doing shots at once.) (EDIT: I stand mistaken. This is a five-shot shot ski. Thanks Tait!), hot tubbing, cooking (for which I volunteered) and participating in much general merriment.

My friend Dawn and I created a meal plan and bought all the groceries to make things easier for everyone attending (and then we divided the cost amongst all the people on the trip). While we had a solid plan, we did wind around the grocery store aisles trying to figure out if we were missing anything. Somehow along the way we decided it would be awesome to get some marshmallows for hot chocolate. And, for some unknown reason, this culminated in purchasing a 1-kilogram (yeah, that’s 2.2 pounds) bag of baby marshmallows. When, at the end of the weekend, we were dividing up the remaining groceries, I somehow was gifted the marshmallows, which, of course, we never opened.

Initially, my instinct was to make browned-butter Rice Krispie treats. Um, then things got busy and I was eating a lot of last-minute meals and that generally translated into eating the entire box of cereal I had bought to make the marshmallow treats. Fail.

And then I starting thinking about some S’mores brownies my friend Andree made. So I started googling and at some point I stumbled across these Rocky Road Brownies. (Why they are related to TLC, I know not.) What I can tell you? They are AMAZING.

Rocky Road Brownies IV

Deep, dark, fudgy base, topped with melted smears of sweet marshmallow and the salty crunch of pecans.

Just look at that.

Rocky Road Brownies II

Let me put it this way: I usually eat one piece of whatever I’ve baked and then give the rest away. This time? I ate two pieces, gave some away, but held another two back for later. And when those were gone I’m not afraid to say that I was a wee bit sad. Thankfully (or not), I’ve got about 2 pounds of those marshmallows left.

Clearly, I’m making these again.
Melted Chocolate

Deep dark brownie batter

Rocky Road Brownies I

Rocky Road Brownies III

Rocky Road Brownies V

(The original recipe calls for walnuts, but I like pecans, so that’s what I keep around. Also, I didn’t have buttermilk and didn’t want to buy some just for this, so I used 1/4 cup of whole milk with a bit of lemon juice squeezed in.)

Rocky Road Brownies

  • 1/2 cup butter
  • 1/2 cup unsweetened cocoa powder
  • 1 cup sugar
  • 1/2 cup all-purpose flour
  • 1/4 cup buttermilk
  • 1 egg
  • 1 teaspoon vanilla
  • 1 cup miniature marshmallows
  • 1 cup coarsely chopped pecans
  • 1 cup semi-sweet chocolate chips

Preheat oven to 350. Butter an 8-inch square pan. (If you have parchment paper, I like to make a sling by lining the pan with a piece of parchment large enough to create overhang outside of the pan.)

In a pot over low heat, combine butter and cocoa, stirring constantly until smooth. Remove from heat and stir in sugar, flour, buttermilk, egg and vanilla. Mix until smooth. Spread evenly in the pan. Bake 25 minutes or until center feels dry. Do not overbake. Remove from oven, sprinkle with marshmallows, pecans and chocolate chips. Return to oven 3 to 5 minutes or just until topping is slightly melted.

Cool in pan on wire rack. Cut into squares.

Continue Reading

Juice of a Few Flowers

Last year was one of celebrations: plenty of new babies and a wedding or two.

That, inevitably, meant many a shower.

Some involved sipping tea out of dainty china cups, others a glass of wine or two, perhaps a tipple of Champagne.

This year is gearing up to be slightly slower showerwise. No weddings on the calendar and only a few friends expecting to add to their families.

Which is too bad, because I’ve just discovered a lovely multi-purpose cocktail.

Juice of a Few Flowers

It’s a drink with a tart citrus punch and a nice kick of vodka. An ice-cold glass, a sugared rim, a sprig of mint.

It’s downright civilized.

So, it’s no surprise then that Juice of a Few Flowers was apparently created in the 1920s by a couple said to give glamorous parties in the East Hamptons.

The original version used gin, but Barefoot Contessa Ina Garten, in her book Back to Basics (Clarkson Potter, $40), has updated the recipe to use vodka.

She notes, though, Gerald Murphy often mixed up the drink without alcohol, pouring it into martini glasses and serving them to the children.

And that makes it a great mocktail for mothers-to-be.

Shower guests and the guest of honour can all sip (relatively) the same thing.

With puckery grapefruit and tart lemon and lime juices, this drink could head toward sour territory, but it’s mellowed by the addition of sweet orange juice, then tempered further with the sugared rim.

Shaken until ice cold (freeze the martini glasses in advance to keep it even further chilled), the drink is smooth and oh-so sippable.

So much so that I don’t think I’ll be waiting for a shower or other celebration to be pulling out this recipe again.

Citrus

Juice of a Few Flowers II

Juice of a Few Flowers

Ina Garten notes if your juicer doesn’t strain the juice, use a sieve to remove the pulp, otherwise it will clog the holes of the cocktail shaker.

  • 1/2 cup (125 mL) freshly squeezed orange juice (2 oranges)
  • 1/2 cup (125 mL) freshly squeezed pink grapefruit juice (1 grapefruit)
  • 1/4 cup (50 mL) freshly squeezed lemon juice (1 lemon)
  • 1/4 cup (50 mL) freshly squeezed lime juice (2 limes)
  • 1 cup (250 mL) vodka
  • extra lemon juice
  • granulated sugar
  • fresh mint sprigs

Combine the orange juice, grapefruit juice, lemon juice, lime juice and vodka in a pitcher.

Dip the rims of 4 martini glasses first in a dish of lemon juice and then in a dish with sugar. Set aside to dry.

Pour the cocktail mix into the glasses, garnish with mint and serve.

This story first appeared in the Real Life section in the Calgary Herald. For more delicious recipes, visit CalgaryHerald.com/life.

Continue Reading

Welsh Scones

Growing up, I had a thing for the Royal family.

I had coffee table books all about Princess Diana, her wedding to Charles, her boys, William and Harry, along with a video of Andrew and Sarah Ferguson’s wedding.

I was one of those girly-girls with a penchant for dressing up, wanting to wear twirly skirts (that whirled out when I spun in circles; I called them turn-y skirts), put on lipstick. I always wanted a tiara.

So, although the inundation of countdowns and articles and television specials and photo galleries leading up to the wedding between Prince William of Wales and Kate (I’m sorry, Catherine) Middleton has been a bit much, my inner eight-year-old girl is kind of loving it. What will the dress look like? What diamond-encrusted tiara will adorn her lovely dark locks? What will the bridesmaids wear? Will they have turn-y skirts?

Outside of the fantasy world, I don’t envy Kate. I’m happy for her and William because they do some genuinely in love, something so clearly missing in the relationship between his parents (though I couldn’t see that as a child). But I wonder too at what she’s giving up for that love. Yes, there are jewels and gorgeous clothes, first-class trips, brushes with celebrity. And there is the paparazzi, the pomp, the expectations, the constantly public life.

No matter, I will be indulging that inner child and tuning in to the wedding.

In honour of that, I’ll be eating scones (and drinking some champagne, of course — though not at 3 a.m. I’m not so devoted that I will wake up that early. That’s why I have a PVR.) as Kate walks down the aisle.

"Welsh Cake" scone

I could eat any version of scones, but I decided to create a recipe that would combine a basic scone with a Welsh cake (which share some similarities with scones, though they are fried instead of baked). My stepfather, who is of Welsh descent, often made these as a Sunday treat when we were kids. (A tradition, thankfully, that continues when I visit my parents.) They have a distinctive flavour that comes from nutmeg and currants. Basically, I wanted to use those flavours. Not just because I love them, but it’s just so fitting.

Afternoon Tea

He is Prince William of Wales, of course. And the couple will start their life as newlyweds in Anglesey, an island off the northwest coast of Wales.

I have to give credit where it’s due, so I will say that Nigella Lawson has changed the way I make scones. Her trick of grating frozen butter is just . . . perfection. I cannot recommend it enough. No matter what scone recipe I use these days, I always, always, always use this technique. Please, try it, I implore you.

This is based on her strawberry shortcake recipe, but has been adjusted.

Butter curls

Egg in Cream

Rolled and Cut

"Welsh Cake" Scones

Welsh Scones

  • 1½ cups flour
  • ½ teaspoon salt
  • 1 tablespoon baking powder
  • 1/4 cup sugar
  • 1/2 cup currants
  • 1/2 teaspoon nutmeg (I may go with a tad more next time)
  • 1/2 cup unsalted butter, frozen
  • 1 large egg
  • ½ cup half-and-half or whipping cream (you may need slightly more)
  • 2 tablespoons whipping cream
  • 2 tablespoons sugar (regular or natural cane sugar), optional

Preheat the oven to 425°F.

Mix together the flour, salt, baking powder, sugar, currants and nutmeg in a bowl. Grate the frozen butter into the dry ingredients and use your fingertips to lightly toss all together. Whisk the egg into the half-and-half cream and pour into the flour mixture a little at a time, using a fork to mix. (I often need another tablespoon or two; I chalk it up to that dry Calgary weather.)

Turn the dough out onto a lightly floured surface, then roll gently to about ¾-inch thick. Dip a cutter in flour and cut out as many scones as possible. (Small ones are cute, but sometimes you just want a large scone with lots of room for Devonshire cream and jam.) Work the scraps back together, re-roll and cut more. (Nigella suggests using a 3-inch/6½-cm round cutter to make 8; I used a smaller one and got about 14.) Place on a baking sheet, brush the tops with the 2 tablespoons whipping cream and sprinkle with the remaining sugar, if desired. I used natural cane sugar, which has larger grains.

Bake until golden. Between 10 and 15 minutes for larger scones. Cutting them smaller? Check earlier. Mine took about 9 minutes. Remove to wire rack to cool.

Eat with copious amounts of jam and Devonshire cream. Or butter and jam. Or just jam.

Continue Reading

Flourless Chocolate Cake

A milestone slipped past last week.

I took note of it, but said nothing because there was no point in celebrating unless there was cake.

Slice of Cake III

Actually, the original plan was to make a salted caramel tart but, once again, pastry bested me. One day, pastry. One day! Truth be told, it was flaky as all get out and tasted great, but uneven rolling led to some parts being more cooked than others and there were slumping and shrinking issues. My theory is that I’m actually not putting enough weight in when pre-baking and then taking the beans out too quickly. It worked much better with the second shell, which didn’t slump as much, but the unevenness of the baked pastry was a little more than this mostly-perfectionist could handle.

No matter, there was a back-up plan. Albeit one that would have to wait until post-milestone.

See, it’s my blog’s third birthday.

Three years.

Craziness.

I remember first broaching the idea with some friends after we had been out at the pub. We were outside, in the frigid cold, saying goodnight when I just sort of threw it out there. “I’m thinking of starting a food blog.”

And since then there have been many baking projects and, thankfully, many happy eaters. (A special thanks must go to the Civilized Sunday crew at the Herald who willingly — and, occassionally, expectantly — ate what I brought to work on the weekend shift. Cake for breakfast? Yeah, that was a good tradition.

There have been amazing times  and incredibly tough times.

So, I’m interested to see what the next year (and more) will bring.

For the last three years, I’ve kicked off the start of a new blogging year with cake. First, there was the inaugural Red Velvet Cake (wee bit embarrassed by the photos back then, but moving along), followed by a much-better version for my first blogiversary and then a triple layer chocolate cake last year.

This year is only slightly different. It’s still cake, but it’s a decadent and rich, truffle-like Flourless Chocolate Cake.

Slice of Cake II

At least in this case, unlike the pastry situation, slumping is expected.

This cake is deeply, darkly rich, ironically lightened by a topping of whipping and sour creams, beaten with icing sugar. (Or, if you think you have tons because there’s always about six bags in the cupboard where they appear to multiply like bunnies until the day you need some and then there isn’t any, a little bit of berry sugar will do the trick.) And it is Oh. So. Good.

I actually heard about it over Twitter from the gang at Real Simple one day. Made it a few days later for friends and was still thinking about it months later and how I really needed to make it again. That’s the sign of a good cake, I figure. (Original recipe here. Though I haven’t really made any changes.)

Baking like this is so lovely. I especially love adding the chopped chocolate to the hot butter-and-cream mixture and then stirring, stirring, stirring as it changes from a curdled-looking mass to silky smooth melted chocolate. And how it comes out of the oven all puffy and light looking before collapsing into a deeply dark slump of rich chocolate cake. The slight tang in the dollop of the whipped cream takes it to a whole new level.

I ate one slice and gave the rest away to friends. Now, as it nears bedtime, I wish I had saved myself just another sliver. Ah well. Reason to make it again soon.

This recipe is fantastic, but I would add a pinch or two of salt. I really feel that a tiny bit of salt in sweet things rounds them out. In this case, I didn’t quite have enough unsalted butter, so about half of the butter was salted. I think it worked perfectly and I may do this from now on. Only have unsalted? Just add a pinch or two of regular table salt.

Chopped Chocolate

Melted Chocolate

Batter in Pan

Puffed out of the oven

Slumped cake

Cake Slice I

Flourless Chocolate Cake

  • 1 cup unsalted butter, cut into pieces, plus more for the pan
  • 1/4 cup unsweetened cocoa powder, plus more for the pan
  • 1 1/4 cups whipping (heavy) cream, divided
  • 8 ounces bittersweet chocolate, chopped
  • 5 large eggs
  • 1 cup granulated sugar
  • 1/2 cup sour cream
  • 1/4 cup icing sugar, plus more for dusting
Heat oven to 350° F. Butter a 9-inch springform pan and dust with cocoa powder.
In a medium saucepan, heat the butter with ¼ cup of the whipping cream over medium-low heat until the butter is melted. Add the chocolate and stir until melted and smooth; remove from heat.
In a medium bowl, whisk together the eggs, granulated sugar, and cocoa powder; whisk in the chocolate mixture.
Transfer the batter to the prepared pan and bake until puffed and set, 35 to 40 minutes. Let cool in the pan for 1 hour. Run a knife around the edge of the cake before unmolding.
Using an electric mixer, beat the remaining 1 cup of whipping cream with the sour cream and icing sugar until soft peaks form. Dust the cake with confectioners’ sugar and serve with the whipped cream.
Continue Reading
1 3 4 5 6 7 10